
MattJakobs Build Thread-2001 Stellar Blue Pearl

Just a small update... I went by the powdercoaters to drop the wheels off and they gave me an initial quote of $125 a wheel for sandblasting and powder. That was a little more than I wanted to spend so after some talking, they lined me up with an industrial sand blaster who charged me $30 a wheel. After they were sand blasted, they said they'd charge me $65 per wheel so I'm in at $95 total per wheel. Not bad at all considering the chrome mess they were. I picked them up from sandblast today and dropping them off for powder this weekend. I went with a charcoal color but they're out of stock in it so waiting on it to come in.

After the sand blast:
<a data-flickr-embed="true" href="https://www.flickr.com/photos/150884531@N04/35736233601/in/dateposted-public/" title="73"><img src="https://farm5.staticflickr.com/4324/35736233601_efdeeca649_z.jpg" width="640" height="480" alt="73"></a><script async src="//embedr.flickr.com/assets/client-code.js" charset="utf-8"></script>
 
Last edited:
Picked up the LC wheels today from powdercoat and they look amazing, I'm very pleased with how they turned out. If anyone local needs anything done, I highly recommend J&J for their prices, honestly, and workmanship. After the sandblasting, the wheels were pitted (as expected) so we decided to go with a textured powder to help hide some of the unevenness caused by the aluminum being soft.
Sun:
<a data-flickr-embed="true" href="https://www.flickr.com/photos/150884531@N04/35028391614/in/dateposted-public/" title="LC1"><img src="https://farm5.staticflickr.com/4213/35028391614_06ef1eb7c4_z.jpg" width="480" height="640" alt="LC1"></a><script async src="//embedr.flickr.com/assets/client-code.js" charset="utf-8"></script>
Shade (sort of):
<a data-flickr-embed="true" href="https://www.flickr.com/photos/150884531@N04/35028393384/in/dateposted-public/" title="LC2"><img src="https://farm5.staticflickr.com/4231/35028393384_44a74d395f_z.jpg" width="480" height="640" alt="LC2"></a><script async src="//embedr.flickr.com/assets/client-code.js" charset="utf-8"></script>
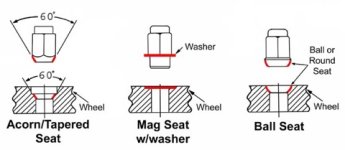
The previous owner also said these wheels came off of a 94 Land Cruiser so I bought some acorn/tapered seated lug nuts to fit. 93 and 94 LC's need these style lug nut where as the 95+ use the same style as our stock 3rd gen's do (mag seat with washer).
See picture for reference: (Picture courtesy of [MENTION=58830]JWaldz[/MENTION])
Lug type.jpg

After further examination of the wheel however, the look to be 95+ because of how the lug holes sit. Can anyone verify this for me?
<a data-flickr-embed="true" href="https://www.flickr.com/photos/150884531@N04/35028396354/in/dateposted-public/" title="LC3"><img src="https://farm5.staticflickr.com/4310/35028396354_87cb4077ab_z.jpg" width="480" height="640" alt="LC3"></a><script async src="//embedr.flickr.com/assets/client-code.js" charset="utf-8"></script>

<a data-flickr-embed="true" href="https://www.flickr.com/photos/150884531@N04/35028397794/in/dateposted-public/" title="LC4"><img src="https://farm5.staticflickr.com/4300/35028397794_61acc95f31_z.jpg" width="480" height="640" alt="LC4"></a><script async src="//embedr.flickr.com/assets/client-code.js" charset="utf-8"></script>
 

Attachments

  • Lug type.jpg
    Lug type.jpg
    26.4 KB · Views: 935
Last edited:
Like you said, there are two different version of the wheels. With these wheels being passed around so much it's hard to keep up with knowing for sure which style lug nuts they need until you just try it. If you have any mag seat lugs I'd see of they fit. If they don't then you'll need the acorn/tapered style. If you do end up needing acorn/tapered style I highly suggest getting the E/T threaded ones. They offer more thread engagement.


Like these (but maybe minus the fact they're spline driven)

gor21138_0.jpg
 
Like you said, there are two different version of the wheels. With these wheels being passed around so much it's hard to keep up with knowing for sure which style lug nuts they need until you just try it. If you have any mag seat lugs I'd see of they fit. If they don't then you'll need the acorn/tapered style. If you do end up needing acorn/tapered style I highly suggest getting the E/T threaded ones. They offer more thread engagement.


Like these (but maybe minus the fact they're spline driven)

They actually turned out not to be the acorn/tapered style, I guess they did just get mixed up when they were tossed around. Thanks for the help!
 
Today was spent repainting the flares. I always thought the thundercloud looked a little weird/out of place but didn't know what to do with them. Today I decided to paint them just out of random. I went with a charcoal color by Rust-oleum called "Soft Iron" with the flat finish. I gave them a good sand followed by a clean and a spray with Windex. After that, I went with 6 coats per flare at about 10 minutes apart.
Before:
<a data-flickr-embed="true" href="https://www.flickr.com/photos/150884531@N04/35028413144/in/dateposted-public/" title="74"><img src="https://farm5.staticflickr.com/4297/35028413144_73cf8af834_z.jpg" width="640" height="480" alt="74"></a><script async src="//embedr.flickr.com/assets/client-code.js" charset="utf-8"></script>
Taped up:
<a data-flickr-embed="true" href="https://www.flickr.com/photos/150884531@N04/35827264996/in/dateposted-public/" title="75"><img src="https://farm5.staticflickr.com/4313/35827264996_f06cfb4da0_z.jpg" width="640" height="480" alt="75"></a><script async src="//embedr.flickr.com/assets/client-code.js" charset="utf-8"></script>
Painted after tape:
<a data-flickr-embed="true" href="https://www.flickr.com/photos/150884531@N04/35028413074/in/dateposted-public/" title="76"><img src="https://farm5.staticflickr.com/4325/35028413074_49601010bc_z.jpg" width="640" height="480" alt="76"></a><script async src="//embedr.flickr.com/assets/client-code.js" charset="utf-8"></script>
After:
<a data-flickr-embed="true" href="https://www.flickr.com/photos/150884531@N04/35827264946/in/dateposted-public/" title="77"><img src="https://farm5.staticflickr.com/4238/35827264946_47b4734be5_z.jpg" width="640" height="480" alt="77"></a><script async src="//embedr.flickr.com/assets/client-code.js" charset="utf-8"></script>
And who doesn't love a puppy picture:
<a data-flickr-embed="true" href="https://www.flickr.com/photos/150884531@N04/35028415614/in/dateposted-public/" title="Latte4Runner"><img src="https://farm5.staticflickr.com/4305/35028415614_b1be9fac15_z.jpg" width="640" height="480" alt="Latte4Runner"></a><script async src="//embedr.flickr.com/assets/client-code.js" charset="utf-8"></script>
 
Last edited:

LC wheels mounted and balanced. Also a little Kayaking today...
I'll post this teaser now until I can get some decent shots.

<a data-flickr-embed="true" href="https://www.flickr.com/photos/150884531@N04/35696293723/in/dateposted-public/" title="83"><img src="https://farm5.staticflickr.com/4416/35696293723_69115555d4_b.jpg" width="800" height="600" alt="83"></a><script async src="//embedr.flickr.com/assets/client-code.js" charset="utf-8"></script>
 
Last edited:
I've been back and forth about buying a DSLR or not so my buddy is letting me use his and get used to it. If you look at my hula girl avatar, he took that with one of his film cameras. I'm still toying around with Photobucket on getting my images from there to here but it keeps saying my files are too big so I guess that'll have to wait.
Here's some shots I took of my LC wheels mounted up and balanced.

<a data-flickr-embed="true" href="https://www.flickr.com/photos/150884531@N04/36458694666/in/dateposted-public/" title=".1"><img src="https://farm5.staticflickr.com/4376/36458694666_54c3638c9d_b.jpg" width="1024" height="683" alt=".1"></a><script async src="//embedr.flickr.com/assets/client-code.js" charset="utf-8"></script>

<a data-flickr-embed="true" href="https://www.flickr.com/photos/150884531@N04/36458696666/in/dateposted-public/" title=".8"><img src="https://farm5.staticflickr.com/4378/36458696666_f9087bf651_z.jpg" width="1024" height="683" alt=".8"></a><script async src="//embedr.flickr.com/assets/client-code.js" charset="utf-8"></script>

<a data-flickr-embed="true" href="https://www.flickr.com/photos/150884531@N04/36458699396/in/dateposted-public/" title=".9"><img src="https://farm5.staticflickr.com/4354/36458699396_34fb6a61c9_z.jpg" width="1024" height="683" alt=".9"></a><script async src="//embedr.flickr.com/assets/client-code.js" charset="utf-8"></script>

<a data-flickr-embed="true" href="https://www.flickr.com/photos/150884531@N04/36458703286/in/dateposted-public/" title=".2"><img src="https://farm5.staticflickr.com/4360/36458703286_62714c1861_z.jpg" width="1024" height="683" alt=".2"></a><script async src="//embedr.flickr.com/assets/client-code.js" charset="utf-8"></script>

<a data-flickr-embed="true" href="https://www.flickr.com/photos/150884531@N04/36458704706/in/dateposted-public/" title=".10"><img src="https://farm5.staticflickr.com/4340/36458704706_66911a3f8a_z.jpg" width="1024" height="683" alt=".10"></a><script async src="//embedr.flickr.com/assets/client-code.js" charset="utf-8"></script>

<a data-flickr-embed="true" href="https://www.flickr.com/photos/150884531@N04/36458710516/in/dateposted-public/" title=".7"><img src="https://farm5.staticflickr.com/4356/36458710516_30b07c6b17_z.jpg" width="1024" height="683" alt=".7"></a><script async src="//embedr.flickr.com/assets/client-code.js" charset="utf-8"></script>

<a data-flickr-embed="true" href="https://www.flickr.com/photos/150884531@N04/36458711046/in/dateposted-public/" title=".3"><img src="https://farm5.staticflickr.com/4401/36458711046_86d30df5b4_z.jpg" width="1024" height="683" alt=".3"></a><script async src="//embedr.flickr.com/assets/client-code.js" charset="utf-8"></script>

<a data-flickr-embed="true" href="https://www.flickr.com/photos/150884531@N04/36505074635/in/dateposted-public/" title=".4"><img src="https://farm5.staticflickr.com/4440/36505074635_532ce01bcc_z.jpg" width="1024" height="683" alt=".4"></a><script async src="//embedr.flickr.com/assets/client-code.js" charset="utf-8"></script>

<a data-flickr-embed="true" href="https://www.flickr.com/photos/150884531@N04/36505075395/in/dateposted-public/" title=".11"><img src="https://farm5.staticflickr.com/4373/36505075395_393e74abf7_z.jpg" width="1024" height="683" alt=".11"></a><script async src="//embedr.flickr.com/assets/client-code.js" charset="utf-8"></script>

<a data-flickr-embed="true" href="https://www.flickr.com/photos/150884531@N04/36505077315/in/dateposted-public/" title=".13"><img src="https://farm5.staticflickr.com/4377/36505077315_c4cd832e3d_z.jpg" width="1024" height="683" alt=".13"></a><script async src="//embedr.flickr.com/assets/client-code.js" charset="utf-8"></script>
 
Last edited:
Went under the truck today to do some rust prevention. My frame wasn't bad with mostly surface rust but I wanted to stop it from getting bad. I started by using a 4" wire wheel connected to the power drill. After that I used Rustoleum's Rust Reformer followed by Rustoleum's Truck Bed Coating which also protects from rust. I highly recommend this as they're are plenty of write ups on here (I used [MENTION=14772]shootmymime[/MENTION] 's thread that can be found Here) and it takes less than a day to do.

<a data-flickr-embed="true" href="https://www.flickr.com/photos/150884531@N04/36505080705/in/dateposted-public/" title="85"><img src="https://farm5.staticflickr.com/4406/36505080705_b4bbf917a3_b.jpg" width="1024" height="768" alt="85"></a><script async src="//embedr.flickr.com/assets/client-code.js" charset="utf-8"></script>

<a data-flickr-embed="true" href="https://www.flickr.com/photos/150884531@N04/36505081715/in/dateposted-public/" title=".14"><img src="https://farm5.staticflickr.com/4442/36505081715_6874ed4a76_b.jpg" width="1024" height="683" alt=".14"></a><script async src="//embedr.flickr.com/assets/client-code.js" charset="utf-8"></script>
 
Last edited:
That looks a lot better, I need to do the same.

It was a lot easier than I expected it to be and it can probably be done in a few hours if that's all you're working on. I got the paint and wire wheel from Home Depot (with other things) and I'm guessing it was about $20-$25.
 
Subscribed!

Thanks for the mention btw!

Thanks man and of course! I looked through your write up because I wanted to use it for my wheels but after sandblasting the chrome off, there was too much pitting in the aluminum not to go with a textured powder. I did however find a 5th matching wheel for a spare (that wasn't previously chrome) and was able to use your write-up to paint it and it turned out great, I'll post pictures of it tomorrow since I still have my spare out to allow the frame to fully dry from the rust prevention/treatment.


============================================================================================================

On another note, it looks like the new engine will be put in within the next month. I'm talking to a local JDM dealer tomorrow about picking up an engine and then it'll be install time. While shes all torn apart, we are going to do some other maintenance to ensure we're running at 100%. I'll soon be ordering a Timing Belt/Water Pump kit including Water Pump, Idler Bearing, Tensioner Bearing, Hydraulic Tensioner, Timing Belt from RockAuto. With that, I'm thinking about taking the Big Three Wiring Upgrade on.
Is there anything else I should worry about apart from new plugs/wires?

Every once in a while, I'll go to start her up and there'll be a little lag. The engine turns over but it takes 3-5 seconds to actually start up. After looking around and talking to some people, I think/hope it's just the fuel filter so a new one will be going in shortly.

While doing the frame, I noticed my CV's have started to leak their lubricant/fluid. With the engine getting done, I think I'm going to reboot them or replace. As far as I've heard, I don't think I have any real reason to replace them instead of a simple reboot. Also looking into replacing the LBJ's with OEM since we're right at that 200k mark. Hoping by July we'll have a whole new 'Runner.
 
Here is my matching spare. I followed this write-up and painted it with "Rustoleum's Flat Soft Iron" paint (same stuff I used on my fenders.

<a data-flickr-embed="true" href="https://www.flickr.com/photos/150884531@N04/35696339673/in/dateposted-public/" title=".15"><img src="https://farm5.staticflickr.com/4376/35696339673_fcb30b7655_b.jpg" width="1024" height="683" alt=".15"></a><script async src="//embedr.flickr.com/assets/client-code.js" charset="utf-8"></script>
 
Last edited:
Thanks, one of the more rare colors out there, Stellar Blue Pearl. Have already done a few things to it, pictures coming soon. Picking up a rear tube bumper tomorrow and will hopefully have the running boards off this weekend.

Nothing like a little spam to brighten your day! :reddance:
 
what ever happened to that front grill guard? I've been looking for one in between now when I save enough for a more heavy duty one.
 
what ever happened to that front grill guard? I've been looking for one in between now when I save enough for a more heavy duty one.

My plan was to keep it on until I upgraded to a hybrid/plate style bumper but I took it off because it wasn't worth the added weight for me and I knew someone who wanted it. It has been sold. I would recommend just saying up until you can afford a nicer bumper like me.
 
Were the rustoleum products you used brush-on or spray cans? It looks great!

They were both spray on. I used two full cans of the Rust Reformer and one full can of the Truck Bed Coating. Before that, make sure to hit it with a wire wheel, I spent most of my time doing that, getting every little piece I could find. I was surprised how much the wire wheel did. Also, don't forget to wrap your suspension with some news paper (I did this after the wire wheel as it would just get in the way before.

<a data-flickr-embed="true" href="https://www.flickr.com/photos/150884531@N04/36505091425/in/dateposted-public/" title=".20"><img src="https://farm5.staticflickr.com/4350/36505091425_6cd072946f_z.jpg" width="1024" height="683" alt=".20"></a><script async src="//embedr.flickr.com/assets/client-code.js" charset="utf-8"></script>

<a data-flickr-embed="true" href="https://www.flickr.com/photos/150884531@N04/36505094685/in/dateposted-public/" title=".22"><img src="https://farm5.staticflickr.com/4372/36505094685_3f11cec125_z.jpg" width="1024" height="683" alt=".22"></a><script async src="//embedr.flickr.com/assets/client-code.js" charset="utf-8"></script>

This is the best picture I could get of the new frame's texture. The Truck Bed product made it feel a little grainy but not as rough as a bedliner. I went with this as an overcoat because of it's durability and it also helps stop rust.
<a data-flickr-embed="true" href="https://www.flickr.com/photos/150884531@N04/36505097885/in/dateposted-public/" title=".21"><img src="https://farm5.staticflickr.com/4342/36505097885_2a8731eb25_z.jpg" width="1024" height="683" alt=".21"></a><script async src="//embedr.flickr.com/assets/client-code.js" charset="utf-8"></script>
 
Last edited:
My plan was to keep it on until I upgraded to a hybrid/plate style bumper but I took it off because it wasn't worth the added weight for me and I knew someone who wanted it. It has been sold. I would recommend just saying up until you can afford a nicer bumper like me.

I hear ya on that one. spend the money once instead of almost twice. $1000 sure is less than the 250-400 range though!
 

Members online

Forum statistics

Threads
278,316
Messages
3,554,111
Members
248,016
Latest member
Advally Service

Trending content

Back
Top