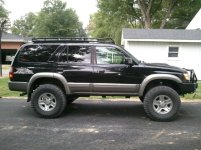
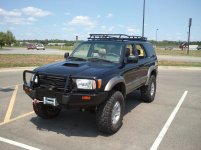
My Build Thread for "Imogene"

Very nice additions man! I really like the Sport Hood on our trucks.... I'm planning on getting one for mine... if the costs are within budget....

Can't wait to see what else you come up with! :)
 
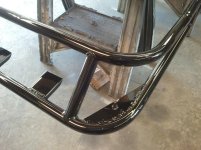
roof rack is painted

The quality of work on my new Whitson Metalworks rack is great.

I wonder how many racks get painted with a basecoat/clearcoat setup?:banana:

Because I am in the middle of painting my truck's hood and flairs, I went ahead
and painted the rack with the PPG basecoat black (Toyota code 202) and then
cleared it. I should be able to mount it all up tonight.
 

Attachments

  • rack-paint.jpg
    rack-paint.jpg
    104.8 KB · Views: 3,206
That looks hella good!

I am counting the minutes 'till I get off work so I can go home and install it. It looks like we are going to get big thunderstorms however and I may not get a chance to install it tonight, and I have plans tomorrow night so it may be Saturday before I get the change to mount everything.:mad:

Oh well, on the + side it will give the paint more time to set up and harden.:artist:
 
How long it took to install the ARB bumper? Do you have to grind and weld the front frame? I like the bumper but I don't have a welding unit.

Can I use the bumper without soldering? I can grind the frame :-)
Let me know
Thanks
 
How long it took to install the ARB bumper? Do you have to grind and weld the front frame? I like the bumper but I don't have a welding unit.

Can I use the bumper without soldering? I can grind the frame :-)
Let me know
Thanks

you will need to cut the frame ends off (at least on the 99+ years, I am not sure about the pre-99 models).
While you don't HAVE to weld the end of the frame, IMHO you would be making a BIG mistake not doing it. Find someone with a welder, and do it.
It doesn't take very long and isn't hard to do
so it shouldn't cost you much to have it done and you will be thankful when your front bumper doesn't get pulled off:cheers:
 
Last edited:
rain rain rain

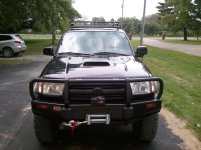
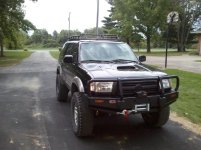
Well, by the time I got home, thunderclouds were looming overhead.:(
With the help of my lovely wife :girl: we were able to get the rack up on the roof and mounted as it started raining.:D

The pics aren't great due to the weather, but here they are ..I LIKE it!!:trophy:
I will post up better pics tomorrow when I can get a better angle and more sunshine.
 

Attachments

  • rack5 (Medium).jpg
    rack5 (Medium).jpg
    102.3 KB · Views: 3,219
  • rack2 (Medium).jpg
    rack2 (Medium).jpg
    101 KB · Views: 3,227
  • rack3 (Medium).jpg
    rack3 (Medium).jpg
    111.5 KB · Views: 9,333
  • rack4 (Medium).jpg
    rack4 (Medium).jpg
    121.7 KB · Views: 122,348
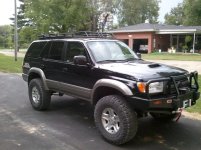
The bottom picture is great! Looks like you got the placement fore/aft perfect. I noticed you hadn't put the front supports on yet, you may find they aren't all that necessary unless you plan to carry things hanging over the front. Mind if i use that picture for future inquiries? Sweet looking rig BTW!
 
The bottom picture is great! Looks like you got the placement fore/aft perfect. I noticed you hadn't put the front supports on yet, you may find they aren't all that necessary unless you plan to carry things hanging over the front. Mind if i use that picture for future inquiries? Sweet looking rig BTW!

I was running out of time for getting pics so the first few pics don't have the front support, but that last one the front support is installed, it is just hard to see.

I don't mind if you use my pics, heck I would be honored.:bluejump: If you want higher resolutions pics, just let me know......oh and thanks for the kind words.:cheers:
 
hey i was looking at some of the sport hoods online and there is one for 100 and a capa certified one for 200. is yours capa certified? and also from the pictures on the site it looks like it is missing the insert. is that a separate part or does it come with it? i saw somewhere it is only a factory part you have to get from the dealer. thanks man
 
Last edited:
hey i was looking at some of the sport hoods online and there is one for 100 and a capa certified one for 200. is yours capa certified? and also from the pictures on the site it looks like it is missing the insert. is that a separate part or does it come with it? i saw somewhere it is only a factory part you have to get from the dealer. thanks man

I have no idea what capa certified is, so I don't know.:shrug:

You are correct that is doesn't come with the insert and other related misc. parts.
 
Pic in the sun :)

Here is a pic in the sun from the other side.:cool:

Now I need to get this thing off road for some real pics....non of this pavement junk:bluejump:
 

Attachments

  • rack6.jpg
    rack6.jpg
    112.7 KB · Views: 3,133
Last edited:
Thanks for all of the positive responses.

As for the limited flares, They are next on my list of things to paint. :hungry:

I have to decide if I want to go through the trouble of taking them off (PITA) or paint them on the truck. The only thing I am not sure about is the small "rubberish" piece
that is between the flares and the body. I don't think the paint will stick to it very well.
I haven't really looked into seeing if I can buy these "rubberish" pieces in black and not even paint them.

I have the same truck and you have done an amazing job transforming your rig! Almost every mod you have completed is what I plan to do to mine in the near future when I have more time and cash. Your rig is looking really good!!!

I'm now on the edge of my seat waiting to see how you plan to paint the body moldings and flares black. :snacker:

I did a little research and here's a couple of good links on the "rubberish pieces" your talking about. Some call it rubber flare trim, fender flare edge trim, others call it flare filler tape. I like the way you describe it kind of how I would as "rubberish pieces" lol!

Writeup by Jalaber using Tacoma rubber flare trim via yotaech

Yotatech thread on part #'s for actual OEM 4runner limited padding (black)


I hope another member here can chime in to verify these part numbers and possibly share their experience if they have replaced their tan/topaz rubber trim/pads with black ones.
-Oly

 
I have the same truck and you have done an amazing job transforming your rig! Almost every mod you have completed is what I plan to do to mine in the near future when I have more time and cash. Your rig is looking really good!!!

I'm now on the edge of my seat waiting to see how you plan to paint the body moldings and flares black. :snacker:

I did a little research and here's a couple of good links on the "rubberish pieces" your talking about. Some call it rubber flare trim, fender flare edge trim, others call it flare filler tape. I like the way you describe it kind of how I would as "rubberish pieces" lol!

Writeup by Jalaber using Tacoma rubber flare trim via yotaech

Yotatech thread on part #'s for actual OEM 4runner limited padding (black)


I hope another member here can chime in to verify these part numbers and possibly share their experience if they have replaced their tan/topaz rubber trim/pads with black ones.
-Oly

thank you thank you thank you!!! You have saved me some research time.

If I can buy them in black, that is what I will do. No need to try and paint something that isn't meant to be painted.:art:

I have a 1" body lift to put on. While I do this, I will have to re do my ARB bumper to raise it 1" as well...I am planning on doing this over the next 3 day weekend coming up. Paint will be somewhere in there as well.

I have slowed down a bit since I have a torn Meniscus in my right knee requiring surgery:happens: I go and meet with the surgeon on Tuesday. Hopefully this will go smooth and not interfere too much with my plans.
 
Here's what I used from the dealer

Check these part numbers against Toyota Parts - Genuine OEM Toyota Auto Parts and Accessories to identify which flares they are for, or check with the dealer.

75659-35040-B5........x4
53853-35090-B4........x2
53851-35050-B5........x2

8 pieces altogether including the front bumper end flares.
 
Thanks blcktpgsr!

I will only be needing 6 pieces. Dang they are expensive...$12.xx a piece...uggh. I may have to re-think painting what I have. I hate to pay that much for basically $10 total worth of materials.:rant:

The flip side of that is what is another $75 into an already expensive hobby.:wink2:

And then I will have to REMOVE these bad boys to change those pieces. I do NOT want to do that.:ak472:
 
This is a beautiful 4Runner! It has come a long way and I am very impressed with the route you've taken with this truck and the detail you put forth in your work, you have good taste! Been watching this thread for some time...

Whitson's rack looks awesome! I like the TRD sticker, fits with where the truck is meant to go... I personally like the tan/black combination but all black will look good as well...

I too have an ARB (love it!) and am eventually planning to put a Smittybilt winch on mine - but I've heard those solenoids aren't waterproof, are you sure that's a good place to put yours? It also seems like a huge pain to rotate the controls on the XRC8 to make it accessible, but we learn.

Wow, nice of your wife to help you with your project (getting the roof rack on in time)!

Again, beautiful T4R! Keep up the great work!
 
This is a beautiful 4Runner! It has come a long way and I am very impressed with the route you've taken with this truck and the detail you put forth in your work, you have good taste! Been watching this thread for some time...

Whitson's rack looks awesome! I like the TRD sticker, fits with where the truck is meant to go... I personally like the tan/black combination but all black will look good as well...

I too have an ARB (love it!) and am eventually planning to put a Smittybilt winch on mine - but I've heard those solenoids aren't waterproof, are you sure that's a good place to put yours? It also seems like a huge pain to rotate the controls on the XRC8 to make it accessible, but we learn.

Wow, nice of your wife to help you with your project (getting the roof rack on in time)!

Again, beautiful T4R! Keep up the great work!

Thanks for the kind words. :thanks:

I will have to look into if the solenoid is waterproof. If it isn't, I will make it:)
 
flex pics

So this weekend I cleaned out my garage.:lasercannon: What a mess.
Afterwards I thought I might go to a near by ditch and just see what kind
of flex my runner has and take some pics.
I know it is not the same as some of the trails I see posted up,
but this is what was close by:wink2:

If you notice, I do get some rubbing on the rear tire when it is stuffed. I will need to change out a couple of bolts to a flush type of head.
My 1" body lift should help with this once it is installed. (more on that later).

So...Here are the pics in no particular order.
(these were taken Saturday)
flex1.jpg


flex2.jpg


flex3.jpg


flex4.jpg


flex5.jpg


flex6.jpg


flex7.jpg


flex8.jpg


flex9.jpg


flex10.jpg


flex11.jpg


flex12.jpg


flex13.jpg
 
Roger Brown body lift

So a few weeks back I bought a Roger Brown 1" body lift. I mainly bought it because I knew one day I would want one, I knew that I had some minor rubbing with the 33" Duratracs, and I also knew that with the BAMF sliders I wanted to install w/kickout that they would hit my limited flairs without some sort of body lift.

So this evening I decided to just look and see how much work was involved with the 1" lift. It was a piece of cake. I really didn't have any intention of actually installing it tonight, but when I realized how easy it was, I went ahead and did it.

Because it is dark out now, I don't have a good pic of the finished product, but that will change later:cheers:

You can see from these pictures that there isn't much to a body lift.
bodylift1.jpg


bodylift2.jpg


The hardest part was adding the steering extension piece, and it was not hard at all. I applied penetrating oil when I started and then did all the body spacers first, then came back and installed the steering spacer....

bodylift3.jpg


The only issue is the large gap at my front bumper. My plan is to work on this over a long weekend. I want to modify the mounting bracket to raise the bumper, similar to what Blcktpgsr did to his ARB.

bodylift4.jpg


bodylift5.jpg


Here is a pic in the garage all finished. I can still drive in and out too!! Thank goodness the roof rack is low profile :party:

bodylift6.jpg
 

Members online

No members online now.

Forum statistics

Threads
278,309
Messages
3,554,071
Members
248,016
Latest member
Advally Service

Trending content

Back
Top