Nelsonmd's Build Thread

I don't think it is. There are 2 connectors down where the tube connects to the locker, but the tube, which is empty, connects right into the locker body.

Check this page out. The guys calls it a breather for the actuator body.

Retrofit Electric Locker

It looks like the factory harness comes with it, and it isn't very long. That guy extended it to inside his cab.
 
Hmmm, good find. I searched alot and only found that one mention of an actuator breather.

I will probably route it along my other breather as well into the gas cap area. Now if I could just find the part number for the breather that goes on the end of the 1/8" vacuum line...
 
I see some people with other vehicles do the locker breather extension. I will probably just run the small vacuum line up along my diff breather line, just to be consistent.

Anyway, tonight I start this little axle project. Anyone have last minute advice?

I'll take pics, but I am pretty rubbish at documentation. Oh well.
 
After you left, I checked Advance for the brake rebuild kit you mentioned, and lo and behold, they had one in stock, so I got that (thanks for the tip there). Also found the collar for my angle grinder, so I got the cutting blade on and cut off the rear shocks. I realized that I have all the bushings/cushions I need, but I don't have new retainer collars, so I will have to either order those, or get them from a dealer.

Can anyone check my part numbers here? I think there are 2 retainers and a washer on each side top (according to the FSM picture):
90948‑02131
90948‑02119
Washer???

And 2 washers on the bottom:
90948‑03011
90948‑03020

I am pretty sure that is the number of rusted peices I took off

Then yesterday, I pulled the UCA's off, the LCA's, and the panhard, cleaned them, painted them, and cleaned and painted some of the frame underneath. I plan on doing a little bit at a time after work this week, then hopefully be done by next weekend so I can reassemble. I also painted over the brake cylinders. I will get some cheap brake drums from Autozone, then I think I have everything I need to reassemble. I do have to get my tap and die set and clean all the fasteners before putting them back on, but that is pretty simple.

So my friend that was too sick to help me out this weekend ended up in the hospital and got his appendix out last night. I guess he wasn't faking it. Good thing they caught it before it ruptured.

Thanks for your help yesterday.
 
Last edited:
Nice.
Well let me know when you need a hand getting the new axle into place. I'll be more than happy to help if I am free.
 
Well, It's 3:15 AM, and I just finished getting the axle in. Started around 8PM or so.

Just one pic for now, more to come along with write-up...
IMG_3135.jpg~original

I still need to get some additional bolts, zip tie the ABS wires in place, and get some new bellcranks as mine are nearly immobile with rust.

Man I wish there was an all night diner around here, cause I am starving...

EDIT: Adding some useful references for rust...
http://www.toyota-4runner.org/3rd-gen-t4rs/70989-serious-frame-rust-questoin.html
http://www.toyota-4runner.org/3rd-gen-t4rs/61327-rust-removal.html
http://www.toyota-4runner.org/maintenance/26155-rust-rust-prevention.html
http://www.toyota-4runner.org/3rd-gen-t4rs/55561-new-england-weather-salt-rust.html
http://www.toyota-4runner.org/4th-gen-t4rs/73829-05-undercarriage-rust.html
http://www.thesamba.com/vw/forum/viewtopic.php?t=131753
http://www.thesamba.com/vw/forum/viewtopic.php?t=417184&postdays=0&postorder=asc&start=0
 
Last edited:
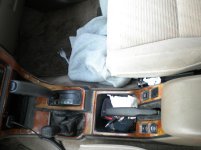
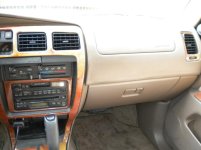
Nelson, the wood on your center console doesn't look stock. It looks like actual wood. Did you replace it?
 
Nelson, the wood on your center console doesn't look stock. It looks like actual wood. Did you replace it?

Haha, no, it is stock. It is delaminating a little bit. Well, actually it isn't eparating, but something is breaking down in there and causing visible change. It doesn't look very good in person, but it isn't so bad as long as it doesn't physically separate.

Wow. 3:15am? Thank you for NOT calling me to help! :eek:
Looks good. Hope it works out for you.

Yeah, I started late, and I knew I would be working all night. I am paying for it today though.

I do have a knocking sounds when I hit some bumps, I am hoping it is just some joints settling. I drove it a bit this morning and it feels good. Tomorrow is oil change and getting some parts to finish mounting the parking brake cable, and transferring the E-locker harness and doing the actuator breather extension.
 
Haha, no, it is stock. It is delaminating a little bit. Well, actually it isn't eparating, but something is breaking down in there and causing visible change. It doesn't look very good in person, but it isn't so bad as long as it doesn't physically separate.

I gotcha. It looked like varnish starting to peel off. I've often thought about getting it replaced with real wood. Of course that would cost thousands of dollars, and might not last as long as the fake stuff.
 
Haha, no, it is stock. It is delaminating a little bit. Well, actually it isn't eparating, but something is breaking down in there and causing visible change. It doesn't look very good in person, but it isn't so bad as long as it doesn't physically separate.


Yeah, I started late, and I knew I would be working all night. I am paying for it today though.

I do have a knocking sounds when I hit some bumps, I am hoping it is just some joints settling. I drove it a bit this morning and it feels good. Tomorrow is oil change and getting some parts to finish mounting the parking brake cable, and transferring the E-locker harness and doing the actuator breather extension.

Any issues with the backlash we noticed? Did filling it up with gear oil take care of that?
 
Man that is a lot of rust, good job on the rear axle swap, looks a lot cleaner.

I gotcha. It looked like varnish starting to peel off. I've often thought about getting it replaced with real wood. Of course that would cost thousands of dollars, and might not last as long as the fake stuff.

I believe it is varnish and the option was stock. It is also real wood or at least it is in my 97 SR5. Mine was peeling bad when I bought it but have pulled the varnish off and put some coats of polyurethane on them to make it look nicer.
 
Last edited:
I believe it is varnish and the option was stock. It is also real wood or at least it is in my 97 SR5. Mine was peeling bad when I bought it but have pulled the varnish off and put some coats of polyurethane on them to make it look nicer.

Real wood? Really?! That's incredible. I always thought it was fake because it seemed like plastic, especially compared to the other luxury SUVs (BMW, Mercedes). Maybe mine is real. Hmmm. Looks good, K. :)
 
I believe it is varnish and the option was stock. It is also real wood or at least it is in my 97 SR5. Mine was peeling bad when I bought it but have pulled the varnish off and put some coats of polyurethane on them to make it look nicer.
[/URL]

It isn't varnish, it is some kind of clear plastic stick-on coating. There is thin wood veneer underneath that gives the wood look. I'm sure it is the same as what you have.

You say you have refinished it? Show us some pics, I would love to see what my options are for making it look nicer.

BTW, try using photobucket instead of imageshack. For some reason imageshack often only loads a quarter of the picture then freezes (I can't actually see the bottom 3/4 of your first picture). I migrated from there over to photobucket and like it better.
 
Real wood? Really?! That's incredible. I always thought it was fake because it seemed like plastic, especially compared to the other luxury SUVs (BMW, Mercedes). Maybe mine is real. Hmmm. Looks good, K. :)

I do believe the wood or "wood" is different in my 4runner. It has the gold package so I guess it had some other options that were different from a normal SR5 or limited.

It isn't varnish, it is some kind of clear plastic stick-on coating. There is thin wood veneer underneath that gives the wood look. I'm sure it is the same as what you have.

You say you have refinished it? Show us some pics, I would love to see what my options are for making it look nicer.

BTW, try using photobucket instead of imageshack. For some reason imageshack often only loads a quarter of the picture then freezes (I can't actually see the bottom 3/4 of your first picture). I migrated from there over to photobucket and like it better.

I'll take a picture tonight. Its not the best looking because I half assed it, you can see runs in the polyurethane. It would look better if I took the trim pieces out of the vehicle and lightly sanded them but I got lazy and just painted it on.

Before pictures attached.
Couple notes on the pictures.
The wood around the radio and ignition still has the factory clear coating on the wood so its a pretty good match by just looking at it. The polyurethane isn't has thick though.
You can see where it pooled up some at the bottom of the wood under the vents, sanding would help which I did not do.
The close up of the yota system on the wood shows its not completely smooth and has some texture to it.
Also this is the stuff I used: Polyurethane $10 well spent
After pictures:
IMG_1580.jpg~original

IMG_1581.jpg~original

IMG_1582.jpg~original

IMG_1583.jpg~original

IMG_1586.jpg~original
 

Attachments

  • DSCN0114.jpg
    DSCN0114.jpg
    89.4 KB · Views: 3,742
  • DSCN0112.jpg
    DSCN0112.jpg
    69.2 KB · Views: 3,686
Last edited:
Yeah, Mine isn't separating nearly as bad as yours. Your fix came out pretty well though, good job.

I finally installed my Energy Suspension Steering Rack bushing yesterday, and it appears to have made a pretty big difference. The wheel wobbles alot less going over bumps now. It took me way too long to install though. The kit came with the bushings on the wrong metal collar, and me being an idiot, I didn't check to make sure it was the right one. Turns out it was the right length, but the inner hole diameter was too small, so I spent a long time trying to force the bolt through it to no avail. Eventually I figured it out and got the right one in there and got it in. It took an embarrassingly long time.

Awesome improvement for about $20. Probably the most bang for your buck I have spent so far.
 

Members online

Forum statistics

Threads
278,306
Messages
3,554,045
Members
248,016
Latest member
Advally Service

Trending content

Back
Top