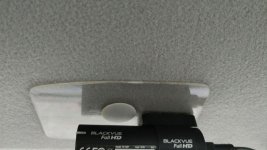
New Dashcam Install - Blackvue DR900S-2CH

No, no, no drilling into the headliner! Please! 8-) Clearly I need to explain this better...
Actually, you explained pretty well the first time; I understood about buying and trimming and drilling the sign -- I just couldn't figure how you then got the sign to stay in place.

And even now that I understand fully what you did, I'm still surprised to hear that the whole thing holds together, what with the weight of the dashcam pulling down on whatever it is that locks those buttons into place.

But I was looking at that area on my 2008 UR just yesterday and saw virtually identical buttons, so I guess I'll see how they're attached after I pull them.

And here I was, thinking that I'd better bite the bullet and affix the sticky pads directly to the headliner.

I bought extra mounts and sticky pads from BlackVue last week. So I have some room for error in getting the location just right. Just the same, I see that you did your install just three days ago -- so I think I might first install just the trimmed sign, with something slightly heavier (and a lot more expendable) hanging from it, and then drive around like that for a few days in my ungraded dirt driveway and in and out of strip-mall parking-lot driveways, just to see what happens :evil:

Hope this helps!
It did, a LOT. Thanks a bunch.
 
Actually, you explained pretty well the first time; I understood about buying and trimming and drilling the sign -- I just couldn't figure how you then got the sign to stay in place.

And even now that I understand fully what you did, I'm still surprised to hear that the whole thing holds together, what with the weight of the dashcam pulling down on whatever it is that locks those buttons into place.

But I was looking at that area on my 2008 UR just yesterday and saw virtually identical buttons, so I guess I'll see how they're attached after I pull them.

And here I was, thinking that I'd better bite the bullet and affix the sticky pads directly to the headliner.

I bought extra mounts and sticky pads from BlackVue last week. So I have some room for error in getting the location just right. Just the same, I see that you did your install just three days ago -- so I think I might first install just the trimmed sign, with something slightly heavier (and a lot more expendable) hanging from it, and then drive around like that for a few days in my ungraded dirt driveway and in and out of strip-mall parking-lot driveways, just to see what happens :evil:


It did, a LOT. Thanks a bunch.

The sign itself is pretty light weight, and the camera hardly weighs anything at all. The three buttons hold in place just fine. No need for any additional adhesive - don't want to mess up your headliner - and I always like it when I can make something completely reversible.
 
Nice [MENTION=187619]Naylor99[/MENTION]! Im looking to get a blackvue next month. If you ever decide to upgrade the one in your mazda, hit me up ill buy yours haha. Great mod, most likely do similar if not same!

Sent from my SM-N950U using Tapatalk
 
Nice [MENTION=187619]Naylor99[/MENTION]! Im looking to get a blackvue next month. If you ever decide to upgrade the one in your mazda, hit me up ill buy yours haha. Great mod, most likely do similar if not same!

Sent from my SM-N950U using Tapatalk

Haha, thanks, but I am happy with the DR650 for now. Whenever it gets replaced (Corvette is next), I will probably upgrade the camera then. That's a few years away, though. And I've spent too much money lately on toys!
 
(1)positioning, (2)Live View

Hey, readers, here's something you might want to think about, which I haven't yet seen mentioned in these posts re positioning. Where I live, there are a lot of intersections where the signal lights are positioned high and/or really close to the stop-line. When stopped right at the line and waiting for the light to change, I often find I have to bend forward to see what the light is doing. So, when I install mine ("any day now"), I plan to aim it high enough to capture the state of the signals at those problematic intersections. In an an accident or ticket scenario, it could be important to be able to document that you didn't stop over the line, or jump the light, or enter the intersection too late in an orange light.

(2)Naylor99, and anyone else who's using Blackvue, especially the latest models -- have you ever tried using Live View while driving (with your phone in a cradle, of course)? And if you have, how bad is the lag-time between what the camera lens sees and what the Live View shows in the BV app? I'm wondering if I could skip installing a backing-up camera, and use both cameras through Live View as maneuvering aids, at least in low-speed maneuvers.

And is it true, as I think I saw someone post, that using Live View stops the recording?
 
Hey, readers, here's something you might want to think about, which I haven't yet seen mentioned in these posts re positioning. Where I live, there are a lot of intersections where the signal lights are positioned high and/or really close to the stop-line. When stopped right at the line and waiting for the light to change, I often find I have to bend forward to see what the light is doing. So, when I install mine ("any day now"), I plan to aim it high enough to capture the state of the signals at those problematic intersections. In an an accident or ticket scenario, it could be important to be able to document that you didn't stop over the line, or jump the light, or enter the intersection too late in an orange light.

(2)Naylor99, and anyone else who's using Blackvue, especially the latest models -- have you ever tried using Live View while driving (with your phone in a cradle, of course)? And if you have, how bad is the lag-time between what the camera lens sees and what the Live View shows in the BV app? I'm wondering if I could skip installing a backing-up camera, and use both cameras through Live View as maneuvering aids, at least in low-speed maneuvers.

And is it true, as I think I saw someone post, that using Live View stops the recording?

Good questions. I have no idea. Seems to me I tried live view briefly in my Miata, just to see it work. Worked fine as I recall, but am not sure if recording stops or not. If I have a chance I will check it out and report back.
 
mounted like OP

I installed the BlackVue 750 rear ... very similar to OPs setup. I only removed the middle tab of the headliner.
Found an old iPhone 4 clear case - (1) trimmed it down with dremel, (2) add a hole, (3) stick the camera to the trimmed down iPhone case. Then using the removed headliner tab to mount the camera. It's very light so no fear of it falling.
The picture is from the backseat looking at the rear hatch.
 

Attachments

  • IMG-20180304-WA0004.jpg
    IMG-20180304-WA0004.jpg
    133.9 KB · Views: 1,612
I installed the BlackVue 750 rear ... very similar to OPs setup. I only removed the middle tab of the headliner.
Found an old iPhone 4 clear case - (1) trimmed it down with dremel, (2) add a hole, (3) stick the camera to the trimmed down iPhone case. Then using the removed headliner tab to mount the camera. It's very light so no fear of it falling.
The picture is from the backseat looking at the rear hatch.

Very nice!
 
utilizing the three headliner buttons and a sign I found at Home Depot
... very similar to OPs setup. I only removed the middle tab of the headliner.
Both of these headliner-button solutions are great but won't quite work for me. My 2008 UR has only two buttons (at the back of the headliner), because there's a dome-light where the middle button would be. So I'll have to either cut a notch in one of the long sides of the plastic to go around the light, or cut a hole in the plastic to completely surround the light. There's not much room between the light and the rear edge of the headliner, so I might not be able to get the cam between the light and the window. I'd like the cam lens to be centered, but I'd also like it to be as close as possible to the window, so that the lens can look down as close to vertical as possible, to see right over the edge of the bumper.
{Weird, I know I posted this a few days ago, but now it's gone. So, apologies in advance if this is a duplicate.}
 
Both of these headliner-button solutions are great but won't quite work for me. My 2008 UR has only two buttons (at the back of the headliner), because there's a dome-light where the middle button would be. So I'll have to either cut a notch in one of the long sides of the plastic to go around the light, or cut a hole in the plastic to completely surround the light. There's not much room between the light and the rear edge of the headliner, so I might not be able to get the cam between the light and the window. I'd like the cam lens to be centered, but I'd also like it to be as close as possible to the window, so that the lens can look down as close to vertical as possible, to see right over the edge of the bumper.
{Weird, I know I posted this a few days ago, but now it's gone. So, apologies in advance if this is a duplicate.}

I would velcro the camera in place and test to to see how it works out. On my Miata, the camera is almost directly behind the drivers headrest, but the fisheye lens effect of these still allows a pretty full picture. It might be fine off to one side just a bit.
 
I would velcro the camera in place and test... It might be fine off to one side just a bit.
Thanks for the suggestion. While in WM's parking lot today, I just happened to have a tape-measure with me. As it turns out, it looks like there's enough room between the light and the window for the camera's mounting plate.

In the silk-purse /sow's-ear department, it occurred to me that, if the plastic lens which covers this rear light (called the "luggage compartment light" in the manual) is held in by screws, then I could replace them with slightly longer screws to hold in place both the lens and a much-smaller version of the Home Depot plastic for mounting the camera. When I looked in the manual for instructions for replacing the bulbs in the various overhead lights, all it said was "REPLACING LIGHT BULBS -- Parts: ... Tools: Screwdriver". But when I went outside to examine those lights, I saw no screws in any of them [sigh...]. I guess the screwdriver is used just to pry off the lens.

But I'm curious about the velcro suggestion: since the point of using a piece of plastic held in place by buttons is (I thought) to avoid attaching the provided adhesive pad directly to the fabric of the headliner, how can I attach velcro without defeating that purpose?
 
If I'm reading things correctly, the only real differences between the DR900s and the DR750s are:

DR900s has 4K, 5Ghz Wifi and a better compression algorithm.

Everything else seems to be the exact same. Is that right?
 
...video... Keep your eye on the guy with his turn signal on...
J... H... C... Could hardly miss him, with or without turn-signal -- especially when he swerved in front of you with no room to spare at 00:41.
Bill, did your original footage capture his plate legibly?
 
J... H... C... Could hardly miss him, with or without turn-signal -- especially when he swerved in front of you with no room to spare at 00:41.
Bill, did your original footage capture his plate legibly?

Yes, i can zoom in and see it clearly.
 
Thanks for the suggestion. While in WM's parking lot today, I just happened to have a tape-measure with me. As it turns out, it looks like there's enough room between the light and the window for the camera's mounting plate.

But I'm curious about the velcro suggestion: since the point of using a piece of plastic held in place by buttons is (I thought) to avoid attaching the provided adhesive pad directly to the fabric of the headliner, how can I attach velcro without defeating that purpose?

Not sure. Maybe just hold it up where it would go and record a bit. I would avoid attaching directly to the headliner in any way.
 
(2)Naylor99, and anyone else who's using Blackvue, especially the latest models -- have you ever tried using Live View while driving (with your phone in a cradle, of course)? And if you have, how bad is the lag-time between what the camera lens sees and what the Live View shows in the BV app? I'm wondering if I could skip installing a backing-up camera, and use both cameras through Live View as maneuvering aids, at least in low-speed maneuvers.

And is it true, as I think I saw someone post, that using Live View stops the recording?

I tried this out on mine, and here are my findings;

A live view does not stop the recording.

A live view seems real time or very close to it, but is a little bit 'jumpy'.

A live view is of limited use, I think. My iPhone screen is not large enough to really make this worthwhile. If something happens you can download, blow it up on a big screen, zoom in, etc. For backing up it would only be useful on a larger screen, in my view. But if you are in need of a backup camera, I'd try this out first anyway...

Hope this helps!
 
An update/follow-up to my installation;

I have now hardwired it using the Power Magic Pro (PMP) kit I bought with my camera. I ran into a few issues, and had a hard time finding more specific info on switched vs constant power, etc., so I thought I'd share. What follows is my notes and observations;

1) I tied into power at the fuse panel under the dash. It is hard to see details in the pic, so I have oriented this pic to match pic of the cover further down. Yes, the wiring could be a bit more neat.

Dashcam_panel.jpg


2) Fuses: The fuses in my Limited are "low profile" mini fuses. My taps were regular 'mini' fuse sized. So, I had to get some new fuses...

Dashcam_fuses.jpg


3) I used the OBD 7.5 fuse for always on pwr, and the 15A power outlet location for switched pwr. (Don't use the one in the pic! The TAIL fuse pictured will only work when your lights are on) As noted by others, you can discover what is what by using a 12v test light probe. There is a handy ground (threaded post) up near the top of the brake pedal. Once grounded, simply probe each fuse (with the car turned off), by placing the point of the probe in contact with the small contact area on each fuse. (Watch the Youtube video below if that doesn't make sense to you). Anything that lights up is constant.

Dashcam_fusepanel.jpg


Here is a pretty good Youtube that shows how to use the probe;

https://www.youtube.com/watch?v=ksrsXwwukFc

4) Note that there is a fuse puller in the underhood fuse box that will work for these type A fuses. It has a nice slot designed for it. My existing fuse pullers did not work as they were a bit too wide. How do I know? At one point I misplaced the small one and was not concerned until I realized this. Panic insued. Don't lose that!

5) I chose to mount the PMP just to the right of the hood release. That leaves a fair amount of wiring leftover, but I tie wrapped it neatly and was able to tuck it all in to the small space behind the kick panel you see (to the left) just below where the fuse panel sits.

PMP_mounted.jpg


Hope this helps!
 
Last edited:

Members online

No members online now.

Forum statistics

Threads
278,316
Messages
3,554,112
Members
248,016
Latest member
Advally Service

Trending content

Back
Top