Octanejunkie's T4R project - 99 SR5 4WD 5-speed

I've been watching for your new project, but somehow missed the party and even on my birthday no less.

I got older and cake (it was a very good cake) but you got the cool new Toy. :biggrin1:


The great aggregate of 3rd gen mods are....addicting.


Also, I think I heard a clunk?
Age is just physical, I prefer to mature like a fine whiskey or wine. I'm jealous of cake and sicc mods. Happy birthday [emoji322]

The clunk was just a frozen bumper filler panel, nothing to really worry about.

Sent from my Pixel 4 XL using Tapatalk
 
I have a spare one of these I can send you, or you can order one yourself: Amazon.com: LemonBest Universal Pu Leather Car Steering Wheel Cover Anti Slip Auto Car Stitch On Wrap Cover 15 : Automotive

I removed the wheel from the car and installed it at the dining room table. Much easier than sitting in the car.

Sent from my Pixel 4 XL using Tapatalk


Gotcha, thanks! I’m not local to you in Ca, a couple of states over in UT so probably not worth the pain to ship unless you really want to send me a pm


Sent from my iPhone using Tapatalk
 
WEEKEND UPDATE

Installed refreshed door checks from [MENTION=148218]JZiggy[/MENTION] thanks a million!

I used the opportunity to clean and vacuum the insides and outsides of the plastic panels, the doors, detailed the switches and levers, cleaned the fabric door pulls and measured all the speakers for potential future replacement; 5.5" front, 4" rear.

The new, rebuilt door checks are awesome. I actually have to wrestle the doors open and closed now lol

Suspension
Installed sleeves on the Tokico rear shock studs to act as bushings in lieu of centering washers to keep the shock studs centered in the rear shock pockets.

FYI, you can access the pockets to tighten the shock stud nuts from inside the rear cargo area. The glue you have to deal with when you peel up the white vinyl panels is nasty and sticks to everything. Engine degreaser removes the glue from tools well.

The shock studs are 9/16", rear shock pocket holes are 11/16" - so not a lot of room but I managed to make small sleeves out of copper pipe that fit super snugly in the LC rubber bushings and centered the shocks perfectly. Done.

Lighting
Moved my DDM projectors and clear corners over from the 2WD. Had to install ballasts and relays, intercept the marker + power for my halos and then re-aim headlights. Good times.

I plan to reshoot the headlight bowls from black to my secondary trim color, Storm Metallic Gray. Future aesthetic project #1

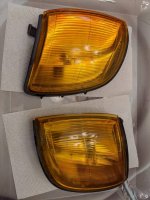
Started the process of dying the clear corners orange using Tamiya X-26.
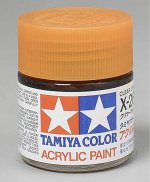
Screenshot_20220307-091103.jpg

I really like the orange corner look and the next step will be to make the corners flash with the turn signals. Future aesthetic projects #2 & #3

Access
Used the Hillman plastic sleeve and washer mod to replace the crumbled bushings for both rear hatch struts.
38770b47134d225e9cd91412b38be25d.jpg

Squeak-free now!

More pics pending

 

Attachments

  • Screenshot_20220307-091103.jpg
    Screenshot_20220307-091103.jpg
    65.5 KB · Views: 582
Last edited:
Started the process of dying the clear corners orange using Tamiya X-26.
View attachment 393446

I really like the orange corner look and the next step will be to make the corners flash with the turn signals.

I’m interested in the orange Tamiya paint for the side markers. Specifically how well it holds up over time. Are you using anything to clear coat over it?

I just repainted mine yesterday for the 3rd time in 2-3 years with orange Duplicolor Metal cast. It seems to fade after about 6 months of uv rays and automatic car washes but I love the finished results. You can get a deep amber if you use about 5 coats. I added a couple coats of clear too this time around to see if it helps it last longer. I have some really bright 7440 amber LED’s wired in for blinkers and they work awesome.
 
I’m interested in the orange Tamiya paint for the side markers. Specifically how well it holds up over time. Are you using anything to clear coat over it?


I just repainted mine yesterday for the 3rd time in 2-3 years with orange Duplicolor Metal cast. It seems to fade after about 6 months of uv rays and automatic car washes but I love the finished results. You can get a deep amber if you use about 5 coats. I added a couple coats of clear too this time around to see if it helps it last longer. I have some really bright 7440 amber LED’s wired in for blinkers and they work awesome.
I'm planning on 3 coats and then clearing them with 1-2 coats of 1K

From what I've read, the Tamiya can be slow to cure, so I'm taking it slow, waiting 24 hours between coats for the first few coats. Here is where they are after a single coat
PXL_20220308_023541799.MP.jpg

Sent from my Pixel 4 XL using Tapatalk
 

Attachments

  • PXL_20220308_023541799.MP.jpg
    PXL_20220308_023541799.MP.jpg
    104.7 KB · Views: 585
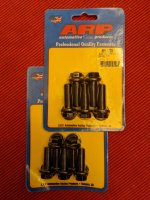
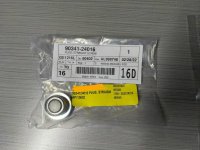
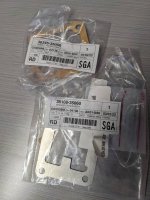
Got these today

PXL_20220308_133527817.MP.jpg
For my upcoming LBJ replacement

2022-03-08_11.35.23.jpg
Lexus front diff drain plug

PXL_20220308_192925644.MP.jpg
Transfer case oil deflector and gasket

Edit: the deflector comes with one gasket and as per other members there is a gasket above and below the oil deflector, two are needed
 

Attachments

  • PXL_20220308_133527817.MP.jpg
    PXL_20220308_133527817.MP.jpg
    122.1 KB · Views: 616
  • 2022-03-08_11.35.23.jpg
    2022-03-08_11.35.23.jpg
    135.2 KB · Views: 643
  • PXL_20220308_192925644.MP.jpg
    PXL_20220308_192925644.MP.jpg
    106.8 KB · Views: 667
Last edited:
your old 2wd

hey OJ.. looks like a fun project.

Do you have an old thread of your 2wd? I'd love to see it as that's what I'm rocking. Are you on FB? Would love to chat about your experience.
 
hey OJ.. looks like a fun project.


Do you have an old thread of your 2wd? I'd love to see it as that's what I'm rocking. Are you on FB? Would love to chat about your experience.
Thanks, I really love these trucks and the upgrade was worth the wait!
Links in my sig, sir

Sent from my Pixel 4 XL using Tapatalk
 
I'm interested to see how the corners come out and hold up. There was a member here years ago with a gold 3rd gen and the glass clear corners that were wrapped in amber/yellow film and it looked amazing. I always liked that look, but never bought the stuff to do it myself. I did put orange LEDs in the corners which look pretty good when the lights are on.
 
I did put orange LEDs in the corners which look pretty good when the lights are on.
That's how I generally run my vehicles - clear or stock corners with amber bulbs/LEDs. I often use the (now) old-school chromed bulbs for best look when they are off.

-Charlie
 
I'm interested to see how the corners come out and hold up. There was a member here years ago with a gold 3rd gen and the glass clear corners that were wrapped in amber/yellow film and it looked amazing. I always liked that look, but never bought the stuff to do it myself. I did put orange LEDs in the corners which look pretty good when the lights are on.

I have orange LEDs in my clear corners, and they look great at night, but during the day not so much.

I decided to stop at 2 coats and will put 2 coats of clear over them before installing. I'm letting them cure first. If I were smarter I would have baked the corners open and painted them from the inside... next time.

That's how I generally run my vehicles - clear or stock corners with amber bulbs/LEDs. I often use the (now) old-school chromed bulbs for best look when they are off.


-Charlie

What can I say, I'm a bastard.

Sent from my Pixel 4 XL using Tapatalk
 
WEEKEND UPDATE

Updated all internal/console bulbs to LED from Super Bright LEDs dot com, just like the 2WD, except not so bright on the map lights this time. Still need to do the gauge cluster.

Started another Satoshi project, actually, more of a semi-Satoshi this time. I started with one of the plain Jane painted ones and widdled on it some.

Screenshot_20220313-203117.jpg

PXL_20220314_031649910.MP.jpg

IMG_20220313_203240.jpg

PXL_20220314_031704179.MP.jpg

I figure I can always go full Satoshi if I hate it lol

Dropped the AC/heater fan to clean out the fan cage, it was surprisingly clean so really nothing to report there.

Sketching out some lighting and electrical projects, and starting to plan where to mount the ARB compressor. I have something fun planned for the second DIN over/under the radio and will replace the rear ashtray with USB chargers for grins and giggles.

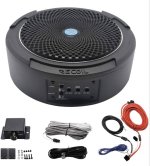
Picked up an 8" round subwoofer for under the driver seat, nothing crazy, just something to 'round out' the low end/bass (pardon the pun)

Screenshot_20220313-205246.jpg Amazon.com: Recoil SL1708 240 Watt 8" Under-Seat Slim Amplified Car Subwoofer with Installation Wiring Kits : Electronics

Leaning towards the ARB under the hood for now... we shall see.

Sent from my Pixel 4 XL using Tapatalk
 

Attachments

  • Screenshot_20220313-203117.jpg
    Screenshot_20220313-203117.jpg
    60.3 KB · Views: 562
  • PXL_20220314_031649910.MP.jpg
    PXL_20220314_031649910.MP.jpg
    79.9 KB · Views: 545
  • IMG_20220313_203240.jpg
    IMG_20220313_203240.jpg
    80.5 KB · Views: 523
  • PXL_20220314_031704179.MP.jpg
    PXL_20220314_031704179.MP.jpg
    103.8 KB · Views: 547
  • Screenshot_20220313-205246.jpg
    Screenshot_20220313-205246.jpg
    61.7 KB · Views: 534
WEEKEND UPDATE

Updated all internal/console bulbs to LED from Super Bright LEDs dot com, just like the 2WD, except not so bright on the map lights this time. Still need to do the gauge cluster.

Started another Satoshi project, actually, more of a semi-Satoshi this time. I started with one of the plain Jane painted ones and widdled on it some.

View attachment 393776

View attachment 393777

View attachment 393778

View attachment 393779

I figure I can always go full Satoshi if I hate it lol

Dropped the AC/heater fan to clean out the fan cage, it was surprisingly clean so really nothing to report there.

Sketching out some lighting and electrical projects, and starting to plan where to mount the ARB compressor. I have something fun planned for the second DIN over/under the radio and will replace the rear ashtray with USB chargers for grins and giggles.

Picked up an 8" round subwoofer for under the driver seat, nothing crazy, just something to 'round out' the low end/bass (pardon the pun)

View attachment 393780 Amazon.com: Recoil SL1708 240 Watt 8" Under-Seat Slim Amplified Car Subwoofer with Installation Wiring Kits : Electronics

Leaning towards the ARB under the hood for now... we shall see.

Sent from my Pixel 4 XL using Tapatalk


Interested to see how you like that sub I’ve had it on me Amazon list for a while haha


Sent from my iPhone using Tapatalk
 
Interested to see how you like that sub I’ve had it on me Amazon list for a while haha


Sent from my iPhone using Tapatalk
I installed it today under the driver's seat, it sounds/feels pretty good lol

It fits under the seat with room to spare. The biggest time suck was pulling the trim and carpet to run the wiring, but that's done. I mounted it as best as I could but the floor is on an angle (it's like a bowl) so I will need to revisit the mounting.

It adds the low end that the factory speakers lack and the level knob is a nice addition. Without it you have to manually set the level on the sub.

Sent from my Pixel 4 XL using Tapatalk
 
Did you retain the OEM head unit too?
No, I replaced it a long time ago, but if I had it I could have wired the sub in using a separate HiPass harness included.

I used dual RCA connected to the sub out on my Pioneer. Works Great!

Sent from my Pixel 4 XL using Tapatalk
 

Members online

Forum statistics

Threads
278,317
Messages
3,554,128
Members
248,016
Latest member
Advally Service

Trending content

Back
Top