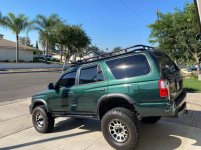
Octanejunkie's T4R project - 99 SR5 4WD 5-speed

I installed it today under the driver's seat, it sounds/feels pretty good lol

It fits under the seat with room to spare. The biggest time suck was pulling the trim and carpet to run the wiring, but that's done. I mounted it as best as I could but the floor is on an angle (it's like a bowl) so I will need to revisit the mounting.

It adds the low end that the factory speakers lack and the level knob is a nice addition. Without it you have to manually set the level on the sub.

Sent from my Pixel 4 XL using Tapatalk


Do you have the rear heaters that are under the seat? My ‘00 SR5 does but not sure on how they were optioned from the factory and if yours will or won’t


Sent from my iPhone using Tapatalk
 
Do you have the rear heaters that are under the seat? My ‘00 SR5 does but not sure on how they were optioned from the factory and if yours will or won’t


Sent from my iPhone using Tapatalk
The rear heater components are all under the passenger seat.
 
WEEKEND UPDATE - 246,556 miles

Mostly cosmetics and convenience stuff

Swapped rear hatches between 2WD and 4WD with a lock cylinder swap. The license plate bezel needs repainting and a new gasket
(bought a long time ago)

Swapped rear seats
(no pics)
Need to align hatch better
Licence plate bezel

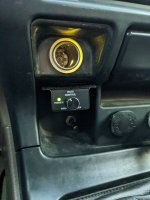
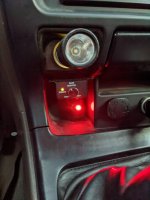
Installed sub level control knob in center console near the antenna mast switch in the cubby under the cigarette lighter (I charge a flashlight there)
PXL_20220318_020018740.MP.jpg
I used Velcro to "mount" the switch because the wire connection is an RJ11 (4-pin telephone plug) and you need full access to the back of the switch to plug/unplug it. Easy peasy.

PXL_20220318_020159183.MP.jpg
The antenna switch is lighted red when the antenna is up

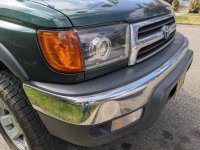
Orange Markers
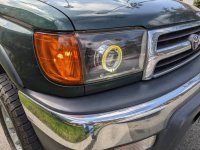
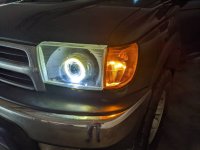
Finished the orange market lamp upgrade. I could have done better overall (execution) but I am happy with the results.
PXL_20220319_173043184.MP.jpg
PXL_20220319_173116336.MP.jpg
PXL_20220319_180033090.MP.jpg
Middle pic is markers and halos outside in daylight
Bottom pic is markers and halos in the garage. Halos go off when headlights go on.

I used Tamiya X-26 Gloss Clear Orange plastic paint (dye) and Tamiya TS-13 Gloss Lacquer Spray

EDIT: markers stay on with the headlights

Faux-Satoshi grille
View attachment 394104

Wrote a thread about it:
Faux-satoshi grill


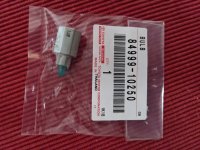
Accumulated a few more parts:
PXL_20220316_010740797.MP.jpg
84999-10250
-installed

Battery Hold Down
74404-35140
-installed

Clutch Pedal Bushings (2)
90386-13007

Clutch Pedal Spring
90507-14030

Front Diff Fill Plug (why not)
90341-18060

More stuff inbound. Stay tuned!
 

Attachments

  • PXL_20220319_180033090.MP.jpg
    PXL_20220319_180033090.MP.jpg
    67.1 KB · Views: 622
  • PXL_20220318_020018740.MP.jpg
    PXL_20220318_020018740.MP.jpg
    66.4 KB · Views: 689
  • PXL_20220318_020159183.MP.jpg
    PXL_20220318_020159183.MP.jpg
    64.4 KB · Views: 853
  • PXL_20220319_173043184.MP.jpg
    PXL_20220319_173043184.MP.jpg
    129.4 KB · Views: 618
  • PXL_20220319_173116336.MP.jpg
    PXL_20220319_173116336.MP.jpg
    116.7 KB · Views: 658
  • PXL_20220316_010740797.MP.jpg
    PXL_20220316_010740797.MP.jpg
    94 KB · Views: 581
Last edited:
Finished the orange market lamp upgrade. I could have done better overall.View attachment 394088View attachment 394089View attachment 394085
Middle pic is markers and halos outside in daylight
Bottom pic is markers and halos in the garage. Markers go off when headlights go on.

Aren’t the markers’ purpose to be on when headlights are on?

That color you ended up with matches the stock toyota orange corners and blinkers off 90’s era vehicles pretty well. What were you thinking could have been done better? Where did you get the JDM corners? Almost afraid to ask what you paid too!
 
Aren’t the markers’ purpose to be on when headlights are on?
yes, they are. I corrected the error in my post, thanks for catching that. I drive with them on all the time, almost like daylight running lights, and I have my halos wired to come on with the markers, but off with the headlights. The next step is to have the markers flash respectively with the turn signals.


QUOTE=Dezert4Runner;3721054]

That color you ended up with matches the stock toyota orange corners and blinkers off 90’s era vehicles pretty well. What were you thinking could have been done better? Where did you get the JDM corners? Almost afraid to ask what you paid too![/QUOTE]

If you get up really close you'll see that the color isn't even, especially on the driver side, but I am happy with the overall tone and look ok.

I bought the clear corners off of a guy on Facebook years ago, I think I paid $75 or $80 for the pair. He had three grades, I bought the second from highest.


Sent from my Pixel 4 XL using Tapatalk
 
Last edited:
WEEKEND UPDATE - 246672

Clutch pedal spring swap
This alleviated the squeeky creaky pedal and took maybe an hour?

Link to my "write up"
Clutch pedal spring and bushing update

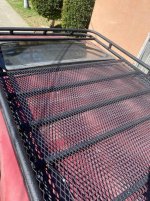
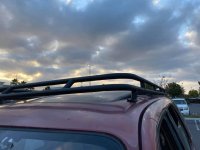
Roof rack
Met a local shade tree fabricator about a roof rack project. $550 for full length that bolts to factory track with front feet (no drill) painted black, or primered for my paint.

received_1428113384284338.jpg
received_266089452392703.jpg
received_5616089821740239.jpg

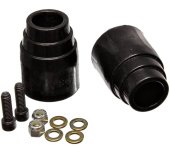
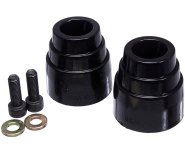
Rear Bump Stops
Ordered Energy 9.9155G (3.4" tall) and 2" spacers to DIY my own extended bumps.
Screenshot_20220328-093354.jpg
Got those for $9 on Amazon, used open box. The box was trashed but the bag they came in was still sealed. Score!

Removed factory bump rocks pending spacers and long allen cap bolts.

Front Bump Stops
Ordered Energy 8.9104G and will install when I do my LCA bushings.
Screenshot_20220328-093811.jpg

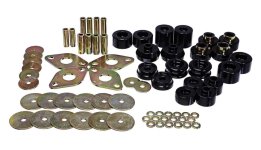
Poly Body Mounts
Ordered Energy 8.4110G and will install with my 1" body lift
Screenshot_20220328-093657.jpg


Sent from my Pixel 4 XL using Tapatalk
 

Attachments

  • received_266089452392703.jpg
    received_266089452392703.jpg
    136.9 KB · Views: 530
  • received_1428113384284338.jpg
    received_1428113384284338.jpg
    135.1 KB · Views: 551
  • received_5616089821740239.jpg
    received_5616089821740239.jpg
    56.9 KB · Views: 530
  • Screenshot_20220328-093354.jpg
    Screenshot_20220328-093354.jpg
    92.9 KB · Views: 547
  • Screenshot_20220328-093657.jpg
    Screenshot_20220328-093657.jpg
    114.3 KB · Views: 576
  • Screenshot_20220328-093811.jpg
    Screenshot_20220328-093811.jpg
    83.7 KB · Views: 546
Last edited:
WEEKEND UPDATE - 246672

Clutch pedal spring swap
This alleviated the squeeky creaky pedal and took maybe an hour?

Link to my "write up"
Clutch pedal spring and bushing update

Roof rack
Met a local shade tree fabricator about a roof rack project. $550 for full length that bolts to factory track with front feet (no drill) painted black, or primered for my paint.

View attachment 394421
View attachment 394420
View attachment 394422

Rear Bump Stops
Ordered Energy 9.9155G (3.4" tall) and 2" spacers to DIY my own extended bumps.
View attachment 394423
Got those for $9 on Amazon, used open box. The box was trashed but the bag they came in was still sealed. Score!

Removed factory bump rocks pending spacers and long allen cap bolts.

Front Bump Stops
Ordered Energy 8.9104G and will install when I do my LCA bushings.
View attachment 394425

Poly Body Mounts
Ordered Energy 8.4110G and will install with my 1" body lift
View attachment 394424


Sent from my Pixel 4 XL using Tapatalk


Seems like a great weekend, I’m interested to hear your review on the bump stops and body mounts!


Sent from my iPhone using Tapatalk
 
Super Lube okay?
I'd expect any multipurpose grease would work, yeah. They don't move/work nearly as much as poly suspension bushings. I just get a nice creak I can feel in the mount right under my left foot. Can wait to get an afternoon to jack up the body and sling a bit of grease in there...

-Charlie
 
That rack looks nice! Reminds me of Whitson roof racks.
I pulled the trigger on one

Poly Body Mounts
Ordered Energy 8.4110G and will install with my 1" body lift
View attachment 394424

Turns out 8.4110G is specific to 2000-2002 and 8.4111G is 96-99 - I ordered the wrong kit.

Reordering the right kit
Might post 8.4110G for sale to save money on return shipping and restock
 
Last edited:
Turns out 8.4110G is specific to 2000-2002 and 8.4111G is 96-99 - I ordered the wrong kit.

Reordering the right kit
Might post 8.4110G for sale to save money on return shipping and restock
Check underneath before returning it. There is a chance some late '99s got the newer style mounts (similar to the mid-year side mirror change). I think it was the a-pillar mount that went to the two-bolt style.

-Charlie
 
Check underneath before returning it. There is a chance some late '99s got the newer style mounts (similar to the mid-year side mirror change). I think it was the a-pillar mount that went to the two-bolt style.


-Charlie
Good idea, the date on my door sticker is 05/99 but I'll look tonight

Sent from my Pixel 4 XL using Tapatalk
 
Check underneath before returning it. There is a chance some late '99s got the newer style mounts (similar to the mid-year side mirror change). I think it was the a-pillar mount that went to the two-bolt style.

-Charlie

Only one 2-bolt mount at the rear.

I posted the kit for sale in a few places and have buyers in line, so it's all good.
 
Interested to hear your feedback on the full poly bodymount kit. I did just the rears on my truck before I did the Eimkeith rear bumper. I do like the idea of replacing all the old tires mounts but I was a little scared of all the vibration feedback into the cab/steering wheel with the stiffer poly bodymount bushings. Also long term noise (will they end up squeaking). Please post some feedback as you get miles on the truck with them installed.

Truck looks great!
 

Members online

Forum statistics

Threads
278,316
Messages
3,554,121
Members
248,016
Latest member
Advally Service

Trending content

Back
Top