Oil Change 5th Gen: How To- LOTS of PICS!

...They managed to snap one of the 10mm bolts off into the skid plate, I'm guessing he used an air ratchet on it. I was able to remove the remnants of the bolt from the backside with some vice grips.

This. I just did my first DIY oil &filter change on my 14 LE by following Antman's excellent post. When I went to remove one of the 10mm bolts at the front of the under engine cover, it snapped cleanly off. No doubt snugged up by the dealer tech with his impact gun. When I got to the pan drain bolt, I noted that it was crush washer free. Strike two. Finally, the filter cartridge assy was super tight with the index piece well beyond the mark. I'm glad I am now taking care of this myself and treating my truck to the proper maintenance process. With the skid hooks ground down, the next time ought to be less of a struggle.
 
With the skid hooks ground down, the next time ought to be less of a struggle.

So, just got done with the first oil change on mine. To be honest, it was more work than I expected. But next time will be much smoother now that I know all my "approach angles". One thing I tried out that I thought I'd share. I didn't have a way to easily grind/cut off the swing-down tabs on my skid plate. So I decided to only remove the 2 bolts and clip on the lower bumper cover and allowed the skid plate to swing down till it hit the ground. I then used 2' of vinyl tubing on the oil filter drain pipe to route that flow away and prevent it from spilling on the skid plate requiring that clean up. It worked pretty good and will be pretty clean, just make sure you're at a good angle and can put on the filter drain pipe with some gusto. I found the best angle for me was to approach the filter from the front-driver side. I will probably try full skid removal next time to see which way I prefer. I took a picture of how I was set up, but forgot to turn on the flash, so I'll have to get a better picture later.
 
....When I got to the pan drain bolt, I noted that it was crush washer free. Strike two. Finally, the filter cartridge assy was super tight with the index piece well beyond the mark. I'm glad I am now taking care of this myself and treating my truck to the proper maintenance process. With the skid hooks ground down, the next time ought to be less of a struggle.

This too^

I have a saying which some know, "Nobody cares about your vehicle as much as you do".

Look, not trying to knock the guys that do oil changes at the dealerships but lets face it - it's not a high skill job and mostly they are the guys at the bottom of the totem pole.

Their job is to get your vehicle in and out as fast as possible and I think for the most part they couldn't give a shit about your vehicle.

That's why nobody touches my vehicles. An oil change is not difficult. When I am done I know for certain it was done correctly. Because I DO care about my vehicles. ;-)

As far as the hooks go in Antmans excellent write-up. If you run the truck up on ramps it's a non-issue. I didn't touch mine.
 
Thanks!

Wow - great post and detail. After reading it all, I'm thoroughly convinced I will continue to pay $35 to have someone else do it. I agree with the other post - what was the design team thinking??
 
This too^

I have a saying which some know, "Nobody cares about your vehicle as much as you do".

Look, not trying to knock the guys that do oil changes at the dealerships but lets face it - it's not a high skill job and mostly they are the guys at the bottom of the totem pole.

Their job is to get your vehicle in and out as fast as possible and I think for the most part they couldn't give a shit about your vehicle.

That's why nobody touches my vehicles. An oil change is not difficult. When I am done I know for certain it was done correctly. Because I DO care about my vehicles. ;-)

As far as the hooks go in Antmans excellent write-up. If you run the truck up on ramps it's a non-issue. I didn't touch mine.

I'll take the high school kid over some of the 4Runner owners after reading multiple scary posts on how they "fix" or "mod" things.
 
This is a great thread.

My wife has a 2014 4Runner and I've thought about doing the oil changes once her freebies run out.

Thanks for the pictures and info!
 
Looks like Toyota stopped using that oil drain plug gasket in the OP's post according to a local dealer. Anyone try the new kind?

Shouldn't be an issue but I'm just overly cautious.
 
Looks like Toyota stopped using that oil drain plug gasket in the OP's post according to a local dealer. Anyone try the new kind?

Shouldn't be an issue but I'm just overly cautious.


Maybe I missed something. Don't feel like going thru 29 pages.

My 5th Gen 4 Runner came with an oil pan drain plug gasket.

Part # 90430-12031

Same one that's on a lot of Toyota's.
 
Is it blue and white? Mine is all black now. If so, I'll go back to the dealership and make sure his lazy ass finds me the right one.

Mine were black.

I changed the oil a few weekends ago and went to the Toyota dealer to get the gaskets. Walked up to the counter and said what I needed. Dude grabbed a plastic bag off the counter and said " how many do you want? They're free."

Don't know if that's always the case, but I should be good for the next year or two :reddance:
 
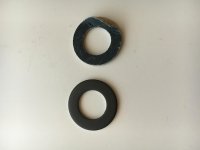
There are fakes being sold on Amazon from some Chinese sellers. These have black paper gaskets glued to poorly made aluminum washers. I re-ordered from an actual Toyota dealer and got the same ones I've been using for years with the rubbery gasket material and correctly sized aluminum washer.
 

Attachments

  • image.jpg
    image.jpg
    133.1 KB · Views: 1,024
Last edited:
Mine were black.

I changed the oil a few weekends ago and went to the Toyota dealer to get the gaskets. Walked up to the counter and said what I needed. Dude grabbed a plastic bag off the counter and said " how many do you want? They're free."

Don't know if that's always the case, but I should be good for the next year or two :reddance:

Indeed, I ordered some and noticed they are now all black.

Dan

As long as they do their job, I'm fine with it.


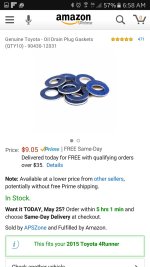
This was the color I was talking about. I used one of these during my last oil change and now the gasket doesn't have a white ring on it.
 

Attachments

  • Screenshot_20160525-065843.jpg
    Screenshot_20160525-065843.jpg
    123.5 KB · Views: 1,009
Last edited:
First of all, a big THANK YOU to @Antman for writing this “How-to”! I checked this out before we purchased our 4Runner and was a bit disappointed at the extra steps to perform the OC. At least we knew what to expect though. However it’s really minor in the overall scheme of things when you consider all the positives to this vehicle!

To those that are finding out that there are imitation crush washers causing consternation and/or “Stealerships” cutting corners (on various steps involved with the OC) I’d like to offer my thoughts. First of all take some time and interest in your 4Runner by doing this somewhat involved but really quite simple job yourself. If you can’t for whatever reason that’s cool too, but I think it’s another way to get to know your ride. DISCLAIMER; I’m not here to bash all dealerships and certainly not independent shops either. Some are quite competent and can be trusted. However, as long as I’m able to, I’m going to be doing this and other simple maintenance tasks myself. We simply said “No Thanks” to “Toyota Care”. Secondly I’d like to suggest installing a Fumoto QwiK Valve. Then you can forget all about replacing crush washers (and more if you’re willing to continue reading). You can get them on Amazon or go directly to the manufactures website. We choose the latter because of the discounts offered and also wanted to get some accessories at the same time too.

We went with the F103S which came with the plastic adapter (SH-10) to attach a 3/8 I.D. drain hose. So you can drain your oil right into you drain pan or jug for recycling. It is in this aspect the cleanest OC I’ve probably done. And I’ve been doing all of my own (and for some others) for decades now! There are two other options of either the F103 or the F103N also. IMHO the F103N is a bit too long and I’ve read where one had struck their skid plate on a rock, which then contacted the valve (F103N). This caused the Lower Drain Pan to get crushed! “So live and learn” from others when at all possible. DISCLAIMER; I do not work for or earn anything from any potential sales of Qwik Valves!

By the way I got an email with a Coupon Code for 50% off all Fumoto Accessories back on May 21st. I can’t say for certain if it’s still good but there are frequently discounts offered throughout the year. The Code was ACC50

One last thing to mention; using these valves it will take slightly longer to drain your oil. Personally I could care less because while it’s draining I’m removing the skid plate (and later lubing the drive shafts). Regardless the oil should be drained with the engine up to operating temperature so that you’re getting as much off the old oil out as possible. By the time you get the plastic front filler and skid plate down to get to working on your oil filter it’ll be done. Hope that this helps someone else doing their own OC. It's simpler and less of a mess too.

 

Attachments

  • IMG_2484.JPG
    IMG_2484.JPG
    59.5 KB · Views: 992
Thanks for the wrote up. Used it today for my first oil change on my 5th Gen. A couple observations from today-
1. I hate this new filter system. The best filter system was the one on my FJ.
2. I couldn't get the oil filter plug off. The whole filter came off instead- BIG MESS.

I think you may want to add a step of "when to reinstall drain plug." Some newbies who are trying this for the first time might not think about it and then when they fill up there becomes a huge mess. Just a thought.

Thanks again for the awesome wrote up!
 
Using a universal filter wrench

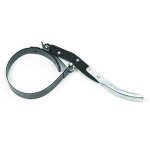
[MENTION=100894]mattyrides07[/MENTION] If while using a 3” extension on a 3/8 drive ratchet to remove the filter drain plug the filter housing turns instead of the drain plug; place a universal filter wrench on the filter housing to hold it in place.

Later when re-installing the filter housing finish with a torque wrench set to 18 ft-lb. Then when you replace the filter drain plug only torque that to 10 ft-lb. Now, see if at the next OC if the filter housing wants to turn while attempting to only remove the drain plug. Hope this helps.
 

Attachments

  • universal oil filter wrench.jpg
    universal oil filter wrench.jpg
    5.4 KB · Views: 919
Later when re-installing the filter housing finish with a torque wrench set to 18 ft-lb. Then when you replace the filter drain plug only torque that to 10 ft-lb. Now, see if at the next OC if the filter housing wants to turn while attempting to only remove the drain plug. Hope this helps.

Even when properly torqued, I also have found they want to move "as one" if you're too smooth when loosening the drain plug. Give it a little impact to break the tension and it then should loosen very easily without moving the filter housing.

If you still have problems, a 2 liter bottle with the bottom cut off can help minimize the mess. I've had to deal with this on my Highlander, it has an access cover for the filter so there is not room to implement Laurich's method.
 
Last edited:

Members online

Forum statistics

Threads
278,315
Messages
3,554,125
Members
248,016
Latest member
Advally Service

Trending content

Back
Top