
You are using an out of date browser. It may not display this or other websites correctly.
You should upgrade or use an alternative browser.
You should upgrade or use an alternative browser.
Okki's Build Thread
- Thread starter Okki
- Start date

Fire Extinguisher 1/1
Fire Extinguisher
Shield ABC automotive fire extinguisher $ 26.70 1 unit Autozone
Nuts & Bolts $ 4.77 4 M5 bolts, 4 M5 nuts, 8 large washers Lowes
Total $ 31.47
This is a fairly quick and easy “mod”. For everyone who does a road trip, I don’t’ think a fire extinguisher is a bad addition to your vehicle. With mine up coming to the FJ Summit I decided it was about time to add one to my truck.
PARTS AND HARDWARE:
I stopped by my local Autozone and picked up the one below. It’s not the smallest fire extinguisher, but since I planned on putting it in the back anyway, I’m happy with the extra capacity.


Mine did not come with mounting hardware so a quick run to Lowes and that was taken care off. I got longer bolts because I’m mounting them not just through plastic, but also through the sheet metal that sits a little further back.

(The above pic is courtesy of Harper7)
I picked up all the required nuts, bolts and washers at Lowes.

MOUNTING THE UNIT:
Once I determined the location where I wanted it mounted, I drilled the holes. With this mounting location you will no longer be able to use the cargo cover, but I don’t own one of those and don’t plan on getting one; so that’s a non-issue. It is also mounted up high enough that you can still use the tray (and hidden storage) under it.

The bottom hole/bolt is a bit of a pain because it falls right at a curved surface, but as you can see from the pic below, everything works nicely within the space behind the trim/sheet metal. I would recommend you use lock-tight putty instead of liquid as the liquid will get a bit messy since you can’t see what you’re doing.

Below is the bracket freshly installed. Next with the fire extinguisher locked in the bracket.


The whole installation takes about 30 minutes if you have all the parts and pieces ready.
OPTIONAL:
As you tighten the bolts, the plastic will get pulled a bit due to the space between the plastic interior trim and the sheet metal. If you want to get fancy you could get some nylon spacers and cut those to size in order to fill that gap. I’ve not done this so far and will see how this works out first.
Okki
Fire Extinguisher
Shield ABC automotive fire extinguisher $ 26.70 1 unit Autozone
Nuts & Bolts $ 4.77 4 M5 bolts, 4 M5 nuts, 8 large washers Lowes
Total $ 31.47
This is a fairly quick and easy “mod”. For everyone who does a road trip, I don’t’ think a fire extinguisher is a bad addition to your vehicle. With mine up coming to the FJ Summit I decided it was about time to add one to my truck.
PARTS AND HARDWARE:
I stopped by my local Autozone and picked up the one below. It’s not the smallest fire extinguisher, but since I planned on putting it in the back anyway, I’m happy with the extra capacity.
Mine did not come with mounting hardware so a quick run to Lowes and that was taken care off. I got longer bolts because I’m mounting them not just through plastic, but also through the sheet metal that sits a little further back.
(The above pic is courtesy of Harper7)
I picked up all the required nuts, bolts and washers at Lowes.
MOUNTING THE UNIT:
Once I determined the location where I wanted it mounted, I drilled the holes. With this mounting location you will no longer be able to use the cargo cover, but I don’t own one of those and don’t plan on getting one; so that’s a non-issue. It is also mounted up high enough that you can still use the tray (and hidden storage) under it.
The bottom hole/bolt is a bit of a pain because it falls right at a curved surface, but as you can see from the pic below, everything works nicely within the space behind the trim/sheet metal. I would recommend you use lock-tight putty instead of liquid as the liquid will get a bit messy since you can’t see what you’re doing.
Below is the bracket freshly installed. Next with the fire extinguisher locked in the bracket.
The whole installation takes about 30 minutes if you have all the parts and pieces ready.
OPTIONAL:
As you tighten the bolts, the plastic will get pulled a bit due to the space between the plastic interior trim and the sheet metal. If you want to get fancy you could get some nylon spacers and cut those to size in order to fill that gap. I’ve not done this so far and will see how this works out first.
Okki
Last edited:

jangoforhire
New member
Hey Okki I am going to be getting some rotopax like you did for my rack. Still happy with yours? Anything you would do differently now that you have done it once?
My rack hasn't come in yet, so my plan is to attach the mounts (That caused a lot of trouble for you) before the rack goes on my roof.
I think I am going to get the same setup as you, although I may go gas/storage instead of gas/water.
My rack hasn't come in yet, so my plan is to attach the mounts (That caused a lot of trouble for you) before the rack goes on my roof.
I think I am going to get the same setup as you, although I may go gas/storage instead of gas/water.
Hey Okki I am going to be getting some rotopax like you did for my rack. Still happy with yours? Anything you would do differently now that you have done it once?
My rack hasn't come in yet, so my plan is to attach the mounts (That caused a lot of trouble for you) before the rack goes on my roof.
I think I am going to get the same setup as you, although I may go gas/storage instead of gas/water.
Yeah, I'm happy with mine so far. I've been debating about getting the larger cans, but I can't truly justify the reason other then "want". The 2 gallon cans are really nice an flat, so they don't event go above the side rails. Putting on the brackets before mounting the rack will make things easier.
Personally I would not go with the storage ones. They have limited internal space (because of the hole in the middle) and are not water proof from what I'm told. If you want to store stuff on the roof I would get a Pelican case and strap it to the rack.
I haven't frozen my water can yet, so I'll be curious to see how that works out.
Okki
jangoforhire
New member
Yeah, I'm happy with mine so far. I've been debating about getting the larger cans, but I can't truly justify the reason other then "want". The 2 gallon cans are really nice an flat, so they don't event go above the side rails. Putting on the brackets before mounting the rack will make things easier.
Personally I would not go with the storage ones. They have limited internal space (because of the hole in the middle) and are not water proof from what I'm told. If you want to store stuff on the roof I would get a Pelican case and strap it to the rack.
I haven't frozen my water can yet, so I'll be curious to see how that works out.
Okki
Yea I am re-thinking the storage one as well. I will probably go gas/water like you. As far as the size goes, I don't REALLY need any cans, so I think I will get the 2 ga. because they look like a good size for the rack. I feel like it would be easier to put them on now as opposed to later down the road. And I am sure these will come in handy at some point. And I'd rather use them once and be glad I had them them than need them once and WISH I had them.
Thanks for the tips!

HedgehogOutdoors
New member
I ended up ordering some Hella Horns... 118db high and low tone. I did get a good reaction from a lady not yielding to me while I was on a roundabout, but I thought they would have been louder.
HELLA 003399803 Supertone 12V High Tone/Low Tone Twin Horn Kit
Price: $51.-
Amazon.com: HELLA 003399803 Supertone 12V High Tone/Low Tone Twin Horn Kit: Automotive
Them not being "loud" may be incorrect in that they are directional horns and being in the cab behind them, you would hear significantly less than in front of them.

May I ask where the horns are made? We have Hella headlights on a few of our fire engines, they are made in Germany. Are these also made in Germany? Thanks, and sorry to bother you over that.
May I ask where the horns are made? We have Hella headlights on a few of our fire engines, they are made in Germany. Are these also made in Germany? Thanks, and sorry to bother you over that.
No bother at all, but I'm not sure off the top of my head. I'll look into that when I get home and post the answer. For some reason it stands out in my mind that they were not made in Germany, but I'll confirm the country of manufacturing.
Okki

HedgehogOutdoors
New member
Thanks for that, I appreciate it. I've been looking for a substitute for the ratherSo Gay sounding stock horns.
Swiffer Mop to wax roof under Gobi Stealth rack.
Swiffer Mop
Swiffer Mop $ 11.65 Walmart
Microfiber towels $ 9.97 Walmart
Total $ 21.62
The Problem!
When I installed the Gobi Stealth Rack on my 2010 Limited, I quickly realized that cleaning and waxing the roof was going to be a challenge due to the lack of space between the rack and the roof.
The Solution:
I grabbed a Swiffer Sweeper 2 In 1 Mop And Broom Floor Cleaner Starter Kit at Walmart and been really happy with how it works. The wet pad is a microfiber, so using it to wash the roof worked well with no swirl marks.
Next I used some microfiber towels and spray-on wax (I use Griots Garage) to wax the roof.
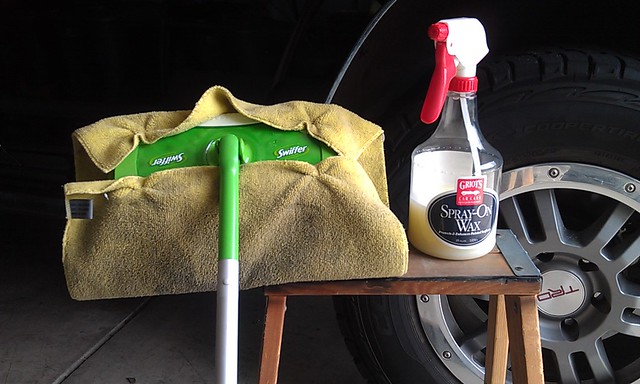
After spraying on the wax (through the mesh of the rack) I used the swiffer to spread the wax evenly. The swiffer dow not fit under the cross bars, but by positioning the swiffer base length-wise or sideways you can cover all areas of the roof.
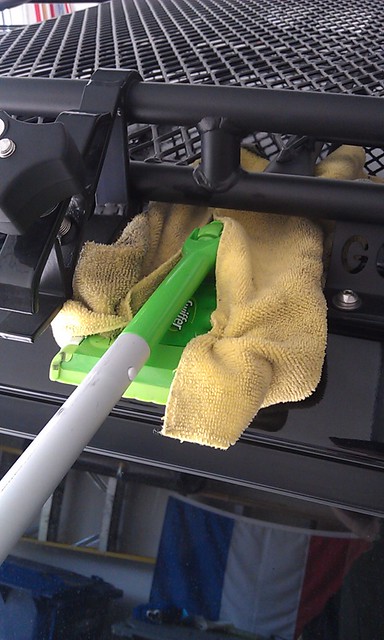
By having the “blade” sideways, it fits precisely between the raised areas that run the length of the roof. You may want to use a second microfiber towel to buff off the wax.
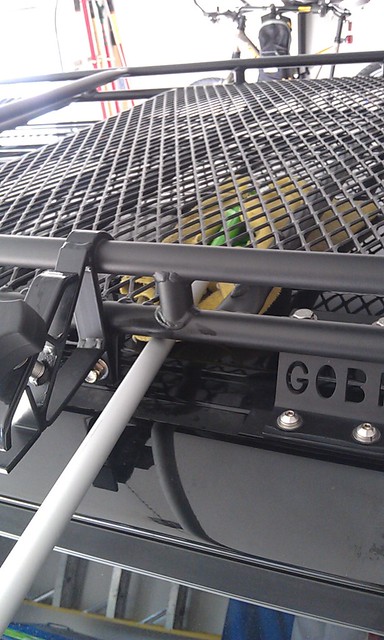
Using this technique, I got my roof waxed in just a couple minutes and looking good under the Gobi.
Okki
Swiffer Mop
Swiffer Mop $ 11.65 Walmart
Microfiber towels $ 9.97 Walmart
Total $ 21.62
The Problem!
When I installed the Gobi Stealth Rack on my 2010 Limited, I quickly realized that cleaning and waxing the roof was going to be a challenge due to the lack of space between the rack and the roof.
The Solution:
I grabbed a Swiffer Sweeper 2 In 1 Mop And Broom Floor Cleaner Starter Kit at Walmart and been really happy with how it works. The wet pad is a microfiber, so using it to wash the roof worked well with no swirl marks.
Next I used some microfiber towels and spray-on wax (I use Griots Garage) to wax the roof.
After spraying on the wax (through the mesh of the rack) I used the swiffer to spread the wax evenly. The swiffer dow not fit under the cross bars, but by positioning the swiffer base length-wise or sideways you can cover all areas of the roof.
By having the “blade” sideways, it fits precisely between the raised areas that run the length of the roof. You may want to use a second microfiber towel to buff off the wax.
Using this technique, I got my roof waxed in just a couple minutes and looking good under the Gobi.
Okki


BigStickKenobi
New member
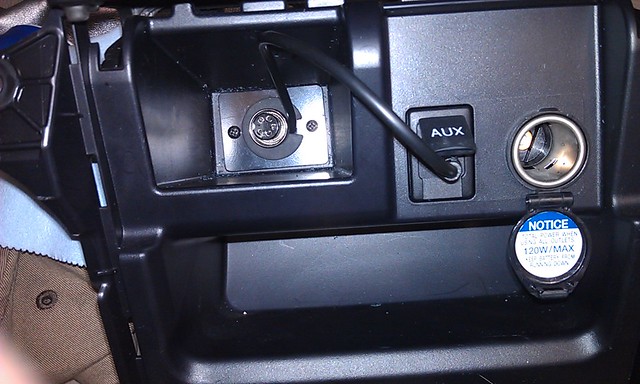
It’s a little fidgety to get the back plate screws in place, but it looks good and works well once done. First the back view; than the front view:
 [/QUOTE]
Okki,
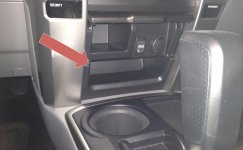
Quick question; I am installing my CB soon It's a Cobra 19DXIV and wanting to place it in the most bottom section of the dash. Basically right below the "cubby" section you routed your extension. If you can remember, can you tell me how much space was behind there, I believe i just need a few inches (that's what she said, lol). i would like to cut out the back and slide it in. Thanks and let me know your thoughts.
Okki,
Quick question; I am installing my CB soon It's a Cobra 19DXIV and wanting to place it in the most bottom section of the dash. Basically right below the "cubby" section you routed your extension. If you can remember, can you tell me how much space was behind there, I believe i just need a few inches (that's what she said, lol). i would like to cut out the back and slide it in. Thanks and let me know your thoughts.
BigStickKenobi
New member
Okki,
Basically, in the picture here.
I'll have to dig through some pics, but basically you only have the space of the indicated area and nothing more. there is a bunch of air channels behind there (to route to the rear center heating/cooling vents). I'm not sure how big your unit is (HAHAHA) but if you can't slide it into the space you indicated, you are likely out of luck. that's why I ended up mounting my control unit in the center tunnel closest space available.
Okki
EDIT:
dug up some pics... judge for yourself, but I think you may want to look for an alternate location or a different CB unit. you have a little left-right wiggle room, but nothing in terms of depth.


Last edited:
BigStickKenobi
New member
Okki,
Sorry for the delayed response. Was out of town on business and had zero internet except iPhone. Thanks for digging up the pics, I truly appreciate it. Looks like it's going to be center console then like everyone else.
Thanks and again and your rig looks awesome!
Sorry for the delayed response. Was out of town on business and had zero internet except iPhone. Thanks for digging up the pics, I truly appreciate it. Looks like it's going to be center console then like everyone else.
Thanks and again and your rig looks awesome!

SOcalTRAIL
New member
I'm gonna steal your Swiffer roof waxing technique. Genius!
Okki,
Sorry for the delayed response. Was out of town on business and had zero internet except iPhone. Thanks for digging up the pics, I truly appreciate it. Looks like it's going to be center console then like everyone else.
Thanks and again and your rig looks awesome!
Thanks! Glad to save you some time figuring out the location.
I'm gonna steal your Swiffer roof waxing technique. Genius!
Inspired by Harper7 on an Antman budget... it's a forum effort

ARB Twin Compressor Installation 1/3
ARB Twin Compressor under hood.
ARB twin compressor (CKMTA12) and Manifold (171503) $ 479.00 ToyotaTRDParts.com
Bracket $ 285.00 Agile Automotive
Hardware kit $ 12.85 Agile Automotive
829-12059168, 12059168, CABLE CAVITY PLUG $ 0.55 Mouser.com
829-12084200, 12084200-L, FMALE 150 SERIES TIN $ 0.95 Mouser.com
829-15324974, 15324974, MP CABLE SEAL BLUE $ 0.24 Mouser.com
829-12052845, 12052845, SECONDARY LOCK $ 0.35 Mouser.com
829-12110293, 12110293, 3P FM BLACK CON ASSY $ 1.53 Mouser.com
Air Pro PUR-14X050 1/4-inch by 50 Polyurethane 250 PSI Air Hose $ 27.44 Amazon.com
Ampro A2570 5 Piece Air Coupler Set Brass, Milton Type $ 7.52 Amazon.com
Total $ 815.43
THE REASON AND THE PARTS
I wanted a compressor that would let me air up the tires after playing on the trail and be able to run some light air tools to make it easier to change a tire should the need arise. The 100% duty cycle ARB twin compressor seemed to fit the bill just right without the express need for a tank (although I will be adding one eventually).
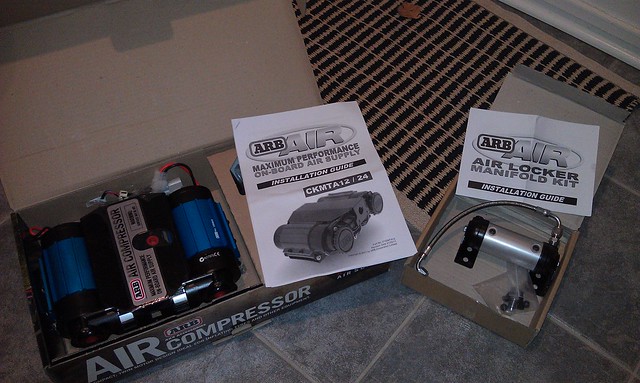
I ordered the compressor and the manifold from ToyotaTRDparts.com and the service was great as usual. With Jangoforhire having the same compressor and a good experience with Agile Auto, I explored obtaining the same bracket.
THE BRACKET
The bracket as designed by Agile Auto ties into the top of the wheel well in two places and the inner fender. It provides mounting holes for both the compressor and the manifold, using all mounting holes. The image below shows the front of the bracket. The compressor and manifold attach on this side.
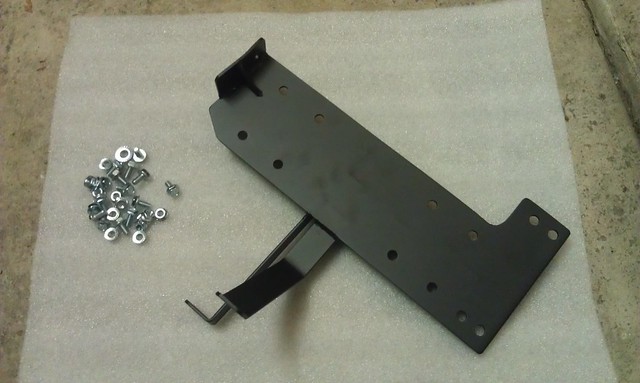
The back of the bracket is reinforced in order to reduce flexing of the bracket.
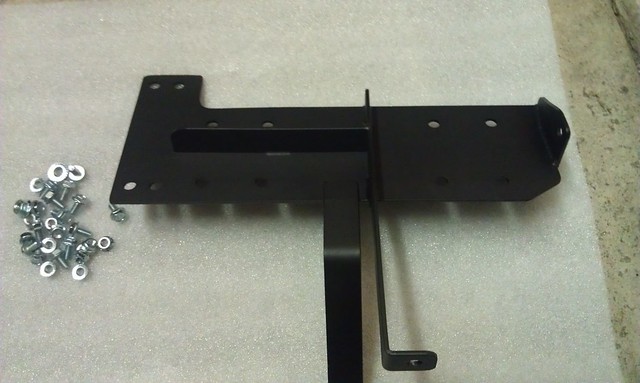
The bracket uses two existing mounting points on the wheel well. One is unuser and the other simple needs the nut removed and reinstalled once the bracket is put in place. You need to install the bracket before you attach the compressor. If you install the compressor first, you will not be able to get the bolt in that attaches the bracket to the inner fender (the front bolt). There are 2 bolts that attach the bracket to the fender.
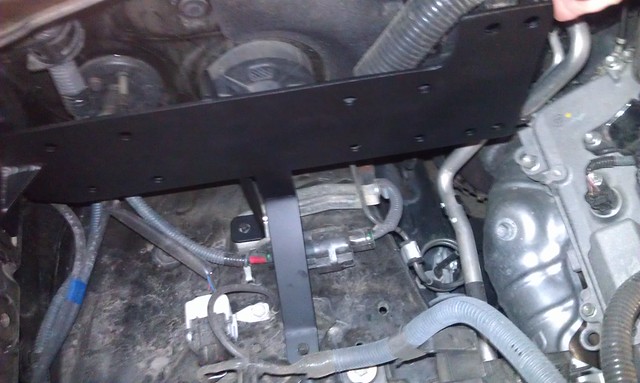
Once the bracket is bolted in securely, you can install the compressor and manifold. Install the compressor first. Since the compressor is fairly heavy and hard to handle, lift it in place and attach it with the top-inboard screw. This one is easiest to get to and will give you a fulcrum to guide the compressor when you add the top-fender bolt second. Once you have the top two bolts in, it’s easy to add the remaining 6. Once the compressor is fully secured, install the manifold.
With the manifold kit you received a braided hose to connect the manifold to the compressor. Make sure you use a single revolution of Teflon tape to make sure the connection is as air tight as possible.
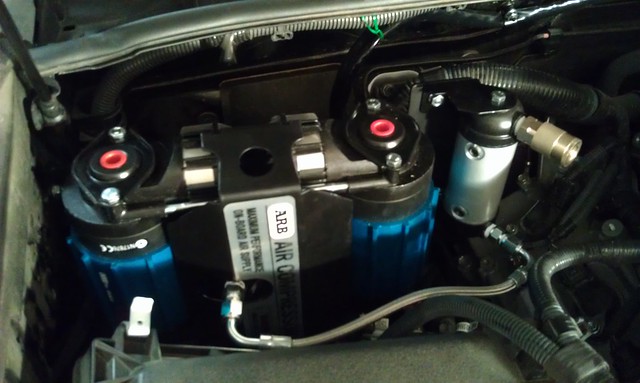
ARB Twin Compressor under hood.
ARB twin compressor (CKMTA12) and Manifold (171503) $ 479.00 ToyotaTRDParts.com
Bracket $ 285.00 Agile Automotive
Hardware kit $ 12.85 Agile Automotive
829-12059168, 12059168, CABLE CAVITY PLUG $ 0.55 Mouser.com
829-12084200, 12084200-L, FMALE 150 SERIES TIN $ 0.95 Mouser.com
829-15324974, 15324974, MP CABLE SEAL BLUE $ 0.24 Mouser.com
829-12052845, 12052845, SECONDARY LOCK $ 0.35 Mouser.com
829-12110293, 12110293, 3P FM BLACK CON ASSY $ 1.53 Mouser.com
Air Pro PUR-14X050 1/4-inch by 50 Polyurethane 250 PSI Air Hose $ 27.44 Amazon.com
Ampro A2570 5 Piece Air Coupler Set Brass, Milton Type $ 7.52 Amazon.com
Total $ 815.43
THE REASON AND THE PARTS
I wanted a compressor that would let me air up the tires after playing on the trail and be able to run some light air tools to make it easier to change a tire should the need arise. The 100% duty cycle ARB twin compressor seemed to fit the bill just right without the express need for a tank (although I will be adding one eventually).
I ordered the compressor and the manifold from ToyotaTRDparts.com and the service was great as usual. With Jangoforhire having the same compressor and a good experience with Agile Auto, I explored obtaining the same bracket.
THE BRACKET
The bracket as designed by Agile Auto ties into the top of the wheel well in two places and the inner fender. It provides mounting holes for both the compressor and the manifold, using all mounting holes. The image below shows the front of the bracket. The compressor and manifold attach on this side.
The back of the bracket is reinforced in order to reduce flexing of the bracket.
The bracket uses two existing mounting points on the wheel well. One is unuser and the other simple needs the nut removed and reinstalled once the bracket is put in place. You need to install the bracket before you attach the compressor. If you install the compressor first, you will not be able to get the bolt in that attaches the bracket to the inner fender (the front bolt). There are 2 bolts that attach the bracket to the fender.
Once the bracket is bolted in securely, you can install the compressor and manifold. Install the compressor first. Since the compressor is fairly heavy and hard to handle, lift it in place and attach it with the top-inboard screw. This one is easiest to get to and will give you a fulcrum to guide the compressor when you add the top-fender bolt second. Once you have the top two bolts in, it’s easy to add the remaining 6. Once the compressor is fully secured, install the manifold.
With the manifold kit you received a braided hose to connect the manifold to the compressor. Make sure you use a single revolution of Teflon tape to make sure the connection is as air tight as possible.
Last edited:
ARB Twin Compressor Installation 2/3
ELECTRICAL CONNECTIONS: POWER
With the compressor installed the next order of business is getting power to the unit. Using the provided harness, I connected the big connector and ran the wire loom along the firewall. You can either connect the terminals directly to the appropriate battery terminal, but since I wanted to have it be accessory switched, I connected it up to the solenoid that I already have installed for my auxiliary fuse panel. NOTE : I have since removed the solenoid and the compressor leads are connected directly to the battery.
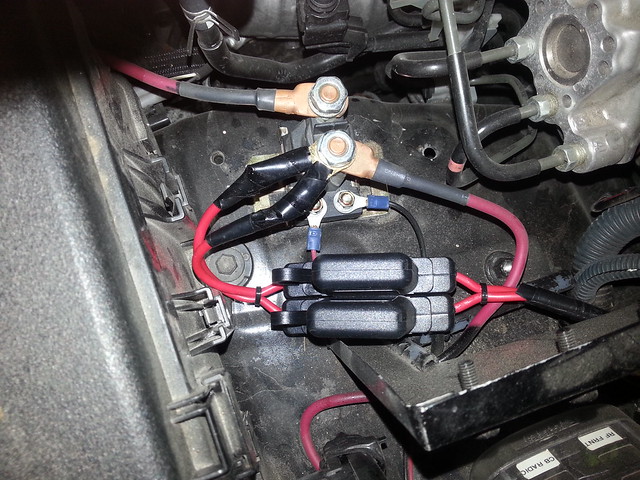
Both cables have an inline fuse. Each cable powers one of the two compressors. The ground wire I have hooked up at the battery (not visible in pictures).
ELECTRICAL CONNECTIONS: SWITCH
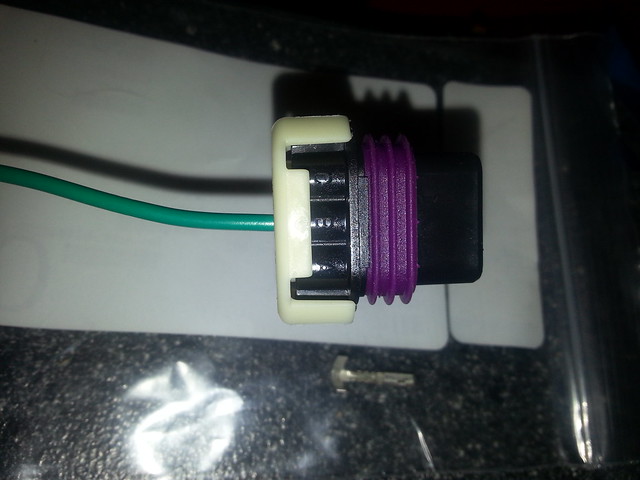
In order to switch the compressor on and off, ARB provides a nice wiring loom. However, since I already wired all my switches, I did not want to pull new wires and replace what I already have. So after a little detective work, I found out that Delphi automotive makes the water proof connector that controls the switch. ARB told me that the black wire in the loom is just there to provide a ground for the switch, so I really only needed to hook up the green power wire since my switch is already grounded. As mentioned earlier, the compressor is grounded via the power loom.
The brown stubs are plugs for the unused holes in the connector. The white collar seals the connections in the unit.
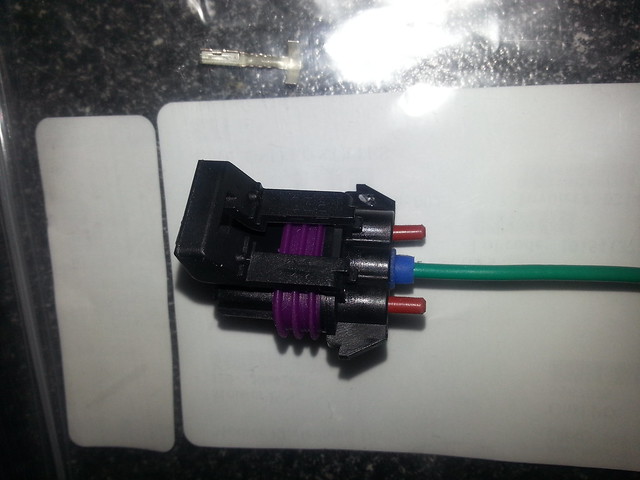
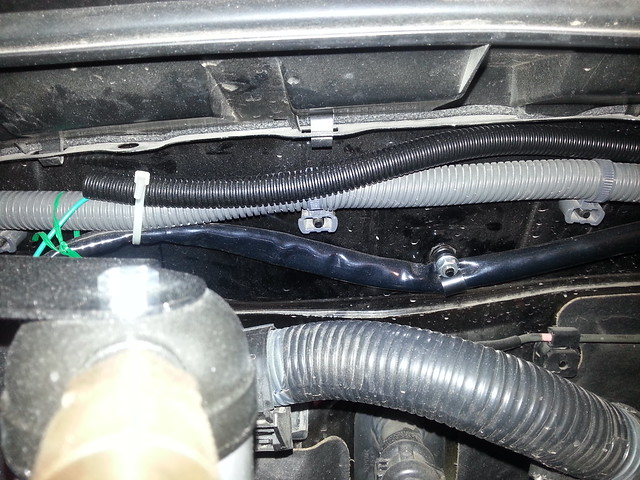
I ran some cable sleeve to protect the switch wire. It is not big enough to also cover the power cables, but since they are already covered in a wrap, I simply used some cable ties on existing studs on the firewall to route and secure it.
ELECTRICAL CONNECTIONS: POWER
With the compressor installed the next order of business is getting power to the unit. Using the provided harness, I connected the big connector and ran the wire loom along the firewall. You can either connect the terminals directly to the appropriate battery terminal, but since I wanted to have it be accessory switched, I connected it up to the solenoid that I already have installed for my auxiliary fuse panel. NOTE : I have since removed the solenoid and the compressor leads are connected directly to the battery.
Both cables have an inline fuse. Each cable powers one of the two compressors. The ground wire I have hooked up at the battery (not visible in pictures).
ELECTRICAL CONNECTIONS: SWITCH
In order to switch the compressor on and off, ARB provides a nice wiring loom. However, since I already wired all my switches, I did not want to pull new wires and replace what I already have. So after a little detective work, I found out that Delphi automotive makes the water proof connector that controls the switch. ARB told me that the black wire in the loom is just there to provide a ground for the switch, so I really only needed to hook up the green power wire since my switch is already grounded. As mentioned earlier, the compressor is grounded via the power loom.
The brown stubs are plugs for the unused holes in the connector. The white collar seals the connections in the unit.
I ran some cable sleeve to protect the switch wire. It is not big enough to also cover the power cables, but since they are already covered in a wrap, I simply used some cable ties on existing studs on the firewall to route and secure it.
Last edited:
ARB Twin Compressor Installation 3/3
THE PROBLEM
For those of you with a keen sense of observation, you noticed that the thickness of the metal that makes contact with the fender is different in several pictures. The first copy of the bracket I received did not provide enough clearance for the hood gas-strut to come down without making contact with the compressor air filter.
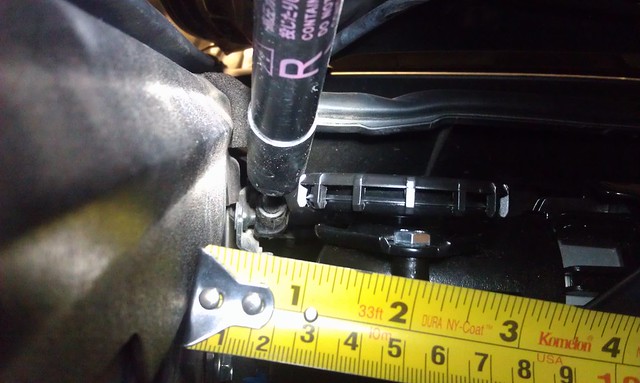
In order to fix this problem properly, the back plate would have to be a little wider and allow for more space between the first set of mounting holes and the fender. The discrepancy was about 0.5 inch in order to allow free movement and some clearance.
Unfortunately, the way Agile Automotive “fixed” the problem was by simply replacing the piece of metal that connects to the fender wall with a slightly thicker piece of metal.
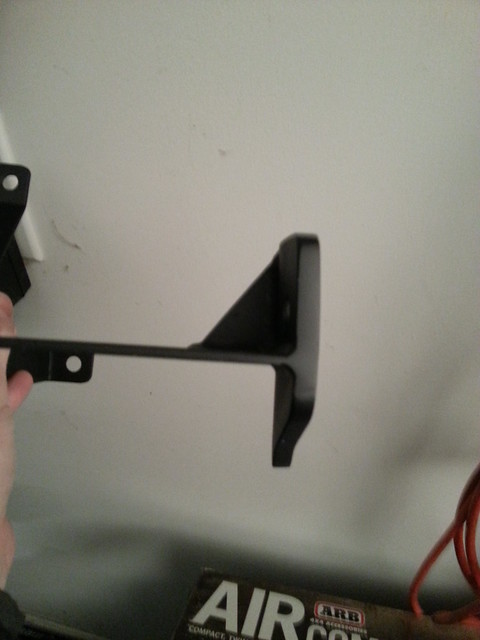
While the basic design that Agile Automotive came up with is good, unfortunately I’m not too thrilled with their fix for the initial mistake that was made in construction. The strut does not make contact with the air filter, but there isn’t enough room to fit a business card between the two either.
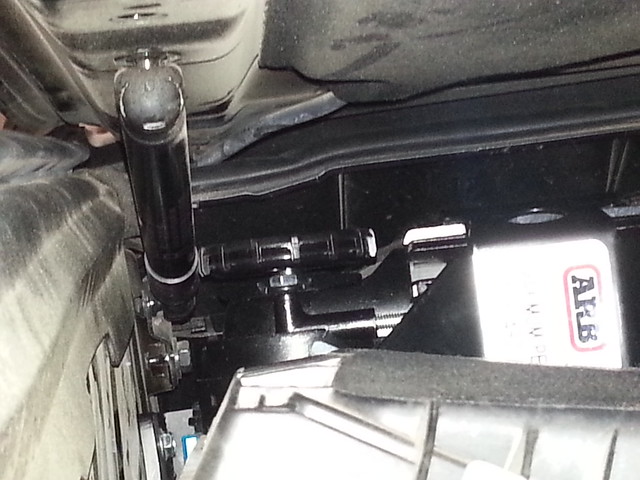
I’ll add a piece of sheet nylon or something similar as a spacer between the bracket and the fender liner at some point in the near future in order to provide some extra clearance, but for the time being the compressor is running like a charm.
The next compressor related project is to move the air chuck to the rear of the truck.
AIR HOSE
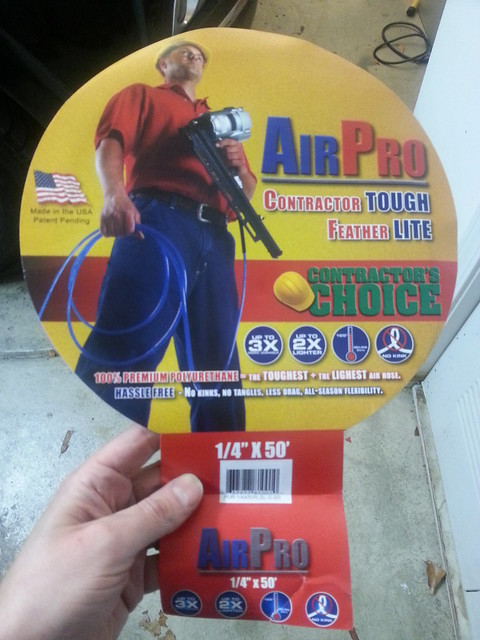
I got the AirPro hose from Amazon. This 50ft hose I initially got in order to relocate the air chuck to the rear of the truck, but I’m really liking it, so I’m ordering a second one for that purpose and will continue to use this one to run the inflator, air tools, etc.
THE PROBLEM
For those of you with a keen sense of observation, you noticed that the thickness of the metal that makes contact with the fender is different in several pictures. The first copy of the bracket I received did not provide enough clearance for the hood gas-strut to come down without making contact with the compressor air filter.
In order to fix this problem properly, the back plate would have to be a little wider and allow for more space between the first set of mounting holes and the fender. The discrepancy was about 0.5 inch in order to allow free movement and some clearance.
Unfortunately, the way Agile Automotive “fixed” the problem was by simply replacing the piece of metal that connects to the fender wall with a slightly thicker piece of metal.
While the basic design that Agile Automotive came up with is good, unfortunately I’m not too thrilled with their fix for the initial mistake that was made in construction. The strut does not make contact with the air filter, but there isn’t enough room to fit a business card between the two either.
I’ll add a piece of sheet nylon or something similar as a spacer between the bracket and the fender liner at some point in the near future in order to provide some extra clearance, but for the time being the compressor is running like a charm.
The next compressor related project is to move the air chuck to the rear of the truck.
AIR HOSE
I got the AirPro hose from Amazon. This 50ft hose I initially got in order to relocate the air chuck to the rear of the truck, but I’m really liking it, so I’m ordering a second one for that purpose and will continue to use this one to run the inflator, air tools, etc.
Last edited:
Similar threads

- Replies
- 2
- Views
- 2K
- Replies
- 1
- Views
- 3K

- Replies
- 9
- Views
- 3K
- Replies
- 1
- Views
- 2K


