Finally project is finished. I almost did the "blinker thing" but I chickened out before splicing wires going from flasher. I hate splicing. And it is scary thing with new cars, where everything is electronic. And as all people know, all electronic devices are powered by the blue smoke - once the smoke is out, the device will stop working. So here are some pictures explaining what I did.
Because 2C plug is simple next to impossible to access I focused on the front plugs - 2D and 2F - these were accessible, kind off. The alarm installer put whole bunch of wires to 2F plug so I went for the lowest hanging fruit, plug 2D. This is how the front of ECU looked like when I took out panel trims:
The black box to the right with whole bunch of wires coming out is the alarm thing.
When I moved it away I could see 2D plug. This is how it looks like with pin 8 wire installed:
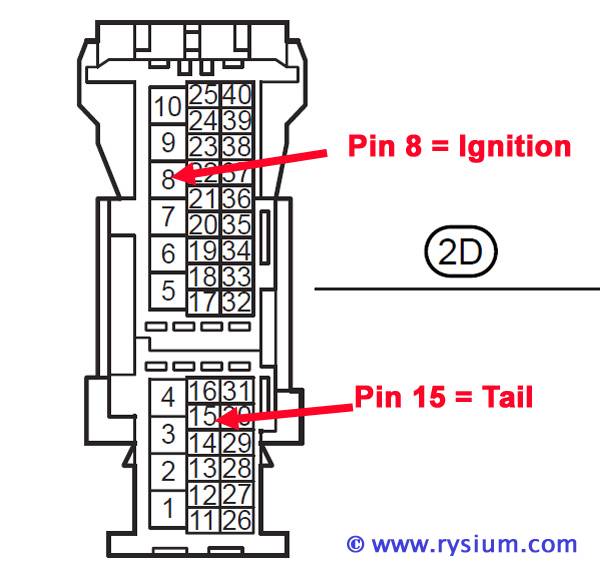
Pin 8 is first column from the right, third from the top. Later I installed pin 15 in the same plug (on the picture above you can see it is empty).
This is the schematic of the plug 2D (It is mirror image of what I see on my pictures)
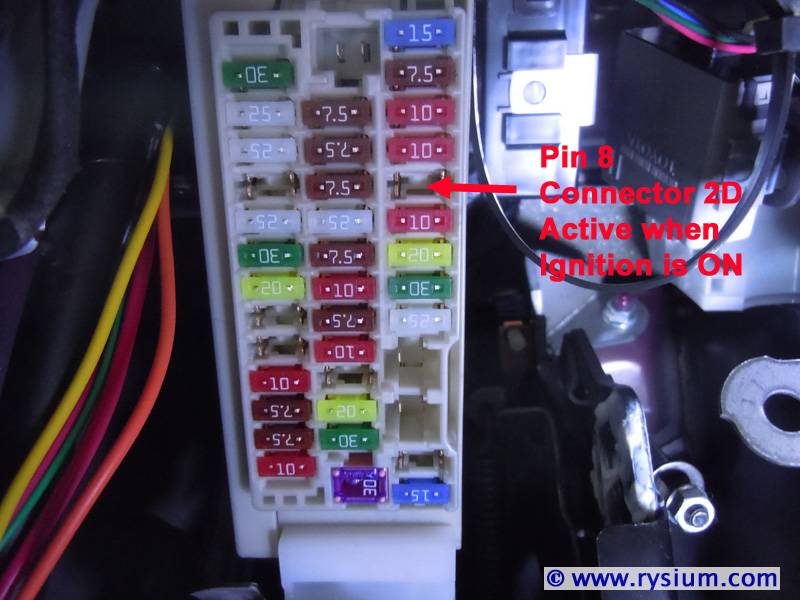
An this is the location of the fuse for pin 2D 8
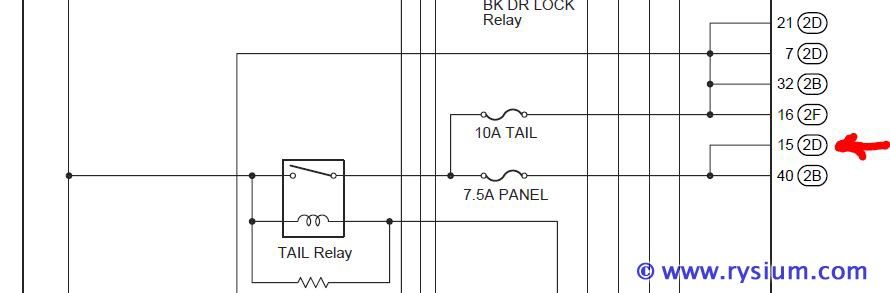
On electrical diagram "RELAY LOCATIONS (Driver Side J_B Assembly Inner Circuit) (2010 4Runner)" both pins are shown confirming my observations:
As I wrote before, the Toyota installation bracket was not exactly the same as original factory Fog lamp. Very close but not 100% plug and play. Here is the comparison between stock fog lamp and Osram LEDFOG 101
From the front:
From the side:
As You can see the stock lamp is longer on one side than Osram. Toyota bracket set came with chrome (plastic) filler to compensate for that.
Here is the bracket problem - the inside one acting as a hook (original Fog lamp on the right, Osram bracket on the left)):
Fortunately it was easy to fix with bench grinder (the metal is very soft):
This is how the lamp looks like installed:
I would say it looks pretty decent. The last thing I had to modify was swapping wires in Fog lamp input to Osram control box. Yellow supposed to be +12V and black should be ground. The plug fits mechanically to 4Runner Fog light plug but polarity was reversed. It was very easy to swap contacts in the plug in in Osram cable (did not change original 4Runner plug).
When I had both lamps installed and wires were routed I had dilemma when to put the controller box. It had to be in the engine compartment. I found two threaded M8 holes on the side wall. The control box shape is so odd there was no way it could be installed on any wall. I didn't want to introduce any metal (rust) so I decided to print a bracket on 3D printer I have. I designed simple bracket which took almost 3 and half hours to print in ABS:
Two M8 bolts with oversized washer are used to bolt the bracket to the wall, four M5 bolts are holding the control box
I wasn't sure how much offset I should use for the M8 bolts so I printed holes on both ends with different offset. On the bottom the bracket had to clear thick bunch of wires (I don't want any vibration eating wires) and on the top it has to clear the air spring holding the hood.
Here is the bracket installed on the wall:
And finally the control box bolted to the bracket
When picture was taken all wires were not connected yet so they are a little bit of mess.
These are all pictures I have, it was late and dark when I finished it. Actually that was OK for setting up the aim of Fog lamps.
Now how good are these lamps: I would say DRL are very good - bright and blinding. It would be illegal to drive with them on at night. Fog lights is hard to tell. I wish they are not so fricken white - yellow LED would be much better solution. But it's winter time in Sacramento, so I'm sure we will have some fog to test my new lights.






 uke:
uke: