OSRAM LEDFOG101 to be installed in 2012 SR5

I don't know yet which way I will go. I have two options:

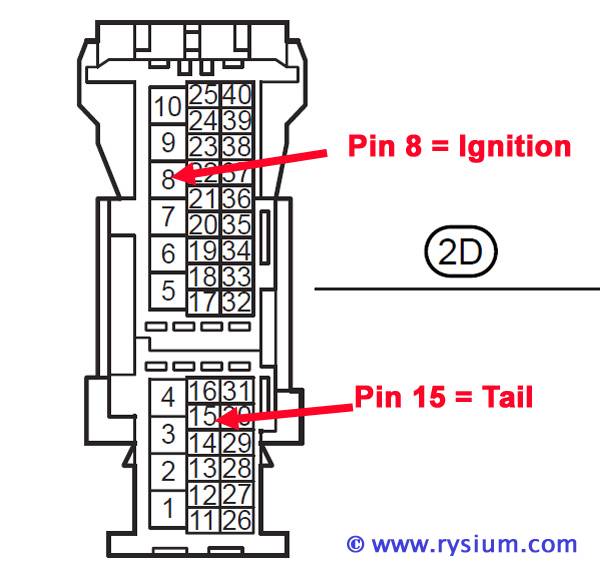
I picked up the first (simply) option. Because of the alarm unit there is enough mess here. I found empty pin on 2D plug which has illumination signal (+12V when markers are ON). So I will wire OSRAM unit "for the Europe".

The other small issue was that Fog Lamp brackets designed by OSRAM for Toyota don't fit 100% in place of original Fog lamps. The distance between two "hooks" was about 3mm to small to fit in opening for original "hooks". I used bench grinder to cut about 1.5mm on each side.

Now there is another stop - hot to mount the OSRAM controller/driver. This thing is bulky supposed to be zip-tied to something. I don;t like it at all, so on my 3D printer I'm printing now the mounting adapter that will allow me to mount the unit to the wall between the fuse box and the firewall. It will take almost 4 hours to print this thing in ABS, when it's done I will take some pictures tomorrow.
 
Finally project is finished. I almost did the "blinker thing" but I chickened out before splicing wires going from flasher. I hate splicing. And it is scary thing with new cars, where everything is electronic. And as all people know, all electronic devices are powered by the blue smoke - once the smoke is out, the device will stop working. So here are some pictures explaining what I did.

Because 2C plug is simple next to impossible to access I focused on the front plugs - 2D and 2F - these were accessible, kind off. The alarm installer put whole bunch of wires to 2F plug so I went for the lowest hanging fruit, plug 2D. This is how the front of ECU looked like when I took out panel trims:

4Runner-2D-mess.jpg


The black box to the right with whole bunch of wires coming out is the alarm thing.

When I moved it away I could see 2D plug. This is how it looks like with pin 8 wire installed:

4Runner-2D-8-installed.jpg


Pin 8 is first column from the right, third from the top. Later I installed pin 15 in the same plug (on the picture above you can see it is empty).

This is the schematic of the plug 2D (It is mirror image of what I see on my pictures)

4Runner-2D-15.jpg


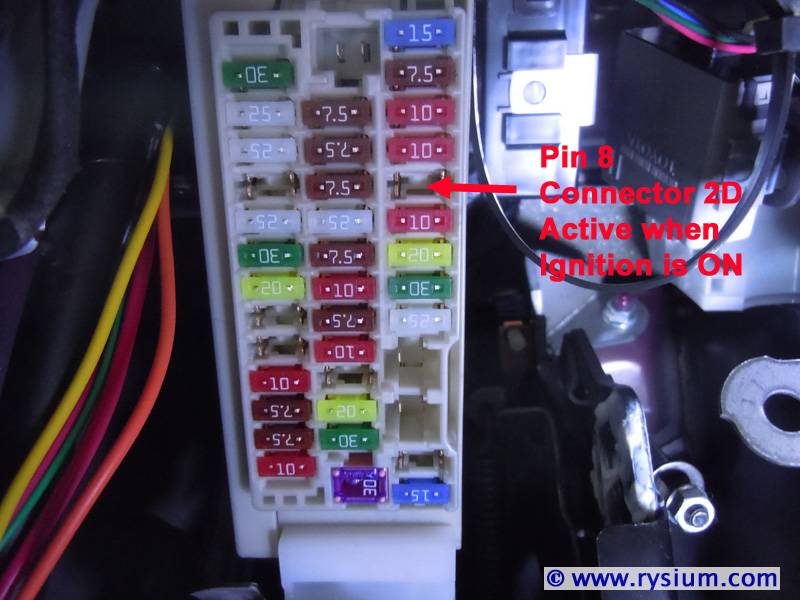
An this is the location of the fuse for pin 2D 8

4Runner-2D-8.jpg


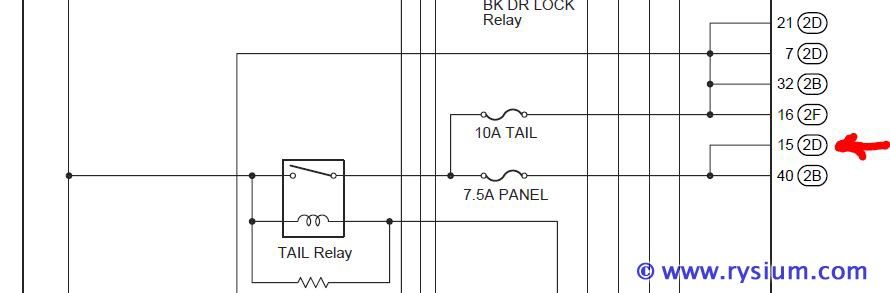
On electrical diagram "RELAY LOCATIONS (Driver Side J_B Assembly Inner Circuit) (2010 4Runner)" both pins are shown confirming my observations:

4Runner-2D-8-fuse.jpg


4Runner-2D-15-fuse.jpg


As I wrote before, the Toyota installation bracket was not exactly the same as original factory Fog lamp. Very close but not 100% plug and play. Here is the comparison between stock fog lamp and Osram LEDFOG 101

From the front:

4Runner-Osram-vs-stock-01.jpg


From the side:

4Runner-Osram-vs-stock-02.jpg


As You can see the stock lamp is longer on one side than Osram. Toyota bracket set came with chrome (plastic) filler to compensate for that.

Here is the bracket problem - the inside one acting as a hook (original Fog lamp on the right, Osram bracket on the left)):

4Runner-Osram-vs-stock-03.jpg


Fortunately it was easy to fix with bench grinder (the metal is very soft):

4Runner-Osram-vs-stock-04.jpg


This is how the lamp looks like installed:

4Runner-Osram-installed-01.jpg


I would say it looks pretty decent. The last thing I had to modify was swapping wires in Fog lamp input to Osram control box. Yellow supposed to be +12V and black should be ground. The plug fits mechanically to 4Runner Fog light plug but polarity was reversed. It was very easy to swap contacts in the plug in in Osram cable (did not change original 4Runner plug).

When I had both lamps installed and wires were routed I had dilemma when to put the controller box. It had to be in the engine compartment. I found two threaded M8 holes on the side wall. The control box shape is so odd there was no way it could be installed on any wall. I didn't want to introduce any metal (rust) so I decided to print a bracket on 3D printer I have. I designed simple bracket which took almost 3 and half hours to print in ABS:

4Runner-Bracket-01.jpg


Two M8 bolts with oversized washer are used to bolt the bracket to the wall, four M5 bolts are holding the control box

4Runner-Bracket-02.jpg


I wasn't sure how much offset I should use for the M8 bolts so I printed holes on both ends with different offset. On the bottom the bracket had to clear thick bunch of wires (I don't want any vibration eating wires) and on the top it has to clear the air spring holding the hood.

4Runner-Bracket-03.jpg


Here is the bracket installed on the wall:

4Runner-Bracket-04.jpg


And finally the control box bolted to the bracket

4Runner-Bracket-05.jpg


When picture was taken all wires were not connected yet so they are a little bit of mess.

These are all pictures I have, it was late and dark when I finished it. Actually that was OK for setting up the aim of Fog lamps.

Now how good are these lamps: I would say DRL are very good - bright and blinding. It would be illegal to drive with them on at night. Fog lights is hard to tell. I wish they are not so fricken white - yellow LED would be much better solution. But it's winter time in Sacramento, so I'm sure we will have some fog to test my new lights.

 
Last edited:
Not the best pictures to show, as it is difficult to take a picture of LED lamp showing how it really looks in real life. Sensors in digital cameras see the world a little bit different than human eye.

Anyway taken yesterday comparison on the wall with Fog lights OFF

4Runner-Osram-installed-02.jpg


and ON


4Runner-Osram-installed-03.jpg


I really don't like the color of LED fog light - it is not as blue as it shows on the picture but for sure is less yellow than the halogen headlights.

Now for the DRL I like them very much. Picture taken this morning (it is a bit blurry but gives the idea) with just LED DRL ON

4Runner-Osram-installed-04.jpg
.

They are very visible almost kind of blinding which is the whole idea of DRL.

Because I did not disconnect pin 5 from the flasher so the truck has all different comninations of DRL available based on the switch (stick) position

1. OFF - Only LED DRL are ON
2. DRL - Front blinkers (factory DRL) and LED DRL are ON
3. Tail - Only front blinkers (factory DRL) and markers are ON
4. Head - Headlights and markers are ON

I king of like the idea :boink:
 
thats a whole lotta work for a plug n play kit...

No more than for example you would have to install Toyota Accessory "LED Fog Light & DRL 2in1" (Part Number: 00016-48011) which was designed for 2015 models. I read the original installation manual for 00016-48011 and I would also spend as much time installing it as I did with Osram kit (probably minus grinding brackets). Original instruction for this accessory has 38 steps which some include "Install a black T-Tap to connector" (after my dead body) and "Using a 14” wire tie, secure the driver box to factory harness, left of the steering wheel column" (the same ugly thing what was done by alarm installer).

No sir, this is not my style. Such installation may look good in Ford but not in Toyota where every line, wire, pipe and hose is routed and secured by factory like it is a space shuttle not a car.
 
this seems like a ton of work, is the light worth it?

If you don't care about DRL I wouldn't recommend it. I think the factory halogen fog lights are better than any LED Fog lamps.

If you don't have DRL but local regulations require you to use DRL or headlights, than adding LED DRL is much better option than using headlights. When you use headlights during the day in 4Runner, the dash and radio goes into "night mode" (very dim). I can't see the radio or any displays during the day when lights are on. At least in Mazda 5 I had the option to override the dash to full intensity when the lights were on. 4Runner does not have that function. At least not in 2012 SR5 model.

My goal was to make 4Runner "legal" in Europe, so for me it was worth the trouble. If for whatever reason anyone wants to replace the stock fog lamps with LED DRL/Fog lamps (Toyota accessory or aftermarket), expect some work to be done - it will never be simple plug and play. Plug and play maybe only for replacing halogen bulb with LED bulb (sometimes).

I just don't understand why everybody is making high color temperature LED lamps for Fog. It should be 3000K or maybe even yellow LED for better fog penetration. Remember the big difference between DRL and Fog lights: DRL function is to be seen, Fog function is to make lighted objects visible. High color temperature is good for DRL but not for Fog.
 
Last edited:
Before I shut up for good the last piece of information. I checked how OSRAM Fogs work as "turn lights" (one fog lamp turns on when the signal is turned on). Absolutely useless !!! :puke:

Osram fog light is aimed to far (doesn't light up the area near the bumper) and it has limited lighting effect to the side of the truck (there is a visible cut-off at about 30 degree to each side).

92 Merkury Sable I used to have 18 years ago with the bumper mounted halogen lamps did much better job than "Hi Tech Osram". I'm glad I did not splice flasher wires - it would create additional mess for no particular reason.

That's all folks. I close the subjects and enjoy my new DRL. Of course if anyone has question I will be happy to answer as much as I can. :closed_2:
 
When you use headlights during the day in 4Runner, the dash and radio goes into "might mode" (very dim). I can't see the radio or any displays during the day when lights are on. At least in Mazda 5 I had the option to override the dash to full intensity when the lights were on. 4Runner does not have that function. At least not in 2012 SR5 model.

I'm not sure if you're aware as it is pretty easy to miss but if you rotate the dimmer switch up to maximum brightness and then push just a bit more it will click over a detent. This switches the instrument cluster to the full brightness setting that you get with the tail lights off. The radio is still hard to see but at least the important stuff is visible.
 
I'm not sure if you're aware as it is pretty easy to miss but if you rotate the dimmer switch up to maximum brightness and then push just a bit more it will click over a detent. This switches the instrument cluster to the full brightness setting that you get with the tail lights off. The radio is still hard to see but at least the important stuff is visible.

When I drove this 4Runner for the first time I thought the same as some cars do that (In Mazda 5 pushing the dimmer knob turned the "override ON"). But in my 4Runner if I move the wheel all way up it I will click only when it breaks and still will not do the override. So either the dimmer wheel is broken (no click no override) or my 2012 SR5 does not have the dimmer override.
 
I close the subjects and enjoy my new DRL.

Sorry, one more thing I forgot. In Osram Kit they included one blank plug (without wires) that is matching original Fog Light connector. The instruction did not say what was that for. Spare?

Yesterday I realized that this was probably used for protecting contacts in the original passenger side fog light connector. One original left fog light connector is plugged into the Osram wire going to the box (for turning on and off LED fog lights) but the right original fog light plug is not connected to anything. So to protect contacts in this plug this blank plug can be used.

So this way the solution with installing OSRAM LEDFOG101 is 100% reversible. At any time I can remove LED Fog lights and reconnect the original halogen fog lights. Just in case OSRAM breaks, I decide I don't like them anymore or I want to sell the truck in the original condition.
 
I just don't understand why everybody is making high color temperature LED lamps for Fog. It should be 3000K or maybe even yellow LED for better fog penetration.

I encountered a little bit of patchy fog on my drive this evening. Nothing serious but I turned on fog lights just to see it they make any difference. I was surprised that they really do. So I guess the whole concept of the fog lights it is not about the power but location and projection pattern. Now can't wait to see some real fog.
 
Question About Flasher Relay

I found flasher just in front of ECU. It is stand alone flasher, not embedded inside ECU. It has plug with all wires accessible. It will be easy task to disconnect DRL wire.

4runner-fogdrl-09.jpg


I also confirmed that Fog Light relay is inside ECU, so either I can plug my FOG connector to one of the connectors near the lamp or go inside the cabin for ECU contact. I am not sure yet.

Now I noticed I have a knee airbag. I guess I will have to disconnect the power from the battery before taking out the lower dash trim, correct?

Does anyone know if this flasher unit can be replaced by the VLED CF18 unit? URL: CF18 ADJUSTABLE FLASHER 8 PIN - Flashers - Shop Products

I have a 2012 Limited and want to use LED bulbs and many have stated this flasher is embedded in this ECU, but apparently not. Seems the have the same part number as what the VLED unit replaces. Just wanting to confirm.
 
Does anyone know if this flasher unit can be replaced by the VLED CF18 unit? URL: CF18 ADJUSTABLE FLASHER 8 PIN - Flashers - Shop Products

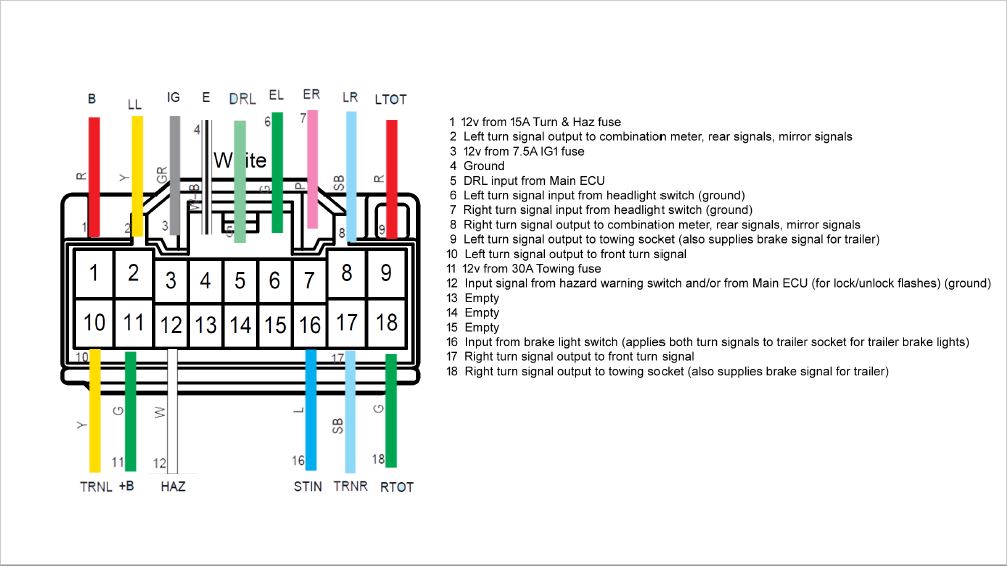
No, it is not compatible. 2012 4R flasher is 18 pins connector with 15 pins used. The connections are:

1 12v from 15A Turn & Haz fuse
2 Left turn signal output to combination meter, rear signals, mirror signals
3 12v from 7.5A IG1 fuse
4 Ground
5 DRL input from Main ECU
6 Left turn signal input from headlight switch (ground)
7 Right turn signal input from headlight switch (ground)
8 Right turn signal output to combination meter, rear signals, mirror signals
9 Left turn signal output to towing socket (also supplies brake signal for trailer)
10 Left turn signal output to front turn signal
11 12v from 30A Towing fuse
12 Input signal from hazard warning switch and/or from Main ECU (for lock/unlock flashes) (ground)
13 Empty
14 Empty
15 Empty
16 Input from brake light switch (applies both turn signals to trailer socket for trailer brake lights)
17 Right turn signal output to front turn signal
18 Right turn signal output to towing socket (also supplies brake signal for trailer)


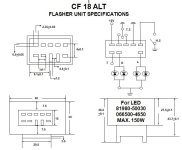
The flasher you linked to is for earlier models (not 5th gen) with less functionality (DRL, trailer etc.) hard to find more info about CF18 but my guess this flasher (8pins) is for this diagram:
 

Attachments

  • CF18-08.jpg
    CF18-08.jpg
    44.3 KB · Views: 1,170
Alright thanks, looks like resistors is the only option for LEDs. These trucks are a lot more ECU controlled than I thought.
 
Last edited:
Ha, it took me over 6 years to get rid of factory DRL :roll: Truck is happy in Poland and jest besides oil change did not require any work. However Polish politicians have nothing better to do than messing with traffic law and vehicle inspections standards :puke:

Last year at the annual inspection the guy told me that next time he will fail me if I don't fix the weird behavior of front turn signals. That strange behavior is the original DRL functionality - apparently DRL is active when position lights are turned on (without headlights on). I have installed switching led in front markers so they show white color when position lights are on but blinking orange together with front turn signals. Because of that the factory DRL is also messing with my front corner lights making them orange (that is illegal in Poland).

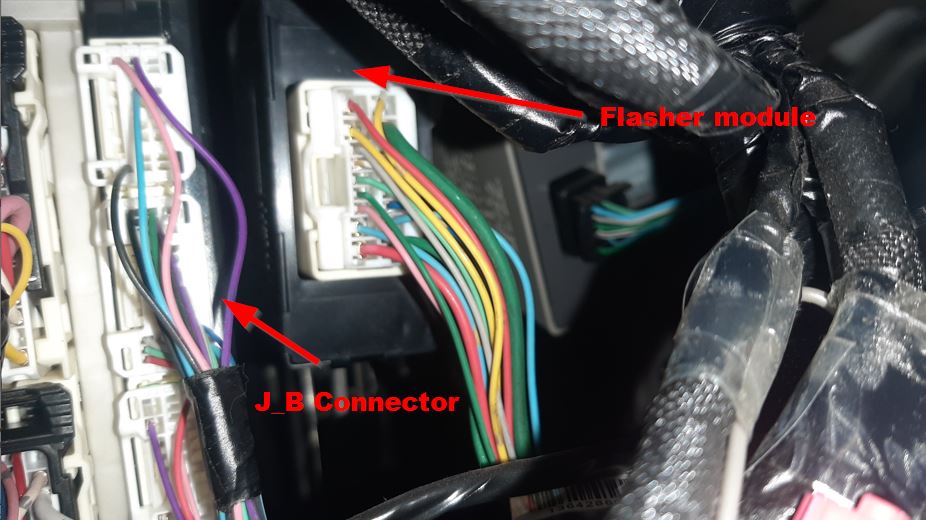
After some reading I finally decided to "cut the wire". I located turn signal flasher under the instrument panel to the right of J_B Connector

4Runner-Flasher-01.jpg


The plug wiring is as follow - look at the connector from the front side (not from the wires side)

4Runner-Flasher-02.jpg


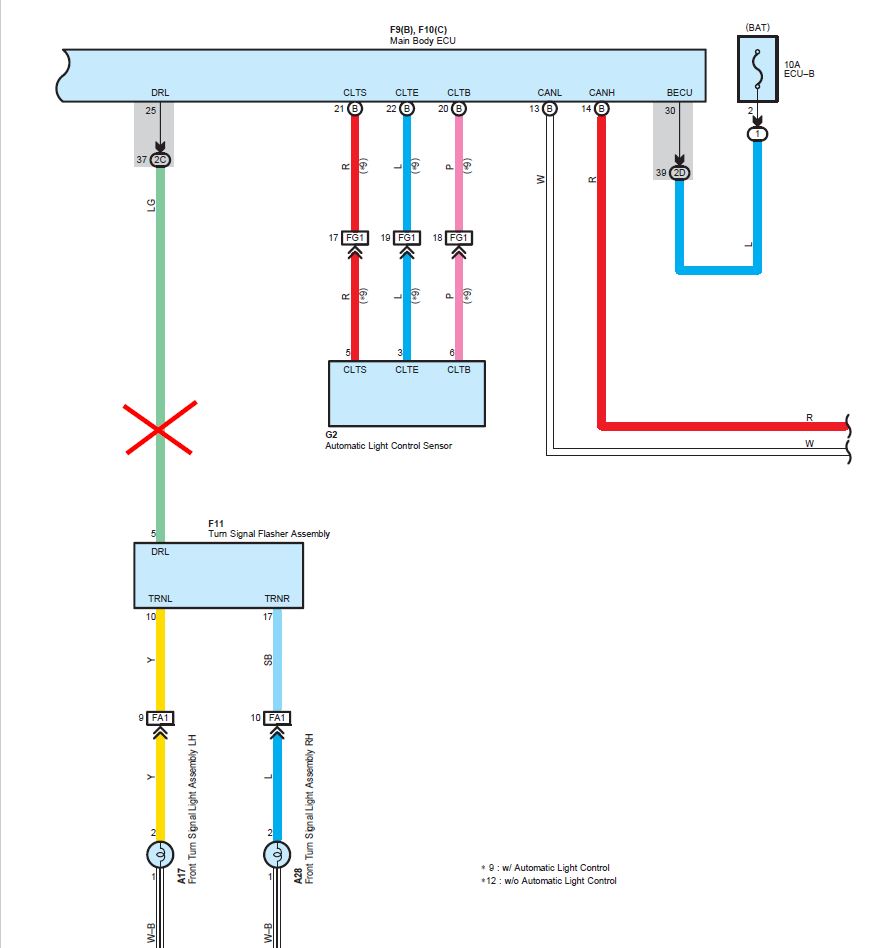
The logic in the flasher is that when contact 5 is pulled to the ground then DRL is activated meaning front turn signal will be steady on. That signal is controlled by Main Body ECU which has it's own convoluted logic when DRL is on (based on the switch light position, parking brake, gear selection and who knows what else). To disable DRL it is enough just to cut the "light green" wire going to pin 5

4Runner-Flasher-03.jpg


I don't like cutting wires, so I de-pined the plug from position 5 and wrapped the pin in a heat shrink.

While I was already inside I decided to fix the trailer blinkers. 4Runner has US standard where trailer turn signals are red and act as a brake lights too (like old US cars). That is not going to fly in Poland - trailer has its own stop light (red) and turn signals (orange).

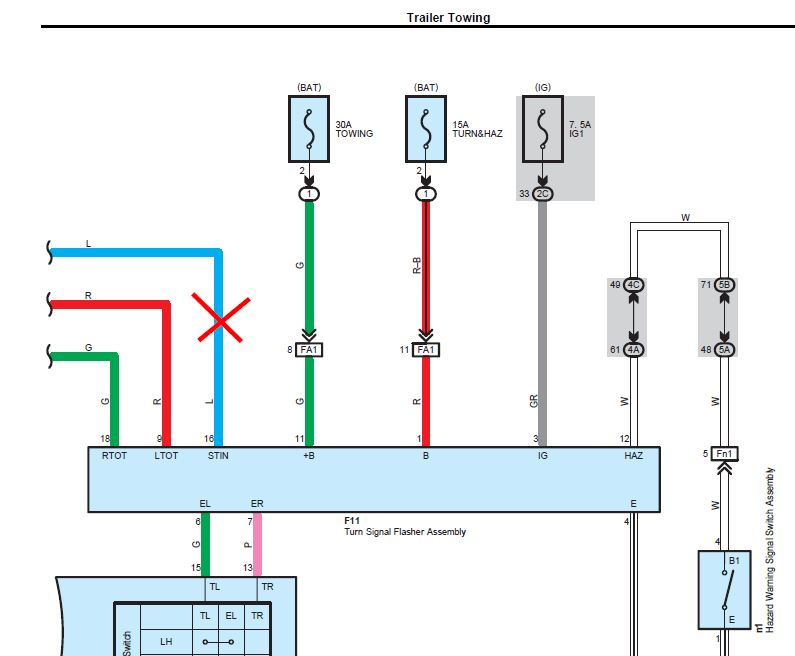
Trailer's "Stop in Blinkers" functionality is activated when pin 16 receives 12V. If pin 16 is open, trailer turn signals work like they should in Europe. To disable the "Stop in Blinkers" functionality in trailer's turn signal it is enough just to cut the blue wire going to pin 16.

4Runner-Flasher-04.jpg


So I de-pinned position 16 in the flasher's connector and put a heat shrink tube over that pin.

All tested fine, no more "weird" front turn signal behavior. By the way these Osram LEDFOG101 still work flawlessly.:clap2:
 

Members online

Forum statistics

Threads
278,316
Messages
3,554,111
Members
248,016
Latest member
Advally Service

Trending content

Back
Top