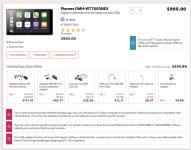
Pioneer 9" DMH-WT7600NEX Floating Display Installed: First Impressions w/OEM Audio+

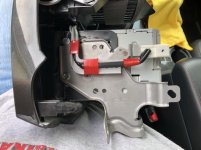
You can reuse your OEM metal brackets/hardware with the Metra kit. First, you'll have to drill out the alignment nibs so they sit flush with the plastic Metra brackets (you still use these to mount the dash kit to the head unit), but that should leave you with enough holes lined up with the threaded DIN mounting points on the Pioneer to screw/bolt the whole assembly together.


Do you even need to mount it to the Metra dash kit? I just mounted it with just the OEM brackets to the dash and it seems to be just fine. The only drawback to that I can think of is if I want to remove the dash kit I have to take the display off the unit first. Anything else I’m missing?
 
Do you even need to mount it to the Metra dash kit? I just mounted it with just the OEM brackets to the dash and it seems to be just fine. The only drawback to that I can think of is if I want to remove the dash kit I have to take the display off the unit first. Anything else I’m missing?

Not entirely necessary. My reason was for the ability to install/remove the whole assembly as a single unit, like OEM.
 
Man, this looks nice. Does the unit have a tilt option like some of the other Pioneers have to help with sun glare on the screen?

I have the NEX8400 and love it, but wouldn't mind the bigger screen, lol.
 
Just wondering, is it choppy or sluggish? One random review from Beat Buy said it was. Couldn’t find any other reviews, really.
 
anymore feedback on this unit? im looking to purchase one. anyone else got this?

this is the kit from crutchfield..might swap the gray kit with the black one
 

Attachments

  • Capture.jpg
    Capture.jpg
    96.3 KB · Views: 2,759
Last edited:
Does the screen dim well for night time driving? I know that was some of the complaints with the Alpine.

While do not have this unit in my 4R, I do have the 10.1” in my Tundra. I don’t have any glare issues while driving in the dark. Admittedly tho I do run mine exclusively in CarPlay with dark mode enabled.

Just wondering, is it choppy or sluggish? One random review from Beat Buy said it was. Couldn’t find any other reviews, really.

I have the 10.1” unit in my Tundra, and feel it is not choppy or sluggish at all, especially considering its operating wirelessly with my phone. No, it’s not as responsive as my iPhone 11 or my IPad Pro, but it operates better than any other factory touch screen I’ve used (including the one in my 2020 Pro 4R). Again, mine immediately auto connects to my phone via CarPlay, so if using the Pioneer interface or android auto with some other phone, it may operate differently.

I also have to chime in some more with how surprisingly nice it is to not have to plug / unplug my phone in every time I drive somewhere.

This unit also made a HUGE improvement in the quality of the audio. The stock “premium” JBL head unit (on the Tundra anyhow) produces a truly awful and pitiful source signal.
 
Last edited:
While do not have this unit in my 4R, I do have the 10.1” in my Tundra. I don’t have any glare issues while driving in the dark. Admittedly tho I do run mine exclusively in CarPlay with dark mode enabled.


I have the 10.1” unit in my Tundra, and feel it is not choppy or sluggish at all, especially considering its operating wirelessly with my phone. No, it’s not as responsive as my iPhone 11 or my IPad Pro, but it operates better than any other factory touch screen I’ve used (including the one in my 2020 Pro 4R). Again, mine immediately auto connects to my phone via CarPlay, so if using the Pioneer interface or android auto with some other phone, it may operate differently.

I also have to chime in some more with how surprisingly nice it is to not have to plug / unplug my phone in every time I drive somewhere.

This unit also made a HUGE improvement in the quality of the audio. The stock “premium” JBL head unit (on the Tundra anyhow) produces a truly awful and pitiful source signal.
Did you install with he GPS module. Not sure if thats used with carplay/android auto or is it for xm radio.

Sent from my ONEPLUS A6013 using Tapatalk
 
You can reuse your OEM metal brackets/hardware with the Metra kit. First, you'll have to drill out the alignment nibs so they sit flush with the plastic Metra brackets (you still use these to mount the dash kit to the head unit), but that should leave you with enough holes lined up with the threaded DIN mounting points on the Pioneer to screw/bolt the whole assembly together.
Trying to picture how to do tbis...couldnt i just take the plastic metra bracket off and reuse the metal bracket with less screws? Im sure it would be secure. Just finished my install..needs to be tweaked a bit. I think i can go one notch lower on the display. Think OP is a tad lower on his screen than mine.

Also need to get new yellow clips..mine wore out during install... Lots of trial and error
9553897699fdf6f48f4d86edbc1a7568.jpg


Sent from my ONEPLUS A6013 using Tapatalk
 
Looks great...can you comment on how much of the vents are covered in that position? Curious if a 10” would work and it appears to fit right in the space between the vent and lower controls.
I can drop it maybe quarter of an inch lower. If you look at OP post and compare mine i think his is at the lowest. The way i have it i can still feel a good amount of air blowing. I also see the "nubs" on the underside of the OEM bracket. I will attempt to reuse it for more stuffness

Sent from my ONEPLUS A6013 using Tapatalk
 
Looks like the 9" is max display and the original poster pic shows it even with the bottom of the vents. Looks much better than the Alpine unit.


Can you take a few pics of the OEM bracket modifications when you do them? Not really clear on this...do yo find your current install is stable?
Yea i can take photos. Its stable but if i were to forcfully pull it out i can get it off from the metra kit. only thing holding it is plastic clips

Sent from my ONEPLUS A6013 using Tapatalk
 
Here's a pic of the OEM brackets used in conjunction with the plastic Metra ones. You may need to drill out or grind down some alignment nibs so they sit flush. I decided to use both together because I wanted to keep the ability to reinstall/remove as a single assembly like OEM. I have a standard double DIN and don't have any direct experience with the newer floating style head units, but it looks to me like the best course of action may be to install the chassis first reusing the OEM brackets and skipping the metra ones all together, install the trim piece over the chassis, then mount the floating display last.
 

Attachments

  • IMG_2150 2.jpg
    IMG_2150 2.jpg
    58.8 KB · Views: 2,640
Here's a pic of the OEM brackets used in conjunction with the plastic Metra ones. You may need to drill out or grind down some alignment nibs so they sit flush. I decided to use both together because I wanted to keep the ability to reinstall/remove as a single assembly like OEM. I have a standard double DIN and don't have any direct experience with the newer floating style head units, but it looks to me like the best course of action may be to install the chassis first reusing the OEM brackets and skipping the metra ones all together, install the trim piece over the chassis, then mount the floating display last.
Awesomene ill be doing this as well

Sent from my ONEPLUS A6013 using Tapatalk
 
This is Pioneer's competitor to the Halo 9.

Pioneer Link

Unboxing video


If you're interested in vids or something specific (like Gaia), just message me on IG @bookstorerunner and I'll see what I can do. Don't message me here as I won't see it.

This won't be an install thread as there are many like it and it's very straight forward if you've done this before. Maestro's supplied harness and wiring diagram makes it pretty easy. Although I will note: when you are installing it, there are two plugs that are keyed and only go one way that plug into the OEM+ speaker and sub harness instead of the stock harness (they will hang loosely and are unused).

Last week I got my hands on the just released Pioneer 9" DMH-WT7600NEX as well as a Maestro RR to retain steering wheel controls.

I installed this on 2019 TRD ORP, with OEM Audio+ Reference 500 and fully soundproofed doors and floorboard with Noico 80mil.

I bought it off Crutchfield due to the generous return policy (60 day). It arrived on a Monday and I had it installed by the following Wednesday.

Since there was no pre-assembled "kit", I pieced together everything separately.


Total cost for the above items came out to USD $1337.66. Labor was free as I did it myself.

I used this Halo9 install video for the interior: link

I bought additional items like an antenna usb adapter but ultimately did not use them. I never listen to FM or Sirius radio and the usb adapter didn't plug into my usb port on the bottom.

If you are an OEM+ user like me, depending on when you bought it, you may have to flash the amp/signal processor under the seat - I've yet to do this as they are sending me a dongle that I am yet to receive. While I've adjusted the EQ and speaker settings to my taste, I still want to have this done.

Pictures of it installed:
IMG_2522.JPG


OBD Readout
IMG_2521.JPG


Pros
  • 720P, looks very sharp compared to the stock unit.
  • style and thin bezel, compare this to images to of the Halo9 and it blows it away in my opinion
  • Size ;). 9" fills the gap very nicely, however there is certainly room for the 10" model
  • Carplay is nice and works as it should (I have Gaia installed but have yet to actually use it on a trip)
  • EQ adjustability, stock left a lot to be desired and this fills the gap
  • Came with a screen protector already installed
  • Multiple adjustment points to get the angle you want
  • Wireless Carplay is nice, but I still prefer to plug in my phone
  • Gauges are interchangeable and display loads of diagnostic information (can't find trans temp however)
  • It's fast and responsive, startup time is comparable to stock, buttons do what I tell it
  • Not flimsy and doesn't feel cheap, feels like quality


Cons
  • Stock low-res rear view camera is immediately made apparent, this is not a knock on the receiver, but because it's so sharp (relatively speaking), the rear view camera looks pretty bad. I'll look into upgrading this when I replace my rear bumper
  • The larger screen means you can't be heavy handed when inserting your key, I jumped in the car quickly and my key hit the screen (lightly, no scratch left), but something to be aware of.
  • The USB adapter to retain the stock USB port does not appear to work on my model 4runner and appears to work for early model 5th gen's, someone can please correct me if I'm wrong and direct me to the correct part # and I will correct this. For now I just ran the USB and 3.5m jack in the original USB port's place (I took it out and it's two wires hanging out there)
  • At night, you can turn off the screen and still play music, however the touch sensitive buttons on the left side are still illuminated, it's a pleasing glow, but I would like the ability to turn all the illumination off
  • Pioneer CarAVAssist iOS app does not appear to work properly and does not want to sync with my receiver, this is minor and I don't use the factory interface as I use Carplay, but still, I'd like this option to be there. This will be used in the future to update the firmware of my receiver, so I'd like to get this to work sooner rather than later. I'll look into this further as I suspect it's user error. However after working in the UI/UX software design field over 8 years, this should be easier.
  • Not a knock on the receiver, but I am skeptical of the Metra kit's attachment point, especially when off road and things bouncing around. Next time I'm back there I'll try to remember to get a shot of it

I've only had it a week and probably have clocked a grand total of 4-5 hours of drive time with (if that), so I'll be sure to update this thread with additional photos and long term impressions, especially with extended trips as things heat up in summer and as I venture off-road with it.

Anyways, hope this was helpful for anyone looking into this.

Looks bomber
 
Did the factory 4R XM antenna/tuner work with this HU or will it require the standalone add-on?
The price-point on this one is definitely more enticing than the Halo.
 
For those using Crutchfield....did anyone use their harness service and did it include wiring all the Maestro?

Also....how did you wire the parking brake?...or does this unit still have the bypass feature in the software (touch screen to turn off)?


Just purchased via Crutchfield and opted not to have them do the wiring. Why make this easy! [emoji23]

Will try to post pics of the install after the weekend.


Sent from my iPhone using Tapatalk
 

Members online

No members online now.

Forum statistics

Threads
278,316
Messages
3,554,124
Members
248,016
Latest member
Advally Service

Trending content

Back
Top