Rear Lower Control Arm Bushing Replacement

Had 1 1/2 hours between meetings today and I decided to start this job, hoping to get at least one arm out. I just made it as it involved quite a bit of finagling to get the bolts straight out. The video was indeed quite helpful. Thanks Tim.

Emboldened, I assembled my 20-ton press from the move 4+ years ago and figured I'd try to remove a bushing after dinner...

No dice as of yet. Darn thing wouldn't budge. I didn't try heat though as I couldn't find my torch, so I imagine that makes a difference alright.


Also know they are directional and have an arrow stamped on them showing which way to drive them out. Also as [MENTION=120071]mtbtim[/MENTION] stated, if you do one side at a time, no straps are needed. -J
 
Last edited:
Also know they are directional and have an arrow stamped on them showing which way to drive them out. Also as [MENTION=120071]mtbtim[/MENTION] stated, if you do one side at a time, no straps are needed. -J

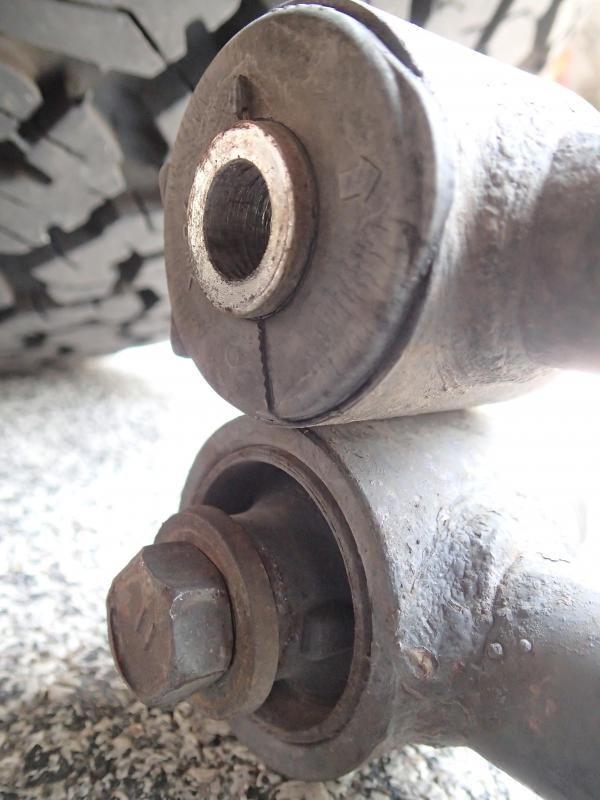
Are you sure about that arrow? I never noticed it. If there is an arrow, maybe it's meaning is for something else entirely. The bushing is just a smooth sleeve with no lip and a consistent diameter. It could be driven in or removed either direction. I'm confident you can press these bushings out either direction. If you are right and they are directional, I must be really lucky because I've done 3 sets of rear lower control arms now without checking for the arrow showing me the direction to press them out.

The ratchet strap did help us get the bolts out and back in.
 
Just went down to the garage, and while the arm in the press is not exactly clean, I looked pretty carefully and I didn't see an arrow.

The drive sleeve I'm using is 44 mm. Tight fit. I found my torch. Will use propane tomorrow
 
Also know they are directional and have an arrow stamped on them showing which way to drive them out.

Are you sure about that arrow?

Wonder if he's talking about the earlier 3rd gen's bushings rather than the newer sleeved version:

My 96's captive bushings (top) compared to the '02's sleeved version (bottom):
80-p7263976_zps87516f58_a53d7ae4ac26e1ae6e2077efcb7b04b7760e782c.jpg
 
Wonder if he's talking about the earlier 3rd gen's bushings rather than the newer sleeved version:

My 96's captive bushings (top) compared to the '02's sleeved version (bottom):
80-p7263976_zps87516f58_a53d7ae4ac26e1ae6e2077efcb7b04b7760e782c.jpg

The top pic looks like my rear uppers and bottom pic looks like my rear lowers on my 98. The uppers just require you to cut off some the bushing lip on each side so you can support the bushing with a sleeve on the bottom and use a socket on the top to drive the bushing through the sleeve. The upper don't have a metal sleeve so they are easier to get out.

Here's the video for the uppers:

<iframe width="560" height="315" src="https://www.youtube.com/embed/IvBid-kIdiI" frameborder="0" allow="autoplay; encrypted-media" allowfullscreen></iframe>
 
The top pic looks like my rear uppers and bottom pic looks like my rear lowers on my 98.
That is definitely the rear lower control arm off an early 3rd gen, and not the upper dogbone. It's firsthand info- I took the picture as a comparison tool in my build thread.

I imagine you'd treat bushing removal similarly to the upper, I was just showing the possible disparity between arrow and no arrow. He could mean another arrow entirely.
 
Last edited:
The top pic looks like my rear uppers and bottom pic looks like my rear lowers on my 98.
That is definitely the rear lower control arm off an early 3rd gen, and not the upper dogbone. It's firsthand info- I took the picture as a comparison tool in my build thread.

I imagine you'd treat bushing removal similarly to the upper, I was just showing the possible disparity between arrow and no arrow. He could mean another arrow entirely.

Gotcha. Thanks for sharing.
 
What about Steve's (Sonoran Steel) rear UCA replacement bushings? anyone has feedback on those?


Their website is currently being updated so no links, but i remember seeing them in his site. Red polyurethane ones.
 
Just went down to the garage, and while the arm in the press is not exactly clean, I looked pretty carefully and I didn't see an arrow.

The drive sleeve I'm using is 44 mm. Tight fit. I found my torch. Will use propane tomorrow


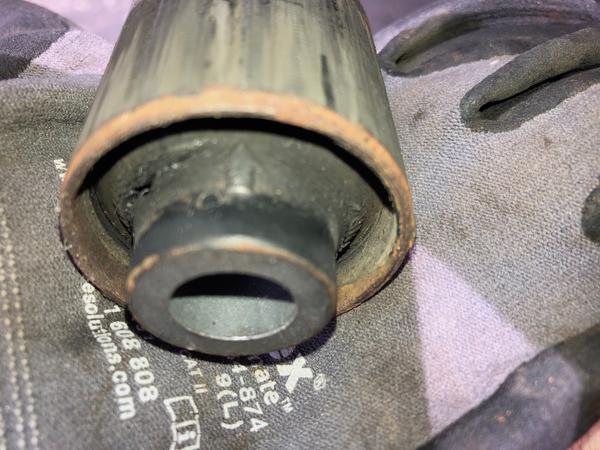
There is a little arrow on the inside of the "captive" rubber bushing in a metal sleeve, did 3- T4Rs and 2 had little arrows on bushings while the 3rd had non-sleeved bushings.

On the 1st rear trailing/control arm I didn't see the tiny arrow and pressed it out in the opposite direction. It's smaller than the one pictured. There was a lot of resistance and it would skip while pressing it thru. On the other arms I pressed in the direction of of the arrow and the bushings smoothly pressed out. I think one side of the metal housed bushing has a little lip hence the skipping. It's sort of like pushing the pin thru on a bike chain that has a unidirectional pin.
 
Last edited:
Wonder if he's talking about the earlier 3rd gen's bushings rather than the newer sleeved version:

My 96's captive bushings (top) compared to the '02's sleeved version (bottom):
80-p7263976_zps87516f58_a53d7ae4ac26e1ae6e2077efcb7b04b7760e782c.jpg

Nope, not talking about the upper earlier, non-sleeved bushing. The bottom pic, the tiny arrow is on the middle rubber coated sleeve (it's about a 1/4 of the sized arrow or smaller as top arm).

The arrow points from where the rubber mold dips to bolt side- hold arm straight away from you where you can only see one end of rod-like looking straight at the back of the truck. It'll point towards bolt.

You won't see it if you hold the arm and have both bushings in view-like looking from the side of the truck.

Great pics by the way.
 
Last edited:
Nope, not talking about the upper earlier, non-sleeved bushing. The bottom pic, the tiny arrow is on the middle rubber coated sleeve (it's about a 1/4 of the sized arrow or smaller as top arm).

The arrow points from where the rubber mold dips to bolt side- hold arm straight away from you where you can only see one end of rod-like looking straight at the back of the truck. It'll point towards bolt.

You won't see it if you hold the arm and have both bushings in view-like looking from the side of the truck.

Great pics by the way.

I can confirm that directional arrow.

tonyb66-albums-maintenance-related-picture51436-img-5002.jpg


That said, like Tim, I got them out, all four, not knowing such existed. HEAT, unlike other bushing jobs I've done really makes a difference here. I applied heat while cranking down, and it obvious that it helps.

My press made a loud "bang" on my first attempt this morning. Pretty dang startling. After several years, I should have checked the hydraulic fluid. Did a bleed, and worked like a champ.

I'll install the new bushings later today after I set some tile and do some clean-up on the arms...

[MENTION=120071]mtbtim[/MENTION] or anyone else, any reason to not remove the upper arms now? I have those new bushings also, and sway bar bushings (front & rear) coming today, supposedly...
 
Last edited:
I can confirm that directional arrow.

tonyb66-albums-maintenance-related-picture51436-img-5002.jpg


That said, like Tim, I got them out, all four, not knowing such existed. HEAT, unlike other bushing jobs I've done really makes a difference here. I applied heat while cranking down, and it obvious that it helps.

My press made a loud "bang" on my first attempt this morning. Pretty dang startling. After several years, I should have checked the hydraulic fluid. Did a bleed, and worked like a champ.

I'll install the new bushings later today after I set some tile and do some clean-up on the arms...

[MENTION=120071]mtbtim[/MENTION] or anyone else, any reason to not remove the upper arms now? I have those new bushings also, and sway bar bushings (front & rear) coming today, supposedly...

I don't think it's a good idea to have all the control arms disconnected at the same time. The rearend might shift on you more than you want making it hard to get the arms lined back up.
 
There is a little arrow on the inside of the "captive" rubber bushing in a metal sleeve, did 3- T4Rs and 2 had little arrows on bushings while the 3rd had non-sleeved bushings.

On the 1st rear trailing/control arm I didn't see the tiny arrow and pressed it out in the opposite direction. It's smaller than the one pictured. There was a lot of resistance and it would skip while pressing it thru. On the other arms I pressed in the direction of of the arrow and the bushings smoothly pressed out. I think one side of the metal housed bushing has a little lip hence the skipping. It's sort of like pushing the pin thru on a bike chain that has a unidirectional pin.

Very interesting. Like [MENTION=175921]TonyB66[/MENTION], I guess the heat allowed us to press them out any way we wanted without much resistance.

I never noticed a lip to either side of the bushing sleeve. It looked the same on both sides and that's why I determined it didn't matter which way it came out.
But, maybe I didn't look carefully enough. If I ever do this job again, I'll take a better look at the bushing sleeve before doing the press work.
 
I can confirm that directional arrow.

tonyb66-albums-maintenance-related-picture51436-img-5002.jpg


That said, like Tim, I got them out, all four, not knowing such existed. HEAT, unlike other bushing jobs I've done really makes a difference here. I applied heat while cranking down, and it obvious that it helps.

My press made a loud "bang" on my first attempt this morning. Pretty dang startling. After several years, I should have checked the hydraulic fluid. Did a bleed, and worked like a champ.

I'll install the new bushings later today after I set some tile and do some clean-up on the arms...

[MENTION=120071]mtbtim[/MENTION] or anyone else, any reason to not remove the upper arms now? I have those new bushings also, and sway bar bushings (front & rear) coming today, supposedly...


Try pressing them the other way to see if there is less skipping/"banging". I can't remember which way I pressed them out now. I didn't use any heat just the 20t press from Harbor Freight b/c I didn't want to possibly change the molecular strength of the metal (maybe it's an unfounded fear). :)
 
Last edited:
Try pressing them the other way to see if there is less skipping/"banging". I can't remember which way I pressed them out now. I didn't use any heat just the 20t press from Harbor Freight b/c I didn't want to possibly change the molecular strength of the metal (maybe it's an unfounded fear). :)

In regards to changing the strength of the metal by using heat, I've had this discussion with other experienced DIYers and mechanics, started a forum thread on the subject and did research online. It seems using moderate heat, not glowing hot, and also not quenching the metal, you're not going to affect the strength or brittleness of the metal. Using heat to help loosen stuck parts seems to be a well-accepted technique. I don't think people in the rust belts of the country would survive without this technique.
 
Nope, not talking about the upper earlier, non-sleeved bushing. The bottom pic, the tiny arrow is on the middle rubber coated sleeve (it's about a 1/4 of the sized arrow or smaller as top arm).

Believe it or not, those are both rear lower control arms off 3rd gen 4Runners. The top one is off my '96 and the bottom is off an '02. The upper control arm is, if you think about it, much smaller....

Thanks for clarifying and good eye! Now I'm wondering (I do this a lot about a lot of things) if the arrow is to show the way to drive them out- or in- or both?
 
Believe it or not, those are both rear lower control arms off 3rd gen 4Runners. The top one is off my '96 and the bottom is off an '02. The upper control arm is, if you think about it, much smaller....

Thanks for clarifying and good eye! Now I'm wondering (I do this a lot about a lot of things) if the arrow is to show the way to drive them out- or in- or both?


I should have been more specific when I referred to the the "upper" arm in the "picture" (not rear upper trailing/control arm)-sorry about that.

It's been awhile since I pressed them out and can't for the life of me remember which way to follow the arrow - in or out. But I do remember one way did make press out much smoother w/o the bang/skipping of the press.
 
Last edited:
I don't think it's a good idea to have all the control arms disconnected at the same time. The rearend might shift on you more than you want making it hard to get the arms lined back up.

Thanks Tim. That was my concern, so I'll take that as some confirmation to install the lower arms first, before removing the uppers...

Speaking of those, in that video it's noted to not lube the outside of the bushings, so it's more apt to be stationary in the arm. Should that also be the case with lower arm bushings too (no lube on the outside of the bushings that slide into the arms)?
 
Thanks Tim. That was my concern, so I'll take that as some confirmation to install the lower arms first, before removing the uppers...

Speaking of those, in that video it's noted to not lube the outside of the bushings, so it's more apt to be stationary in the arm. Should that also be the case with lower arm bushings too (no lube on the outside of the bushings that slide into the arms)?

Yeah, you're just suppose to lubricate the inner diameter for the sleeve. We didn't technically do it right in the lower arm video. Thanks for reminding me about that. I need to note that with a pinned comment.
 
I should have been more specific when I referred to the the "upper" arm in the "picture" (not rear upper trailing/control arm)-sorry about that.

It's been awhile since I pressed them out and can't for the life of me remember which way to follow the arrow - in or out. But I do remember one way did make press out much smoother w/o the bang/skipping of the press.

Reading skills, some days I haz them, some days not so much! :doh:
If I were to guess I'd ass*u*me the arrow was for install at the factory- but it doesn't mean I'm right.

removing the uppers...
You've probably already figured this- do those one at a time, to keep the axle mostly in place and make your life a little easier.
 

Members online

Forum statistics

Threads
278,310
Messages
3,554,077
Members
248,016
Latest member
Advally Service

Trending content

Back
Top