Rear Wheel Well Storage?

It’s not a ton of storage but more than you would think.

17012513518_78ff2723e4.jpg


17199667881_4d1721d56a.jpg


But be warned that over time the lid fit will become sloppier. Easily fixed with some Velcro.

17199819482_793639875e.jpg


17013937400_21fd87df92.jpg


There is also a decent amount of space inside the driver wheel well that can be got to forward of the tire jack. I use these spaces mostly for stuff that I hope I will never need but like having just in case.

16992812637_bbe7b4456b.jpg
 
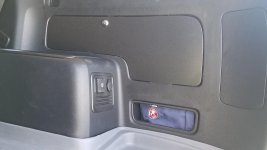
I have a LTD so my passenger side storage bin is out of the question because of the JBL amp. But do we know what the wires are in this shot?

Im thinking of cramming an air compressor in here and need a 12V constant or 12V acc on to tap into relatively close by.

Jango, did you ever find an air compressor that fit in there?
 
If it's a long heavy duty set probably not, but otherwise I bet you can. It will be a little awkward getting in and out though

Sent from my HTC6525LVW using Tapatalk

Thank you, I don't plan on needing them often but would just be a nice addition to have and not something floating around the rear cargo area!
 
I just did this last night to both sides. Yes I used the brut force method and I was abler to fit an emergency light and some rubber tie downs in one and on the passenger side I was able to put a small air compressor and a nylon tow rope. Cleaned up a lot back there.
 
Just wanted to throw in my $.02. You don't have to break the tabs. I have large hands and here's what I did. I opted to leave the screws out afterwards. If the tray boxes become sloppy over time, I'll cross that bridge when I come to it and figure something out.

Tools:

Bit driver (looks like a screwdriver but has a place to put a philips/torx/slotted/allen/etc. bit in it) $4.99 Harbor Freight

Bit driver flexible extension (has an end that fits in the bit driver and an end that receives the bit, is about 5-6" long, flexes past 90 degrees) $2.99 Harbor Freight and came with 6 bits

Pry tool (I used plastic bicycle tire mount/dismount "spoons") - $2.00/pair at a bike shop

Instructions:

Start with the rear left most corner on the DRIVER'S side "tray box" - pry until it pops a bit.

Continue this all the way around the outside (since the 2 screws are on the inner section)


DRIVER's side:

When you can satisfactorily pull it up enough to get your LEFT hand in there, put the flex attachment with a medium-sized philips bit in it in the box WITH your hand inside too and guide it until you feel the bit bite into the screw head. With your LEFT hand still holding the attachment onto the screw head, use your RIGHT hand to turn the screwdriver to unscrew the screw. Do this for both screws.

PASSENGER's side:

Follow all the same instructions for the previous side, except your RIGHT hand goes into the box to hold the bit on the screw and your LEFT hand turns the screwdriver.

That's all there is to it. No breaking tabs. I'm in Southern California (LA/OC) so if anyone needs help with this let me know.
 
Followed trailtruck's method. Cracked the tray ever so slightly because I was getting impatient but can't even tell.

Adding my $.02. Get yourself some paracord and tie it into a loop, tuck it under the tabs on the panel side before popping the tray back in and all you gotta do is pull and the tray pops out. No panel popper needed
 
Still Works on2016 TE

I just got up the courage to try this on my 2016 TE, and it works just like Antman said. I was a little worried as I was bending up the cover, but the 2 tabs broke off cleanly. Thanks Antman!
 
For those wanting to try this without breaking tabs, like trailtruck, I used a flexible extension attachment with a philips bit, but with a cordless drill. No broken tabs. Just fish around until you feel it catch on the screw.

After I removed all the screws and opened up the tray, I put paracord on middle tab after so I can remove it quickly.
 
rear storage space

This extra storage compartment is a great idea. I keep all kinds of stuff piled in the back trays. Gloves, paper towels, line, soap dish... I can put all that clutter in this space and keep the back trays clear.
 
Tabs breaking

Once again- this was originally Harper7's idea, but here are some pics from my "Brute Force Access" (BFA) method to the storage area :

This is the direction you would pry up on the lids to break the tabs:

View attachment 49153


I'm pointing to where the tabs break


View attachment 49154

And here's a shot under a lid, and the amount of space in the wheelwells. I don't have an A/C outlet nor an amp back there, so I have a pretty good amount of space.

View attachment 49155

View attachment 49156

View attachment 49157


Break away, gentleman :banana:

FYI. The tabs broke because you didn’t remove properly. Most likely you pulled from the wrong side and did not use trim tools.
 
FYI. The tabs broke because you didn’t remove properly. Most likely you pulled from the wrong side and did not use trim tools.

Your first post, calling out [MENTION=65614]Antman[/MENTION].........you must wear suspenders to keep those balls up.


All kidding aside I think he would agree with you there are better ways to do it that have a much better chance of saving the tabs.
 
FYI. The tabs broke because you didn’t remove properly. Most likely you pulled from the wrong side and did not use trim tools.

Thanks for advising me on the proper way to remove trim. I broke it on purpose- you do it the way you want! Either way works just as well for me.
 
Your first post, calling out [MENTION=65614]Antman[/MENTION].........you must wear suspenders to keep those balls up.


All kidding aside I think he would agree with you there are better ways to do it that have a much better chance of saving the tabs.

F those tabs. Lolol. :)
 
I have a post on it....but basically I made it from a road sign aluminum scrap and a lock off an alarm system box and hit it with plasti-dip!:hello:
 

Members online

Forum statistics

Threads
278,316
Messages
3,554,106
Members
248,016
Latest member
Advally Service

Trending content

Back
Top