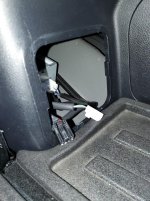
Rear Wheel Well Storage?

Ditto

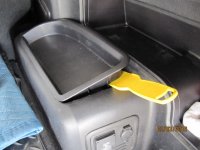
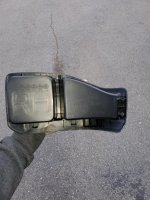
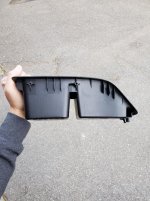
You don't have to break the tabs. I have large hands and here's what I did. I opted to leave the screws out afterwards.

Tools:
Bit driver (looks like a screwdriver but has a place to put a Philip's/torx/slotted/allen/etc. bit in it) $4.99 Harbor Freight

Bit driver flexible extension (has an end that fits in the bit driver and an end that receives the bit, is about 5-6" long, flexes past 90 degrees) $2.99 Harbor Freight and came with 6 bits

Pry tool (I used plastic bicycle tire mount/dismount "spoons") - $2.00/pair at a bike shop

Instructions:
Start with the rear left most corner on the DRIVER'S side "tray box" - pry until it pops a bit. Continue this all the way around the outside (since the 2 screws are on the inner section)

DRIVER's side:
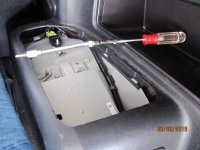
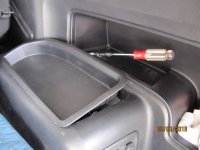
When you can satisfactorily pull it up enough to get your LEFT hand in there, put the flex attachment with a medium-sized philips bit in it in the box WITH your hand inside too and guide it until you feel the bit bite into the screw head. With your LEFT hand still holding the attachment onto the screw head, use your RIGHT hand to turn the screwdriver to unscrew the screw. Do this for both screws.

PASSENGER's side:
Follow all the same instructions for the previous side, except your RIGHT hand goes into the box to hold the bit on the screw and your LEFT hand turns the screwdriver.

I 2nd these instructions. Used a flexible neck on a ratcheting screwdriver with a Phillip’s bit head. Definitely start at he rear as this gives you easier access than the forward one. You can bend to about 30-40* without breaking the tabs. I kept my finger stabilizing the bit head & didn’t loose the screws. I’m going to try a single parador like loop on the center outboard tab & leave the screws out. Eventually I expect to make some kind of inner hinge like that shown above with Velcro. One big point-use something between your hand & the outer edge to protect your hand. It makes it much more comfortable/tolerable.
 
I saw no purpose for the tabs and screws. I twisted them off then put the tray back on, I can easily pop it open anytime and stick stuff under there. Or when I just need to get to wiring etc
 
Just wanted to throw in my $.02. You don't have to break the tabs. I have large hands and here's what I did. I opted to leave the screws out afterwards. If the tray boxes become sloppy over time, I'll cross that bridge when I come to it and figure something out.

Tools:

Bit driver (looks like a screwdriver but has a place to put a philips/torx/slotted/allen/etc. bit in it) $4.99 Harbor Freight

Bit driver flexible extension (has an end that fits in the bit driver and an end that receives the bit, is about 5-6" long, flexes past 90 degrees) $2.99 Harbor Freight and came with 6 bits

Pry tool (I used plastic bicycle tire mount/dismount "spoons") - $2.00/pair at a bike shop

Instructions:

Start with the rear left most corner on the DRIVER'S side "tray box" - pry until it pops a bit.

Continue this all the way around the outside (since the 2 screws are on the inner section)


DRIVER's side:

When you can satisfactorily pull it up enough to get your LEFT hand in there, put the flex attachment with a medium-sized philips bit in it in the box WITH your hand inside too and guide it until you feel the bit bite into the screw head. With your LEFT hand still holding the attachment onto the screw head, use your RIGHT hand to turn the screwdriver to unscrew the screw. Do this for both screws.

PASSENGER's side:

Follow all the same instructions for the previous side, except your RIGHT hand goes into the box to hold the bit on the screw and your LEFT hand turns the screwdriver.

That's all there is to it. No breaking tabs. I'm in Southern California (LA/OC) so if anyone needs help with this let me know.


Thanks Trail Truck. I did this today and it worked out great, took about 20 min. most of that was setting up the tools and feeling for the screw head. The flexible screwdriver is the trick and worked great.

It took me longer to find the screw I dropped in the wheel well using mirror and magnet.
My intent is not for storage but to install a couple of 12V- DC outlets and a fuse block that will be fed from my aux Battery. This way I won't have contact with any OEM circuits.
My SR5 has the inverter in this wheel well so space is at a minimum.
Now I can order all the parts to do this mod.
 

Attachments

  • IMG_6198.JPG
    IMG_6198.JPG
    105.4 KB · Views: 4,793
  • IMG_6201.JPG
    IMG_6201.JPG
    109.3 KB · Views: 5,314
  • IMG_6202.JPG
    IMG_6202.JPG
    98.4 KB · Views: 4,145
Thanks Trail Truck. I did this today and it worked out great, took about 20 min. most of that was setting up the tools and feeling for the screw head. The flexible screwdriver is the trick and worked great.

It took me longer to find the screw I dropped in the wheel well using mirror and magnet.
My intent is not for storage but to install a couple of 12V- DC outlets and a fuse block that will be fed from my aux Battery. This way I won't have contact with any OEM circuits.
My SR5 has the inverter in this wheel well so space is at a minimum.
Now I can order all the parts to do this mod.

Just saw this post and actually completed a similar install this morning in the same space. I ran the power down the pax side under the door trim panels using 4AWG tied to the aux battery in the pax side engine bay next to firewall (C4 fab battery bracket). I then used the ground from the inverter and tied both the ground and power into a blue sea system fuse box loosely tucked under the panel towards the front of the storage area in front of the inverter. Installed a blue sea system 12v plug lower right corner under the existing 12v plug. I used brute force to break the screw tabs but the top plate attaches no problem.
 
Take some pics and post them we all like to see mods
Also found a post by 4runnertrdgirl from 4-23-2017 that shows how she did this.
Edit: Check out my post in" what did you do to your 4R" 3/20/2019 today for more details.
 
Last edited:
SR5 Rear tray works the same for removal?

Hi Everyone,

Thanks for all the useful info in this thread. The pictures I see are different than the tray in my 2015 SR5 as mine have built in cup holders. I'm assuming that the pictures in the thread are from a Trail edition without the third row seating like I have.

Does anyone know if the removal for the tray in the SR5 with built in cupholders works roughly the same?

Thanks!
 
<iframe width="560" height="315" src="https://www.youtube.com/embed/i5h66oVnEdk" frameborder="0" allow="accelerometer; autoplay; clipboard-write; encrypted-media; gyroscope; picture-in-picture" allowfullscreen></iframe>
 
Just wanted to throw in my $.02. You don't have to break the tabs. I have large hands and here's what I did. I opted to leave the screws out afterwards. If the tray boxes become sloppy over time, I'll cross that bridge when I come to it and figure something out.

Tools:

Bit driver (looks like a screwdriver but has a place to put a philips/torx/slotted/allen/etc. bit in it) $4.99 Harbor Freight

Bit driver flexible extension (has an end that fits in the bit driver and an end that receives the bit, is about 5-6" long, flexes past 90 degrees) $2.99 Harbor Freight and came with 6 bits

Pry tool (I used plastic bicycle tire mount/dismount "spoons") - $2.00/pair at a bike shop

Instructions:

Start with the rear left most corner on the DRIVER'S side "tray box" - pry until it pops a bit.

Continue this all the way around the outside (since the 2 screws are on the inner section)


DRIVER's side:

When you can satisfactorily pull it up enough to get your LEFT hand in there, put the flex attachment with a medium-sized philips bit in it in the box WITH your hand inside too and guide it until you feel the bit bite into the screw head. With your LEFT hand still holding the attachment onto the screw head, use your RIGHT hand to turn the screwdriver to unscrew the screw. Do this for both screws.

PASSENGER's side:

Follow all the same instructions for the previous side, except your RIGHT hand goes into the box to hold the bit on the screw and your LEFT hand turns the screwdriver.

That's all there is to it. No breaking tabs. I'm in Southern California (LA/OC) so if anyone needs help with this let me know.

This is what i did. It scratched up my hands a bit. But not bad. Patience, and persistence. Glad i had the flex attachment. Took me about 15 mins to do. I too left the screws out. It snaps back in tight. I was thinking of breaking off a couple tabs so i can lift the tray in and out easier. Unless someone else has a cool hack that would allow the tray to easily lift off, and yet not rattle loosely around.
 
Anybody knows what is that block in this well on the passenger side?
it is marked as 21Z03081040 but google doesn't find anything.
Thanks.
 
Anybody knows what is that block in this well on the passenger side?
it is marked as 21Z03081040 but google doesn't find anything.
Thanks.

I assume you mean the power block that runs the 12v/AC plugs on the outside of the wheel well facing the the rear.

249059d1492790855-ac-outlet-cover-removal-4runneracoutlet-jpg


the block is pictured below with the white sticker on it:
327748d1551648094-rear-wheel-well-storage-img_6201-jpg
 
Last edited:
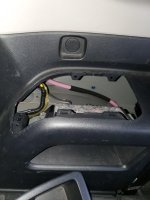
FWIW if you remove the panel with the cigarette lighter, you can put your arm in and reach the screws if you don't want to break anything. I did it with mine (with 3rd row) but should be the same process. Here are some pics done with those with 3rd row seating. In a 3rd row, there are 4 screws.
 

Attachments

  • 20220429_191049_resized.jpg
    20220429_191049_resized.jpg
    135.1 KB · Views: 2,228
  • 20220429_191106_resized.jpg
    20220429_191106_resized.jpg
    137.4 KB · Views: 2,218
  • 20220429_191452_resized.jpg
    20220429_191452_resized.jpg
    137.6 KB · Views: 2,184
  • 20220429_191510_resized.jpg
    20220429_191510_resized.jpg
    137.1 KB · Views: 2,226
Last edited:
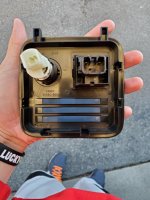
Here's what the panel with the cig lighter looks like. It just pops off.
 

Attachments

  • 20220220_170532_resized.jpg
    20220220_170532_resized.jpg
    127.3 KB · Views: 2,170
Hypothetically speaking, if someone successfully did this mod, and then when it was time to cut the tabs, they cut the tabs Harper said to leave and left the tabs that Harper said to cut, could that person order a replacement tray and correct the mistake? Is there an easy way to identify that part number?

And yes, I'm using the term "successfully" pretty liberally.
 

Members online

Forum statistics

Threads
278,312
Messages
3,554,085
Members
248,016
Latest member
Advally Service

Trending content

Back
Top