Replacing Transfer Case Output Shaft Oil Seals, a How-To for DIY'ers

Prop shaft retraction continued...

Turns out my prop shaft was almost seized. On inspection it looked as if a grease gun hasn't been within 50 paces of it ever. Managed to collapse it by using a ratchet tie down/strop through the rear universal and leveraged off the cross member. A few love taps with a hammer on the universal also helped persuade it to let go.

Then came the nut which took a 24"long, 1/2" drive breaker bar and a two ton car jack. I was getting nervous as the whole transfer case was twisting in place from the torque being applied. Actually the whole vehicle appeared to be moving as I pumped the jack just before it cracked. Once the nut was off the rest of the job took about 20 minutes. Seal easily removed with a standard flat head screw driver and new seal easily fitted with thumbs.

Thanks again for the write up it was very useful. Now for the diff pinion seal.
 
What would work for an over the counter solution to un-stake an existing staked nut? I don't have a tool to grind a chisel to be thinner as BFAD had to end up doing in Step 7. Maybe a Flathead would work?
 
BigFish, Thanks for the write up! I'm having the same exact issue, I ordered the parts and came back to review your post to find the pictures missing. If there is any way to get them back I'll print it off. Thanks for the asssit!
 
I'm having an issue assuring that i am getting the correct parts. I would remove the old ones and take them to the parts store to compare but this is my only accessible vehicle so once theyre out its not moving. where is the transfercase part number stamped? or transfercase model i should say. Looking at seals i can get there are seals for RF1A transfercase, TF1AV transfercase, HF2A transfercase. I just dont know the difference or where to find out which i have..

1996 4runner sr5 3.4 Automatic 4x4
 
Last edited:
Great thread! I'm at the step where you remove the flange and I just can't get the damn thing to come off. Thought/ideas?! Thanks!

Update: I got it off by using some love taps...

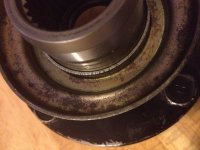
New question though! Is this flange damaged? I can't tell if it's significant enough to tear the new seal. Unfortunately I'm going to have to use it because I need to put this back together and get to work tomorrow. However, I can definitely repeat this job again much easier!

Thanks!
 

Attachments

  • photo (1).jpg
    photo (1).jpg
    136 KB · Views: 1,682
Last edited:
Just wanted to add a few updates in case anyone else finds this helpful:

1.) Still no leaking after quite a few thousand miles, so I think that flange was in decent enough shape still.

2.) A really nice side effect is that I no longer have issues disengaging my 4wd with the push button on my 97 Limited! I used to have to turn my car off to disengage 4wd with the push button after it worked fine for years. It would disengage after I turned the engine back on, but it was annoying. Now it engages and disengages without any issues. Pretty happy about that and I never would have thought this would be the fix for it.
 
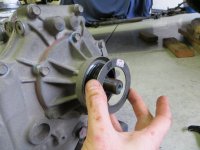
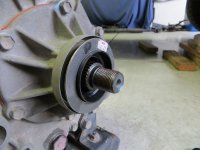
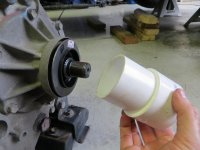
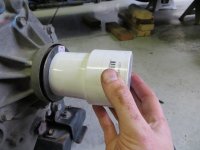
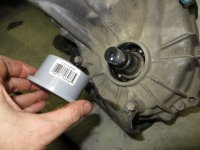
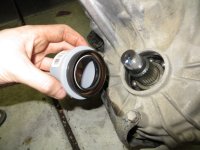
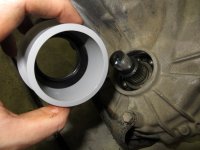
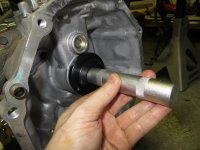
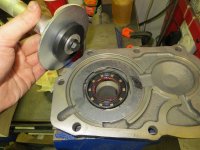
Some follow on info for anyone doing this project: If you need seal drivers, head to your local Ace Hardware and shop in the conduit and PVC aisles - you will find something. Pics below show a large shimming washer and 2.5" PVC pipe extender being used on the rear seal, and a 2" box adapter being used for the front seal.
 

Attachments

  • IMG_7499_800x600.JPG
    IMG_7499_800x600.JPG
    99.3 KB · Views: 1,508
  • IMG_7500_800x600.JPG
    IMG_7500_800x600.JPG
    89.7 KB · Views: 1,475
  • IMG_7501_800x600.JPG
    IMG_7501_800x600.JPG
    88.8 KB · Views: 1,767
  • IMG_7502_800x600.JPG
    IMG_7502_800x600.JPG
    81.7 KB · Views: 1,429
  • IMG_7505_800x600.JPG
    IMG_7505_800x600.JPG
    100.9 KB · Views: 1,620
  • IMG_7506_800x600.JPG
    IMG_7506_800x600.JPG
    99.5 KB · Views: 1,849
  • IMG_7507_800x600.JPG
    IMG_7507_800x600.JPG
    94.5 KB · Views: 1,645
Semi-related: The lisle tool works good for pulling the tcase shifter seals (use a socket to install new ones). The transfer case adapter seal and transfer case input seal can be installed with a standard seal driver. The transmission input seal is a bit more tricky, as there is a specific depth - I shimmed it with the same washer used to install the tcase ouput seal (see above).
 

Attachments

  • IMG_7509_800x600.JPG
    IMG_7509_800x600.JPG
    109.8 KB · Views: 1,420
  • IMG_7510_800x600.JPG
    IMG_7510_800x600.JPG
    86.5 KB · Views: 1,311
  • IMG_7513_800x600.JPG
    IMG_7513_800x600.JPG
    103.8 KB · Views: 1,712
  • IMG_7538_800x600.JPG
    IMG_7538_800x600.JPG
    120.2 KB · Views: 1,457
Thanks to all of you for this thread.
I feel I can handle this repair on my '98 4Runner now that I've read all these posts, and the photos are invaluable.

What a great community!


Some follow on info for anyone doing this project: If you need seal drivers, head to your local Ace Hardware and shop in the conduit and PVC aisles - you will find something. Pics below show a large shimming washer and 2.5" PVC pipe extender being used on the rear seal, and a 2" box adapter being used for the front seal.
 
Great thread, nice writeup!

Hey!

I'm in this process, but can't get the center 30mm nut off (front flange on the transfer case). Car is on the ground, locked center diff, breaker bar + 2ton lift, impact wrench, but nothing, the nut won't move. I'm afraid I'm going to break something inside the transfer case if I try harder..

Any ideas?

Cheers
 
Just wanted to say thanks [MENTION=44220]BigFishAllDay[/MENTION]

I've now used all of your write ups on my truck and they made the process so easy on those jobs. If I'm ever out in NM I owe you lunch or something.

Thanks for the great write ups!
 
Staked Nut

Informative write up, however you do not have to make special tools to unstake the nut, just put an impact on the nut and it spins right off, or use a breaker bar if you don't have an impact. Using an impact wrench wrench allows you to avoid securing the transfer case output flange from turning with a bar.
 
Informative write up, however you do not have to make special tools to unstake the nut, just put an impact on the nut and it spins right off, or use a breaker bar if you don't have an impact. Using an impact wrench wrench allows you to avoid securing the transfer case output flange from turning with a bar.

Unstaking the nut is still a good idea to avoid damage to the threads.
 
Hey!

I'm in this process, but can't get the center 30mm nut off (front flange on the transfer case). Car is on the ground, locked center diff, breaker bar + 2ton lift, impact wrench, but nothing, the nut won't move. I'm afraid I'm going to break something inside the transfer case if I try harder..

Any ideas?

Cheers
Perhaps the front output shaft has reverse threads.
 
Just took mine off with impact and didn't damage threads. You're more likely to damage threads by hammering on a punch in this area, not necessary at all.

Are you saying you didn't have to punch the "dent" out and the nut smoothed its self out when you used an impact wrench to remove? I'm tackling the job this weekend and would love to skip the hammer and punch part at the start. Thanks!
 
So, I remember reading a lot about this when I was doing the output shaft seal up front a few years ago. A lot of people would say, yeah, use an impact and don't worry about unstaking the nut. However, there were a few people who would say don't do that because you'll strip the threads off of the part the nut screws onto (the transfer case?).

I used an impact, and it seemed fine to me. I wouldn't want to do it a bunch of times, but I have a feeling the impact effectively unstakes the nut as it's removing it anyway. Those threads are beefy.
 

Members online

Forum statistics

Threads
278,315
Messages
3,554,123
Members
248,016
Latest member
Advally Service

Trending content

Back
Top