Ripcord's 2002 4Runner Sport Ed.

Glad to see her all buttoned up again, Rip. I see you found the trailer wiring that we talked about via PM. That stuff worked out great w/the heavy gauge wire they use in it.

Those extended bumpstops really are quite a bit taller. Nice find! I can't believe I didn't notice those things.

Thanks for the shout out, I really appreciate it, and I'm glad that all the work & info I put into my thread helped you out w/your retrofit. BTW, if you want a (stock) cover for that e-locker motor, let me know, I've got one in the garage that you can have. I'd actually like to take a ride in your truck now and see how different the 4.30's feel vs. the 4.10's, so feel free to stop by anytime. :driving:
 
nice! so just to clarify to have elocker can you just mount the 3rd member to your existing axle or you had to the get the entire "elocker" capable axle with the 3rd? just wondering about mounting points and such if there is anything different.
 
It looks like in the pictures of your new housing before you painted it, that there is a crack in the axle tube between the upper link mount and panhard mount....or is that just some dirt or something?
 
nice! so just to clarify to have elocker can you just mount the 3rd member to your existing axle or you had to the get the entire "elocker" capable axle with the 3rd? just wondering about mounting points and such if there is anything different.

Correct, it's easiest to get the whole housing.

You can modify your existing housing, but without welding and fab expirience it will be more trouble than it is worth
 
Glad to see her all buttoned up again, Rip. I see you found the trailer wiring that we talked about via PM. That stuff worked out great w/the heavy gauge wire they use in it.

Those extended bumpstops really are quite a bit taller. Nice find! I can't believe I didn't notice those things.

Thanks for the shout out, I really appreciate it, and I'm glad that all the work & info I put into my thread helped you out w/your retrofit. BTW, if you want a (stock) cover for that e-locker motor, let me know, I've got one in the garage that you can have. I'd actually like to take a ride in your truck now and see how different the 4.30's feel vs. the 4.10's, so feel free to stop by anytime. :driving:
Thanks dude!
The 4.30 are actually noticable. not significant, but noticeable. Higher rpms on the highway, but she takes off from a stop a lot easier.

I do need to stop by! Got that tensioner plate and stuff and I still haven't seen the CBI in person!


It looks like in the pictures of your new housing before you painted it, that there is a crack in the axle tube between the upper link mount and panhard mount....or is that just some dirt or something?
Good eye, that is actually a thin metal band that wraps around the axle at that point. Not sure why its there, my old axle had it in the same spot too.

Correct, it's easiest to get the whole housing.

You can modify your existing housing, but without welding and fab expirience it will be more trouble than it is worth
Much easier indeed!

Simply sexual... Love this thing.
Thanks dude!
 
GAH! Don't show me these things!

Thanks though, but I really need tires.

Those projectors turned out real nice BTW! :thumb3:

Haha, who needs tires??? :D Just thought I'd pass them along in case you found an extra $500 laying around.

Thanks, I'm really happy with how they came out.
 
Damn man, talk about making the best out of a bad situation! The truck looks great as always, and I'm glad she's functional again. Are you going to go with duratrac's again when you get new tires?
 
I just joined the forum. :hello:

I read about half of your thread. your ride is amazeballs!!!

HUGE thanks for taking the time to make this thread and all the links on the front page. its terrific.
 
Damn man, talk about making the best out of a bad situation! The truck looks great as always, and I'm glad she's functional again. Are you going to go with duratrac's again when you get new tires?
Thanks dude, I like to think Im a glass half full kinda guy. haha

You guessed right, same size and everything.

I just joined the forum. :hello:

I read about half of your thread. your ride is amazeballs!!!

HUGE thanks for taking the time to make this thread and all the links on the front page. its terrific.
Welcome! Glad you enjoyed it and thanks for reading.
I think I use that first page more than anyone else does, haha.
 
|March 10, 2011|


Here is where I ordered my parts:

Dome lights: Oznium.com: $35
Flexible 5mm LED Dome Light
Each LED comes with a set of ‘dummy bulbs’ with easy plug-in wiring to the LED board. These things are crazy bright!

Dash Lights: Autolumination.com: $55
Autolumination Instrument Panel Light Bulbs & Lamps)
--For the 2002’s, almost of all the bulbs you need are #74’s. The climate control uses a few Neo-wedge bulbs.
ECT/rear window:2x Neo-wedge type A
Climate controls:3x Neo-wedge type B
Gauges: 3x #74 (#24) Matrix 5-LED (Type 1; with 3 LED on top, 2 on sides)
Key ring:1x #74 Single LED Superstar
Glove box light: 1x #74 Any style that is narrow
Tranny Shifter:1x #74 Any style that is narrow (Note: there is a green film on inside the shifter, so a white light here did not change the color)
Ash Tray Light:1x #74 Matrix 3-LED (Note: my ashtray light is used in the stereo pocket)


Other useful threads:
http://www.toyota-4runner.org/3rd-gen-t4rs/78310-led-conversion-questions-2.html#post870257
http://www.toyota-4runner.org/3rd-gen-t4rs/35104-led-lighting.html
http://www.toyota-4runner.org/3rd-gen-t4rs/79771-you-can-change-color-your-clock-2.html
http://www.toyota-4runner.org/3rd-gen-t4rs/83928-changing-bulbs-c-unit.html


LED4runner.png~original


==============================================

Before; Look at all that green!
100_0649.jpg~original


LED dome lights and cargo lights:
100_0452.jpg~original


Tearing the dash apart:
100_0652.jpg~original


100_0675.jpg~original


Back side of Gauge cluster:
100_0679.jpg~original


Wax paper to eliminate hot spots:
100_0666.jpg~original


100_0687.jpg~original

100_0688.jpg~original


Gauges:
100_0695.jpg~original


Overall: :art:
100_0752.jpg~original

(sorry for pic quality on that one: 4 second shutter time on night time mode is tough)


thanks a million for the chart man. i just got my cluster lights a few days ago and i installed today.. i wish these led's had their polarity marked though. lol i had to plug it in and take it out close to 8 times i think (partly because i forgot i had the dimmer set to low lolol!)

anyway heres a pic: still need to do climate control and whatnot.
2012-10-27183435.jpg~original


i used 3 led matrix neo wedge bulbs (coded as t5 i think) 3 bucks a pop.

if im ever in NM ill get you a beer! (when i turn 21 :p)
 
Hey Rip just wanted to give a "what up" on your build page before I get your old bumper put on my rig. I stumbled across this thread and just wanted to say what an awesome, epic build thread this is. I practically looked through the entire thing last night and you've put in a lot of time to make this thread and your truck amazing. The first page with links to everything makes it so nice to navigate through for a first timer like me. Makes me want to do so much to my 4runner now, as I'm sure it has to plenty of members on here. I've looked over that 3rd Gen Buyer's guide/info thread numerous times and didn't even realize you were the one that created it! You're practically a celebrity on this site haha...I had no idea I was buying the bumper off a runner that was so famous! I now feel honored buying your bumper and putting it on my rig haha! Seriously though mad props on this build and the buyer's guide. Look forward to meeting up with you and now I will have to become more active in this forum and definitely post pics of my runner once the bumper is on!
 
thanks a million for the chart man. i just got my cluster lights a few days ago and i installed today.. i wish these led's had their polarity marked though. lol i had to plug it in and take it out close to 8 times i think (partly because i forgot i had the dimmer set to low lolol!)

anyway heres a pic: still need to do climate control and whatnot.
2012-10-27183435.jpg~original


i used 3 led matrix neo wedge bulbs (coded as t5 i think) 3 bucks a pop.

if im ever in NM ill get you a beer! (when i turn 21 :p)
Thanks dude, glad I could help. Your lights look good there!

I recently had one of the 3 climate control lights burn out (the fan control backlight) So I may be replacing the lot here soon. Might mix up the colors too.

Hey Rip just wanted to give a "what up" on your build page before I get your old bumper put on my rig. I stumbled across this thread and just wanted to say what an awesome, epic build thread this is. I practically looked through the entire thing last night and you've put in a lot of time to make this thread and your truck amazing. The first page with links to everything makes it so nice to navigate through for a first timer like me. Makes me want to do so much to my 4runner now, as I'm sure it has to plenty of members on here. I've looked over that 3rd Gen Buyer's guide/info thread numerous times and didn't even realize you were the one that created it! You're practically a celebrity on this site haha...I had no idea I was buying the bumper off a runner that was so famous! I now feel honored buying your bumper and putting it on my rig haha! Seriously though mad props on this build and the buyer's guide. Look forward to meeting up with you and now I will have to become more active in this forum and definitely post pics of my runner once the bumper is on!
Thanks so much Andrew for the post, means a lot!

I look forward to meeting you and cant thank you enough for buying the bumper. It was starting to annoy me sitting there in the garage!
 
DOM Rear Upper Control Arms

|November 9, 2012|
(Wohoo page 50!)

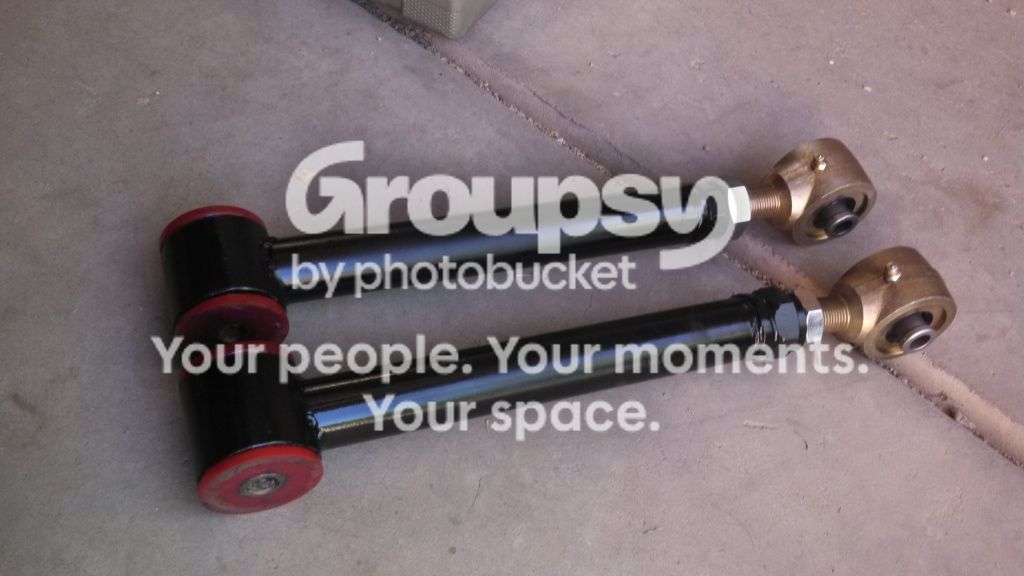
Finally got the longer, stronger DOM links built the other day!


You may recall I had the driveshaft failure that was caused by the weaker OEM upper links. I also have vibration issues at 65 mph that is attributed to the Pinon angle due to the lift.

With these new upper links, they are 1/4" longer than OEM which should reduce or eliminate the vibrations at 65 mph.


To build them, I used some scrap tubing my friend Steven had laying around his shop. We used 2" diameter 0.25" wall chromoly tubing for the ends and 1.25" diameter 0.120" wall for the arm of the link. I ordered some bushings from energy suspension. I dont remember the part number, but they were a b*tch to find the right size I needed.


Enough of that, on to the pics!

First we cut the 2" sections for the ends.
2012-11-07_12-54-05_514.jpg~original


Then we notched the arms:
2012-11-07_12-57-56_513.jpg~original


2012-11-07_12-56-57_39.jpg~original


Tested lenghts:
2012-11-07_12-54-54_720.jpg~original


Steven is very skilled with a TIG welder.
2012-11-07_13-34-20_324.jpg~original


2012-11-07_13-34-27_162.jpg~original


Painted:
2012-11-07_18-30-53_550.jpg~original


Bushings in:
2012-11-07_18-36-53_924.jpg~original


Before Pinon angle:
photobucket-5793-1352478018295.jpg~original


Links in:
2012-11-09_08-42-46_480.jpg~original


After Pinon angle:
2012-11-09_08-56-52_146.jpg~original


You may notice my driver's side axle seal is leaking.. Gonna replace that later today before I leave to denver.

:redbrick:


EDIT: May 27, 2013.

Rebuilt them for various reasons..

http://www.toyota-4runner.org/3rd-gen-t4rs/85197-ripcords-2002-4runner-sport-ed-66.html#post1390264

IMG_20130525_161839_094_zps35056660.jpg~original


---------------------------------------


My friend Steven is the team leader of the BAJA SAE design at New mexico Tech. He designs and builds these cars and competes against other engineering schools.

He is also the team driver and is very good!

The 2010 Build:
2012-11-07_13-51-25_720.jpg~original


Last years build:
2012-11-07_13-51-19_196.jpg~original


This year's build:
2012-11-07_13-51-35_411.jpg~original


2012-11-07_13-51-43_375.jpg~original
 
Last edited:
Wow Rip, those things are a piece of art! I'm looking forward to your review on the rear UCA's with that increase in length of 1/4" - I have the same slight vibration at higher speeds. I was thinking of going with factory length units when I replace mine, but may need to follow suite instead....
 
Awesome rig! Very drool worthy. I like how much time you put into everything so that it is done right.


Those upper links look super nice. Good job on those to you and your buddy! :artist:
 
I like!!! Very nice work. These should suit your truck very nicely.

I'd be interested in a set if he wants to make more, those look killer!
 

Members online

No members online now.

Forum statistics

Threads
278,312
Messages
3,554,089
Members
248,016
Latest member
Advally Service

Trending content

Back
Top