Rock_Rat
Senior Member
Power Stop Brake Calipers
Hey guys, figured I'd poke my head in here and say hey. Hey! Yea it's been a while. I've been busy with life and I found out that I spent far too much time on here so decided to take a break for a bit.
I do have some important info to post regarding the Power Stop Calipers, thus the main reason for stopping by. The QA/QC on these is non-existent. I'll keep it short.
Originally installed back in March 2015 (with issues with the bleeder). See Tundra Brake Upgrade in my build page.
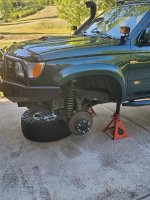
I've changed pads once or twice (Wagners), but this past month or so I noticed my driver side was squeaking and brakes didn't feel right. Pulled the wheel off and saw I had a leak somewhere in the driver's caliper - all grimy and cruddy looking. No brainer as long as the brake line was OK, it's time to replace the dust boots and square seals.
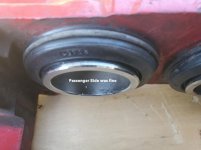
Got everything all cleaned up today, replaced the seals and began putting the boots on. Passenger side was fine.
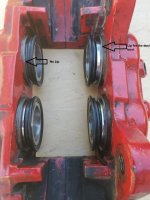
Driver's side - no go! Well, the "lip" (Loss of what else to call it) was missing on the outboard side of the drivers caliper - where the leak is. They are just "dust boots" so I shouldn't see any real leaking except whatever was bypassing the internal seal. That "lip" is used to hold the dust boot in place using an "o" ring. I believe it came from the manufacturer that way. Perhaps they both broke off, which I find extremely unlikely. I have no idea how those boots stayed on for so long.
Anyway, I figured this was important enough to post for everyone considering the PowerStops. You just can't go wrong with OEM. Seems to always come back to that, damn, they're expensive.
Off to the junkyard tomorrow to look for a set of used calipers.
I have a cpl thousand notifications to go through. I'll be back in here more regularly.
BTW - no changes on the rig. Supercharger still going strong, all is well. Looking to replace the tires in a few months. Probably Cooper Maxx or Pro.
Hey guys, figured I'd poke my head in here and say hey. Hey! Yea it's been a while. I've been busy with life and I found out that I spent far too much time on here so decided to take a break for a bit.
I do have some important info to post regarding the Power Stop Calipers, thus the main reason for stopping by. The QA/QC on these is non-existent. I'll keep it short.
Originally installed back in March 2015 (with issues with the bleeder). See Tundra Brake Upgrade in my build page.
I've changed pads once or twice (Wagners), but this past month or so I noticed my driver side was squeaking and brakes didn't feel right. Pulled the wheel off and saw I had a leak somewhere in the driver's caliper - all grimy and cruddy looking. No brainer as long as the brake line was OK, it's time to replace the dust boots and square seals.
Got everything all cleaned up today, replaced the seals and began putting the boots on. Passenger side was fine.
Driver's side - no go! Well, the "lip" (Loss of what else to call it) was missing on the outboard side of the drivers caliper - where the leak is. They are just "dust boots" so I shouldn't see any real leaking except whatever was bypassing the internal seal. That "lip" is used to hold the dust boot in place using an "o" ring. I believe it came from the manufacturer that way. Perhaps they both broke off, which I find extremely unlikely. I have no idea how those boots stayed on for so long.
Anyway, I figured this was important enough to post for everyone considering the PowerStops. You just can't go wrong with OEM. Seems to always come back to that, damn, they're expensive.
Off to the junkyard tomorrow to look for a set of used calipers.
I have a cpl thousand notifications to go through. I'll be back in here more regularly.
BTW - no changes on the rig. Supercharger still going strong, all is well. Looking to replace the tires in a few months. Probably Cooper Maxx or Pro.
Attachments
Last edited: