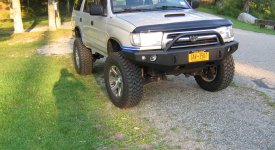
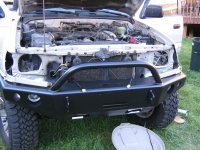
Scramble's "Metallica Truck" Build Thread

This was my first time using an angle grinder

LOL. You still have the safety shield on it in those photo's. First thing that comes off is that thing. It just gets in the way. Once you use one for a while you get used to which direction the sparks are gonna fly based on how your approaching the material. It's a very handy tool to have in the shed.
 
LOL. You still have the safety shield on it in those photo's. First thing that comes off is that thing. It just gets in the way. Once you use one for a while you get used to which direction the sparks are gonna fly based on how your approaching the material. It's a very handy tool to have in the shed.

Is it? LOL That shield is long gone. I love the thing, I have all kinds of disks for it now. Various grit sanders, different thickness cutting wheels, grinding disks. Cuts rusty bolts off in seconds, sands rusty metal in no time.
 
Last edited:
June 2015

I left the SW bumper out in the yard for about 2 weeks before I had a chance to paint it. It was up on wood blocks with a tarp over it but it still accumulated some surface rust. I used a wire wheel on my drill for the large areas & sand paper/ wire brushes for the tougher, smaller areas to get to.
I built a little spray booth in the corner of my basement by hanging old sheets from the ceiling & an exhaust fan in the closest window.

IMG_1019 by Mike Campbell, on Flickr

IMG_1020 by Mike Campbell, on Flickr

IMG_1021 by Mike Campbell, on Flickr

IMG_1022 by Mike Campbell, on Flickr

IMG_1023 by Mike Campbell, on Flickr

IMG_1024 by Mike Campbell, on Flickr

IMG_1027 by Mike Campbell, on Flickr

IMG_1029 by Mike Campbell, on Flickr

IMG_1030 by Mike Campbell, on Flickr

IMG_1031 by Mike Campbell, on Flickr

IMG_1032 by Mike Campbell, on Flickr

IMG_1034 by Mike Campbell, on Flickr
 
Last edited:
Bumper Spray June 2015

Prep is the most important part of a good paint job. It took 6 total wipe downs with Acetone before the rag showed no dirt. I did 3 light coats of Duplicolor Self-Etching primer, 3 light coats of Rustoleum White primer (left over from another project) & emptied 4 cans of Duplicolor Lacquer Semi-Gloss Black. Lacquer paint goes on more smoothly than enamel. Easier to blend & shows no overspray lines the way enamel rattle cans do. I really loved the way it looked more matte than semi gloss. My GF really loved the way it looked too. It looked professionally painted.
Unfortunately lacquer isn't as tough as enamel & I had a few rock chips within a few weeks. I should have hit it with a matte clear coat. I started a thread back then & everyone said not to clear coat it because it would be harder to touch up. Bullocks! I ended up removing the bumper, roughing it up with sandpaper & spraying it with Duplicolor Enamel Semi-Gloss Black. It was hard to get a perfect spray but I got it looking great. I have no pics of the re-spray. Wasn't in the mood. LOL

Dupli Acetone by Mike Campbell, on Flickr

Dupli Black Lacquer by Mike Campbell, on Flickr

selfetchprimer by Mike Campbell, on Flickr

MetalPrimer_White_480x480 by Mike Campbell, on Flickr
 
Last edited:
A few more random pics from the install. I kept shaving the new bumper brackets down with an 80 grit disk until the bumper slid between them sort of easily. I rubbed general purpose axle grease on the brackets & bumper so I wouldn't scratch the new paint off. Like I said earlier, the Shrockworks bumper is a tight fit. I dont see any pics of the brackets painted, sorry.

I also painted the fender flanges Black because I didn't like the way they showed up behind the Black bumper.

IMG_1028 by Mike Campbell, on Flickr

IMG_1046 by Mike Campbell, on Flickr

IMG_1047 by Mike Campbell, on Flickr

IMG_1048 by Mike Campbell, on Flickr

Roughed it up lazily with a wire wheel, primed & painted.

IMG_1056 by Mike Campbell, on Flickr

IMG_1057 by Mike Campbell, on Flickr

IMG_1054 by Mike Campbell, on Flickr

Here's some random crap you have to trim off to get the new bumper to fit.

IMG_1058 by Mike Campbell, on Flickr
 
Last edited:
It's cool looking at the different views & details of your shrockworks bumper & the work involved installing it.
 
It's cool looking at the different views & details of your shrockworks bumper & the work involved installing it.

They are super nice bumpers but a pain in the dick to install. I had mine powder coated so I had to notch my radiator support brackets for the bumper brackets to clear everything. I'm glad I bought mine during the last winter group buy now. I really hope Shrockworks wasn't affected from Harvey...
 
nice bumper mike. What bout the winch area? how will you be able to access the winch free spool and stuff with the top being covered?

btw let me get that hood, its the same color as my truck lol
 
It's cool looking at the different views & details of your shrockworks bumper & the work involved installing it.

Thanks, lots of people take pics when delivered & when installed but not what the brackets & inside of the bumper look like. I feel like I'm posting too many pics but I'm only posting half of what I took. LOL

They are super nice bumpers but a pain in the dick to install. I had mine powder coated so I had to notch my radiator support brackets for the bumper brackets to clear everything. I'm glad I bought mine during the last winter group buy now. I really hope Shrockworks wasn't affected from Harvey...

Yea, they're a little bit of work. That's one of the reasons I didnt order it powder coated. It was a good way for me to get my feet wet working with metal. I'm pretty good with wood but I haven't worked with metal since my machine shop & sheetmetal classes in high school.

nice bumper mike. What bout the winch area? how will you be able to access the winch free spool and stuff with the top being covered?

btw let me get that hood, its the same color as my truck lol

You can access the winch from the 2 cut outs in the bottom front, SW builds these mainly for Warn 8000-9500 sized winches.

You can have my hood for 1 million dollars! :-)
 
Last edited:
July 2015

A few posts back I mentioned that I re-painted the bumper with Dupli-Color Semi Gloss Black Enamel because the Dupli-Color Semi Gloss Black Lacquer was susceptible to rock chips. Here's the difference in sheen. I really like the matte look of the lacquer better but durability is more important. The enamel was much harder to blend. The lacquer was so much easier to work with.
Lacquer on the top & Enamel on the bottom.
 

Attachments

  • IMG_1092.jpg
    IMG_1092.jpg
    152.2 KB · Views: 1,977
  • IMG_1244.jpg
    IMG_1244.jpg
    141.8 KB · Views: 1,946
Last edited:
Aug 2015

After getting the bumper squared away it was time to wire the lights.
The Shrockworks directionals plug in to the factory wiring so that was easy.
When I ordered the bumper I also ordered 2 sets of PIAA Ion Crystal Fogs with Black housings because they also received the 20% off in the group buy. I ordered the 4" 510's for inside the bumper & the 6" 520's for the top of the bumper.

PIAA Ion Crystal Fogs

It doesn't look like I took a lot of pics on this install. I was racing against daylight from what I remember.

https://www.amazon.com/PIAA-520-Cry...505354378&sr=1-1&keywords=piaa+520+fog+lights

https://www.amazon.com/PIAA-5101-51...505356234&sr=1-2&keywords=piaa+510+fog+lights

I also ordered new headlight assembly's from TYC on Amazon. $76.96 for 2 new headlights is pretty amazing & that brand gets the best reviews of any aftermarket headlight.

https://www.amazon.com/TYC-20-5652-...1-2013-199-3-0&sr=1-1&ymm=1999:toyota:4runner

Here's the PIAA relays. This is the DS fender in front of the battery & behind the headlight. I used whatever bolts I had laying around that would fit in the factory holes. Nothing scientific about this at all. LOL

IMG_1248 by Mike Campbell, on Flickr

I bought some 5/8" Split Loom Flexible Tubing Conduit Hose for a factory look up to the fire wall.
https://www.amazon.com/gp/product/B00U8L9ZPW/ref=oh_aui_detailpage_o05_s00?ie=UTF8&psc=1
I used an old wire hanger & some duct tape to push/pull the wires through the rubber grommet.

IMG_1249 by Mike Campbell, on Flickr

I think I did a pretty good job keeping it neat.

IMG_1245 by Mike Campbell, on Flickr

IMG_1246 by Mike Campbell, on Flickr

IMG_1247 by Mike Campbell, on Flickr

And the night shots.

IMG_1252 by Mike Campbell, on Flickr

IMG_1253 by Mike Campbell, on Flickr

IMG_1256 by Mike Campbell, on Flickr

IMG_1259 by Mike Campbell, on Flickr
 
Last edited:
Very nice work on the prep and paint job on the bumper.

That sand dune color with those later model 4runner wheels look fantastico! :)
 

Members online

Forum statistics

Threads
278,316
Messages
3,554,120
Members
248,016
Latest member
Advally Service

Trending content

Back
Top