Seat Heater Install

Still have driver seat to do. Just finished up passenger seat today. Did wiring yesterday.

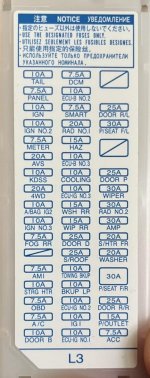
My biggest concern here is the wiring at the fuse panel. My old Audis have a line of posts that you can easily wire in new accessories whereas here there's really nothing to work with. I'd like to eventually wire this better since it doesn't seem all that practical long term. The two 20amp yellow fuses are for the heaters, the 5amp Brown one is for the switches (doubled up). The one at the top is for my ARB compressor switch. All the heated seat components were tapped into unused fuse slots. Any suggestions for better wiring are most welcome!

Blue sea fuse box under the glove box.
 
Seat Heater Install:
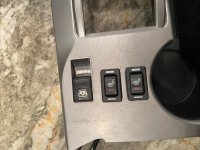
So a few years ago I removed the cloth and threw on some 'leather'. See signature for details. During that process I installed 'besond seat heaters'. They are similar to 'rostra' and the switch looks 'OEM' (scroll dial like the dimmer switch). The switch has an amber/orange light to tell you that it is on, and the 'heating' gauge glows green (vs. stock blue). Install in the OEM spot on the center console near the rear window switch. The instructions were lacking and while similar to the rostra, they weren't 100% clear on power needs etc.

Concerned about the power needs, and not being in a cold environment at the time, I never got around to hooking the system up electrically, and just installed the pads.

Long story short, I finally got around to fidgeting with the electrical and got it all hooked up.

They claim they pull 27 +/-3 watts per pad (1 seat pad, 1 back pad, multiplied by 2 seats . At 14.4 Volts that's roughly 8.3 amp draw (10 amp at 12 Volts).

The power leads for each had a 20 amp fuse, and the ignition on switch was wired with a 5 amp (that's a total of 50 amps going by the fuses). The 'night light' wire had no fuse.

I measured the amp draw using an amp clamp and combined the seats on high pulled a total of 8 amps.

So I hooked that bad boy right up to the "S/HTR FR" interior fuse box which has a 20 amp fuse in it and is already relayed to ignition on. Threw in an 'add a circuit' fuse tap with a 20 amp fuse to power and ignition signal the seats, and we're good to go.

I then threw on another 'add a circuit' fuse tap with a 5 amp (could probably be a 2 amp or lower) for the 'night light' function on the 'TAIL' interior fuse box.

Works like a champ.
 
3-Wire Install

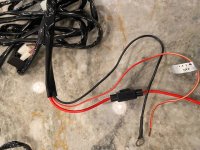
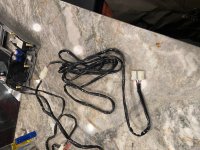
In the middle of installing this kit bought off Amazon. The kit I got has two position (Hi/Low) rocker switches. Wire harness has Red, Red/Yellow stripe and black wires. Instructions for Single-Dial Switch kit describe same number of wires and say to install Red/Yellow stripe wire to Ignition Positive 5 amp circuit. Is this the same as the positive on P/RND plug?

Also, the harnesses have quite a bit of length to the plugs to the warmers. Should I bundle excess and leave in the console?
 

Attachments

  • IMG_8311.jpg
    IMG_8311.jpg
    114.6 KB · Views: 2,360
  • IMG_8312.jpg
    IMG_8312.jpg
    124.1 KB · Views: 2,275
  • IMG_8313.jpg
    IMG_8313.jpg
    90.4 KB · Views: 2,316
How do you remove Passenger side recliner handle?

Need to remove the handle to get the plastic panel off.

Edit: Nevermind, found it in the Repair Manual. Still not easy to get off, but success.
 
Last edited:
Install Completed

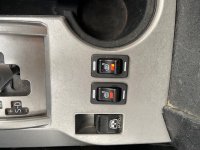
Like others said, would take half the time the 2nd time around. Removing plastic pieces from the seats is a pita and just feels like you're breaking the parts off. Warmers work well and my wife is happy: warm booty = happy wife.
 

Attachments

  • Seat Warmer .jpg
    Seat Warmer .jpg
    95.5 KB · Views: 2,786
nice job! which kit did you order from amazon? i've looked at several but don't see those switches; only the little round ones.
 
nice job! which kit did you order from amazon? i've looked at several but don't see those switches; only the little round ones.

This one:

Amazon.com: Besond Rectangle hi-Off-lo Switch Heated seat, Carbon Fiber Heater Element,Heated seat Two Seats : Automotive

Similarly, I did not want the round switches. Toyota's rocker switches ranged in price from $53 to over $100 for one switch. You'll have to dremel out the lower plastic where the dummy plugs went in to take the larger rectangle rocker switches, but it's not a big deal. They come with an extra-long wiring harness, as in way too much. I coiled that up, zip tied and stuffed one under the rear part of the console and the other next to the shifter. Placed the wiring in one of those plastic spring covers and ran under the carpet along the tunnel under the driver's seat where Toyota ran a wiring bundle, then up under the door sill cover and up the front pillar to the fuse box. Both heater wires to a mini fuse tap with 10A fuse and both LED light wires to a mini fuse tap with 5A fuse. They are working fine. You could just join those wires under the center console and just run single wires to the fuse box for the switches and LED lights. The wiring is the easy part. Taking apart the seats is the tough part. Though I have hog ring pliers, I zip tied back together.

Like the OP said, it helps to have the Toyota Repair Manual downloaded. I had already done this from some prior work, but it is 8,954 pages and not indexed and I don't know how to search it. Of course the sections addressing the seats are around page 7,500 SMH.

I ordered on the iPhone while in the car traveling down from Montana to Southern California because my wife wanted it for Xmas. Auto shop in Missoula wanted $450 to install a kit and needed the car for a full day. My Suburban was torn apart with me replacing worn UCA bushings, ball joints and tie rod ends, so I could not get her car there for the install before we left for SoCal for Xmas with the family and Rose Bowl Game. My recovery was to order and install myself. I am now a hero with a happy wife.....and that part works :-)
 
Last edited:
how long/hard was it taking the upholstery off? i saw the guy who started this thread in 2011 say it took 5 hours for the first and 2 hours for the second but that was like 56 pages ago ;)
 
how long/hard was it taking the upholstery off? i saw the guy who started this thread in 2011 say it took 5 hours for the first and 2 hours for the second but that was like 56 pages ago ;)

About 2 hours for each, but really got stuck on the passenger side recliner lever handle. There is a tab on the inside you need to pry up to slide it off and it is
not intuitive. I quit and read the manual, leaving this for the next morning when I was fresh (on vacation/time off). I wasted the most time running around trying to find the mini fuse taps. Supply chain issues really messing things up.

The seat back upholstery has zippers on the sides, so you only need to clip the bottom 3 hog rings and you can slide the heat mat up inside to the first cross list in the foam. I trimmed the heat mat down to the carbon fiber elements on the top so it would be heat all the way up to the list. You don’t need mat above that list as it would be across the shoulder blades and then nothing at the small of your back where
EVERYONE with old backs wants it. So the seat back is real easy.

The seat bottoms you have to clip 15 hog rings each and you need to cut out the section without carbon heating wires in the mats so you can anchor the upholster cover down into the list. I used zip ties instead of hog rings. You will need a bag of 50.
 
Last edited:
Seat heaters finally installed

Well, after about 10 hours total work, I finally have the Rostra seat heaters installed. Overall, I'm satisfied, but this job was probably one of the biggest pain in the @$$ jobs I've ever done. Very hard on the hands and back.

Anyway, I found this thread very helpful, as well as Rostra's youtube site which lists fairly decent instructions for installing the heat element pads on a Tacoma (essentially the same). Physically, this was the most difficult part of the task.

Now, the electrical was a particular nightmare, as there aren't really any good "standard" processes for running the power. So, like everyone else, I improvised and took a few lessons learned from several others on this thread. I used an add-a-circuit tapped directly into the fuse panel for the 20A seat heater slot. I pig tailed the add a circuit and ran both hot leads from the left and right seats to this single power tap. I ran the ground loops to the emergency brake mount bracket which is directly forward of the fuse box. I spent the rest of the time wrapping, looping, and zip tying a lot of excess wiring up under the steering wheel. Unfortunately, the "green" illumination wires which run to the switches I didn't connect. The reason is that one of the switches illumination didn't work. So, opted just to cut both wires and then capped them off. I still get the orange lights when the heaters are on, Just no green illuminated dials when the headlights are on.

Anyway, after two days of work, the job is done. I will chalk this up as one of those jobs that I will never do again.....much like mudding/sanding drywall. I don't do that anymore either! Thanks to all who provided their inputs on this thread. It truly helped!

 
I had Katskin interior put in my Miata, for $150 more they installed heated seats. Extended convertible time significantly. I will also never own a car without remote start.
 
Last edited:
Has anyone here done rear seat heaters?

I'm curious where to connect them in the fuse box? I have stock front seat heaters so this pin in the fuse box is already taken.
 
Has anyone here done rear seat heaters?

I'm curious where to connect them in the fuse box? I have stock front seat heaters so this pin in the fuse box is already taken.

I believe there are other open accessory power slots in the cabin fuse panel. In fact, I am going to re-wire mine to have each seat (left/right) on a single circuit from the panel. Will reply when I identify another available slot.
 
I believe there are other open accessory power slots in the cabin fuse panel. In fact, I am going to re-wire mine to have each seat (left/right) on a single circuit from the panel. Will reply when I identify another available slot.

[MENTION=646448]wtrouble88[/MENTION]


Where did you end up putting the 2nd heater?

I have wire taps that are max 15 amps, so I have to put them on individual circuits on a 2022 Trail Special Edition.

I tried the Seat Heater slot, that worked well. I tried the moonroof slot, since I don’t have one. (“S/Roof”). That worked, but unfortunately it is always powered on (this must be because Homelink needs to be on always to open garage doors. I don't have that either).

I will try blanks tonight. Also, I don’t have a power passenger seat, so that’s an option.

My wiring diagram :
 

Attachments

  • B85B9FD1-0DB0-419D-B4F1-5DC9BD8F4E48.jpg
    B85B9FD1-0DB0-419D-B4F1-5DC9BD8F4E48.jpg
    100.9 KB · Views: 526
Last edited:
[MENTION=646448]wtrouble88[/MENTION]


Where did you end up putting the 2nd heater?

I have wire taps that are max 15 amps, so I have to put them on individual circuits on a 2022 Trail Special Edition.

I tried the Seat Heater slot, that worked well. I tried the moonroof slot, since I don’t have one. (“S/Roof”). That worked, but unfortunately it is always powered on (this must be because Homelink needs to be on always to open garage doors. I don't have that either).

I will try blanks tonight. Also, I don’t have a power passenger seat, so that’s an option.

My wiring diagram :

I wired both seat heaters into the single seat heater fuse location with an add-a-fuse. They work great. For whatever reason, it took about an hour of continuous use to get them to heat up for the first time. Since that initial burn in, they heat up immediately and get nice hot. Weird but oh well. They work!
 
Ordered the Clazzio seat covers and their Toyota style seat heater with switches. Still waiting for them to arrive, but want to get familiar with how to wire them.

What’s the easiest and safest way to wire these? I don’t care for the backlight on the switches themselves, but just want to make sure there’s no power to them when the car isn’t running to prevent battery drain.

From reading this thread, the simplest way seems to be using the add a fuse, but I see various methods of how users are hooking it up. Some use two add a fuse, some tie both power wires from both heating pads into one add a fuse, etc. How do you know which fuse(s) to run? I also see different amps being used and it’s confusing me even more.
 

Members online

Forum statistics

Threads
278,312
Messages
3,554,085
Members
248,016
Latest member
Advally Service

Trending content

Back
Top