Socco Builds A Roof Rack

Socco

New member
Hey Y'all,

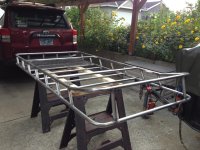
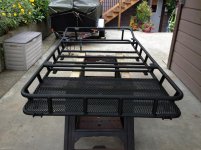
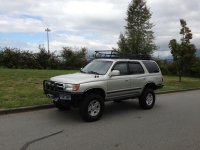
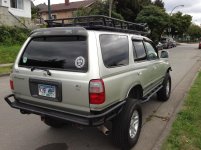
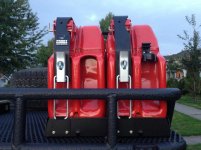
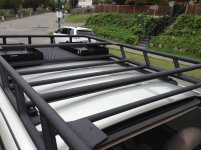
I was never in the market for a rack, but a few upgrades led to my change of heart. After doing the TBU, I picked up a spare 5 Star rim as the steel spare wouldn't fit over the front calipers any longer. Then I found that it really didnt fit under the truck very well either. Taking up too much room in the back, I started to look up. I always wanted to carry some Jerrys of fuel and to have a place to mount auxiliary lighting. Hence, now I needed a rack. So after admiring other dudes' racks :boink: (obligatory rack joke: check) I decided to give it a try. I could have just bought one and have been done with it, but I rarely get a chance to play with my MIG.

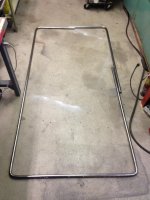
With an el' cheapo pipe bender and a tube notcher picked up from Harbour Freight, I started to make a mess...err...rack. In my "design" I drew from several ones that I liked to make what I had envisioned. Here she be...
 

Attachments

  • IMG_0780.jpg
    IMG_0780.jpg
    131.3 KB · Views: 3,800
  • IMG_1003.jpg
    IMG_1003.jpg
    125 KB · Views: 3,822
  • IMG_1005.jpg
    IMG_1005.jpg
    137 KB · Views: 4,003
Register to hide this ad
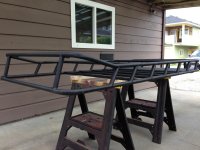
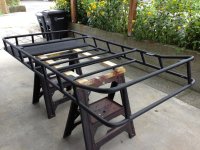
After Rhino Liner....

Next is wiring up the lights and finishing the front stabilizer feet.
 

Attachments

  • IMG_1018.jpg
    IMG_1018.jpg
    131.3 KB · Views: 9,129
  • IMG_1016.jpg
    IMG_1016.jpg
    138.9 KB · Views: 3,874
  • IMG_1017.jpg
    IMG_1017.jpg
    138.3 KB · Views: 11,148
  • IMG_1019.jpg
    IMG_1019.jpg
    135.6 KB · Views: 4,014
  • IMG_1021.jpg
    IMG_1021.jpg
    136.5 KB · Views: 5,123
  • IMG_1022.jpg
    IMG_1022.jpg
    122.1 KB · Views: 3,790
  • IMG_1029.jpg
    IMG_1029.jpg
    135.5 KB · Views: 3,758
  • IMG_1024.jpg
    IMG_1024.jpg
    135.9 KB · Views: 15,746
Thanks to everyone for the compliments! Its nice to see enthusiasm from someone other than myself...My wife got pretty bored hearing about it!

Lol that was a big jump from the first pic to the third pic. Looks sweet!

Ha! Yeah, at first I forgot to resize my pics so I was having a real B of a time uploading them last night. Besides, the "During" pics were boring.

That is nice!! how much you got into that??? What is it made out of?

I stopped keeping track of the $. Not because it was expensive, but I just got lazy. The 1" 16ga tubing was around $100, The 1/4" plate for the tabs and the expanded metal was kicking around the house. The bar stock for the mounting feet was $20-$30. Stainless hardware will be near $30. The most expensive part was the Liner, it was done for $200.
 
Well done Seth, got my first hand impression of your rack build on Facebook and I thought......that was very cool!
 
My build seems to be slowly fading... I'm holding on to hope that I can start sometime before I die! What are the specs on the tube you used, and @ how much do you have in that?
 
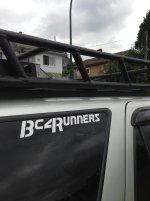
Sweet looking Rack. Saw the pictures on the BC runners Facebook page as well. You say you did the bending and notching with harbour freight stuff? Is there anything at princess auto that wold be similar? You've inspired me!
 
My build seems to be slowly fading... I'm holding on to hope that I can start sometime before I die! What are the specs on the tube you used, and @ how much do you have in that?

Tube was all 1" 16 gauge mild steel. I think there's around 85' there with all the risers and cross bars.

Sweet looking Rack. Saw the pictures on the BC runners Facebook page as well. You say you did the bending and notching with harbour freight stuff? Is there anything at princess auto that wold be similar? You've inspired me!

Thanks! Princess only has the bender. KMS has both:

Magnum Tubing Notcher [MAG-PN12S] - $67.95 : KMS Tools & Equipment from Vancouver BC, Largest selection of tools in Canada Portable Hydraulic Pipe Bender [TBR-TA1202] - $169.99 : KMS Tools & Equipment from Vancouver BC, Largest selection of tools in Canada

The bender is $100 at HF, I sold mine after using it for $80. The trick to using it is to pack the tube FULL of sand, otherwise it will kink. I had to stop myself from buying a real bender.
 
Thanks! Princess only has the bender. KMS has both:

Magnum Tubing Notcher [MAG-PN12S] - $67.95 : KMS Tools & Equipment from Vancouver BC, Largest selection of tools in Canada Portable Hydraulic Pipe Bender [TBR-TA1202] - $169.99 : KMS Tools & Equipment from Vancouver BC, Largest selection of tools in Canada

The bender is $100 at HF, I sold mine after using it for $80. The trick to using it is to pack the tube FULL of sand, otherwise it will kink. I had to stop myself from buying a real bender.


Cool thanks for the reply. Is the rack flat or does it have a bend in it to match the shape of the roof?

It's going to look bad a$$ with some lights mounted on the front!
 
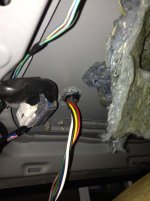
Started wiring up the roof lights today. I took a deep breath and drilled a big hole....I'll be using 12/1+16/6 Trailer wire as conductor between a fuse/relay block and a J box on the rack. More pics to follow, I promise.
 

Attachments

  • IMG_1035.jpg
    IMG_1035.jpg
    122.5 KB · Views: 1,225
Ok, so a little more progress to report on. The most exciting part is that I finally figured out how to use Photobucket to put pics on the post. Enjoy!
So I found a nice little spot for my Relay/Fuse block

IMG_1037_zps8d23134a.jpg~original


Ran 8 GA wire from the battery, through a 50A CB (under the red cap) along the rear brake line and up into the cab.
IMG_1059_zps42b5cdf9.jpg~original

IMG_1061_zps1227ad26.jpg~original

IMG_1051_zps82ccebeb.jpg~original


Mounted the block to the inside of that hidden pocket in the rear. The stuff that looks like green bubble gum is actually plastic (PP) welding rod.

IMG_1053_zps38c1c82a.jpg~original


Remounted the rear trim panel...IT FITS!!!!:party:

IMG_1054_zps62cb21e4.jpg~original


The cover sits just shy of even with the panel, doesn't stick out like I'd feared.

IMG_1055_zps458bde59.jpg~original


Got the switches from OTRATTW wired up to WeatherPack plugs, for easy bolster plate removal in the future.

IMG_1045_zpsa67c81f9.jpg~original


Wired the switches so that the icon and wording is illuminated with the parking lights. The Red "On" indicator is paralleled with the output so it lights when switched on.

IMG_1058_zps9137aaa7.jpg~original


I've got the Left Alley and Rear lights completed, but I ran out of corrugated loom and time the other day. Hopefully I can get it finished up on Friday night. Stay tuned....
 

Members online

Forum statistics

Threads
278,316
Messages
3,554,106
Members
248,016
Latest member
Advally Service

Trending content

Back
Top