

DreamsOfDirt
New member
In this thread I'll share my experience in self installing sound deadening. Hopefully someone else can learn from my mistakes.
I decided to add sound deadening to my 2018 ORP for two reasons: improved audio quality and reduced road noise. My primary focus in the doors and tailgate, but I expect I'll end up doing the floor too in order to abate the road noise.
After research on this forum, google, and Youtube, I decided to utilize Soundskins brand sound deadening - at least for the doors. As you might imagine there are seemingly endless options from the classic Dynamat to more non-traditional materials like Frost King Duct wrap (I believe Antman did a mod with something similar to the latter). In the end I selected SoundSkins given it combines the foil and butyl of Dynamat extreme with acoustic foam for an all in one product.
I had a full eight hours to myself, surely enough time to knock out the doors and tailgate - nope. I ended the day with only one door done. Some of this was natural learning curve. Some of it was a couple trips to the hardware store. Finally, some of this was due to some OCD tendencies. I knocked out the second door (outer and inner skin) in 3 hours. I'm confident I will do the third door in even less time.
Here's what I learned from that first debacle of a day (in order importance):
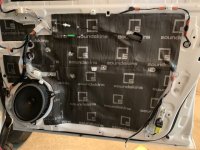
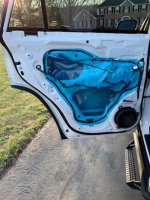
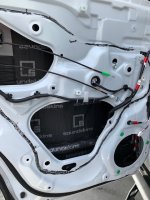
1. Using a large single sheet of sound deadening material on the inner skin (metal that the trim panel hooks to) looks cool but is a giant, time consuming, pain to accurately cut. You'll end up needing two pieces anyway if using the SoundSkins Pro roll due to the 4runner door size. Listening to the online videos, it seems simple enough: make a template/tracing on paper or semi-transparent tape, and then cut the sound deadening material to match. Per online suggestions I tried using carpet protection sheeting (tape) - too sticky to get laid out without crinkles / make a good trace. If you had a second person to help you layout the tape tie might work better. I also tried wax paper with some success, but still had some issues with alignment. When I moved to the passenger door I used several pieces on the interior skin, it doesn't look as nice as a full sheet, but it looks pretty good AND is infinitely easier to work with and quicker. Below I've posted a picture of the completed passenger door - two larger pieces to cover the two larger holes in the door panel. several small pieces to fill in around bolts, speaker, etc. If I have one piece of advice, it's to use multiple pieces.
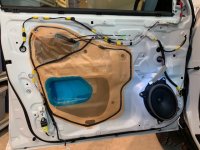
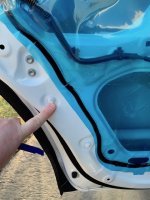
2. Look carefully at your door and the backside of the trim panel prior to starting to apply material to the inside skin. I made a mistake on the first door of covering a couple of holes for trim clips and I went way to high up on the door with material (1/2 inch from the window). This resulted in me pulling off material to get the door panel back on and really pissing me off because it looked like crap after all my work to use one larger sheet on the driver side.
3. Watch videos online. The Taco Tunes guys have some great videos including one on taking off the trim panel. With their video and one door of practice I was down to 9 minutes to remove the panel off the second door. Sound Skins videos were somewhat helpful, but I found that when putting material inside of the door their cardboard method of sizing pieces was more cumbersome than just measuring with a small tape measure. Finally, Car Audio Fabrication has several great videos and links to products used. I appreciated the tip to try to use carpet protection film instead of the pricey Tesa tape to make a template/tracing, even though it didn't work for me. One good tip from them was to use leather punches to make perfectly round holes in the material for bolts/wires. My local Ace hardware guy actually found a cheaper way - take a metal tube (he gave me copper) of the diameter you want (I chose 1"), and sharpen one end of the tube (he did it for me in the back).
Taco Tunes:
https://www.youtube.com/watch?v=0AB4l5y6Sa8&index=2&list=PLFuSO7p8sCy10Vk2DvJcxCy7xCidVhEXf
Sound skins official video:
https://www.youtube.com/watch?v=5PZx189lR2k
Car Audio Fabrication:
https://www.youtube.com/watch?v=oIzkhrkTZwk
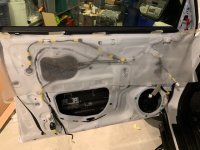
4. The adhesive Toyota uses to hold the factory plastic sheeting on over the holes is the devil. In a perfect world, all the material should be taken off, but after far too much time trying I just left some on there and sound deadened over it. Not ideal, but I'm expecting / hoping it won't cause major issues.
5. The piece of styrofoam held in place with two bolts inside the door is also adhered with foam tape to the outer skin. It can be removed by working it back and forth and pulling it back towards yourself/up. Removing the foam adhesive is also a pain, but not as bad as the devil adhesive above.
6. When cutting pieces for the outer skin (inside the door), I found it easiest to do five pieces: two pieces going from the bottom of the door up to the cylindrical support bar (meet in the middle of the door), two pieces above the support bar, but in this case I ran pieces the entire width of the door, about 10" high. for the top strip I stopped at the edge of the door handle assembly. Finally, one piece wrapped around the support bar.
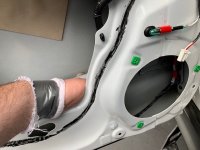
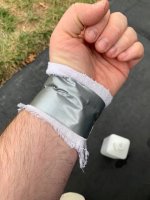
7. Others have suggested wearing long sleeves and gloves to protect against cuts from sheet metal. The shirt was somewhat helpful, but I didn't like the gloves. Going forward I'm going to wrap a strip of fabric around my wrist and then wrap it in duct tape. I cut both my wrists as I was trying to place the material in the bottom interior of the door. the space is tight and I cut them when turning my hands. My fingers survived unscathed.
8. Suggested tools: Snap off knife or utility knife (I preferred snap off knife, although I used both) (required), socket set (required), Phillips screwdriver (or drill with Phillips bit) (required), small flat head screw driver (required), seam roller - wooden or plastic (I recommend ordering online in advance. Home Depot does not carry them and I ended up getting a plastic one from Ace in a pinch) (required), panel tools, sharpie, small tape measure (smaller size is easier to manipulate with one hand inside of the door), cardboard or plywood to cut material on, rubbing alcohol or degreaser to clean metal, rags, scissors (useful if you need to cut material once it's applied and you need to peel it back), 1" leather punch or copper pipe for making clean holes, stool to sit on, old blanket to set your door panel on once removed, and Tupperware to keep all door hardware in while you work.
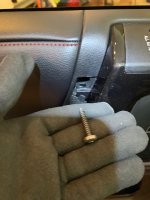
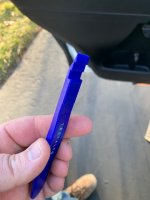
9. When prying off the small square access point on the trim to access the screw, use your screwdriver and put it in the corner, not the middle. It will pop off easier. You can see in the pic below I scratched the trim panel a bit when I tried to put the screw driver in the middle. Still pissed at myself for that one.
10. Make sure all clips are in the trim panel (not in the door) before trying to re-install the trim panel onto the door.
That's it for now - more to come as I move to other doors (hopefully next week), and eventually onto the floor.
I decided to add sound deadening to my 2018 ORP for two reasons: improved audio quality and reduced road noise. My primary focus in the doors and tailgate, but I expect I'll end up doing the floor too in order to abate the road noise.
After research on this forum, google, and Youtube, I decided to utilize Soundskins brand sound deadening - at least for the doors. As you might imagine there are seemingly endless options from the classic Dynamat to more non-traditional materials like Frost King Duct wrap (I believe Antman did a mod with something similar to the latter). In the end I selected SoundSkins given it combines the foil and butyl of Dynamat extreme with acoustic foam for an all in one product.
I had a full eight hours to myself, surely enough time to knock out the doors and tailgate - nope. I ended the day with only one door done. Some of this was natural learning curve. Some of it was a couple trips to the hardware store. Finally, some of this was due to some OCD tendencies. I knocked out the second door (outer and inner skin) in 3 hours. I'm confident I will do the third door in even less time.
Here's what I learned from that first debacle of a day (in order importance):
1. Using a large single sheet of sound deadening material on the inner skin (metal that the trim panel hooks to) looks cool but is a giant, time consuming, pain to accurately cut. You'll end up needing two pieces anyway if using the SoundSkins Pro roll due to the 4runner door size. Listening to the online videos, it seems simple enough: make a template/tracing on paper or semi-transparent tape, and then cut the sound deadening material to match. Per online suggestions I tried using carpet protection sheeting (tape) - too sticky to get laid out without crinkles / make a good trace. If you had a second person to help you layout the tape tie might work better. I also tried wax paper with some success, but still had some issues with alignment. When I moved to the passenger door I used several pieces on the interior skin, it doesn't look as nice as a full sheet, but it looks pretty good AND is infinitely easier to work with and quicker. Below I've posted a picture of the completed passenger door - two larger pieces to cover the two larger holes in the door panel. several small pieces to fill in around bolts, speaker, etc. If I have one piece of advice, it's to use multiple pieces.
2. Look carefully at your door and the backside of the trim panel prior to starting to apply material to the inside skin. I made a mistake on the first door of covering a couple of holes for trim clips and I went way to high up on the door with material (1/2 inch from the window). This resulted in me pulling off material to get the door panel back on and really pissing me off because it looked like crap after all my work to use one larger sheet on the driver side.
3. Watch videos online. The Taco Tunes guys have some great videos including one on taking off the trim panel. With their video and one door of practice I was down to 9 minutes to remove the panel off the second door. Sound Skins videos were somewhat helpful, but I found that when putting material inside of the door their cardboard method of sizing pieces was more cumbersome than just measuring with a small tape measure. Finally, Car Audio Fabrication has several great videos and links to products used. I appreciated the tip to try to use carpet protection film instead of the pricey Tesa tape to make a template/tracing, even though it didn't work for me. One good tip from them was to use leather punches to make perfectly round holes in the material for bolts/wires. My local Ace hardware guy actually found a cheaper way - take a metal tube (he gave me copper) of the diameter you want (I chose 1"), and sharpen one end of the tube (he did it for me in the back).
Taco Tunes:
https://www.youtube.com/watch?v=0AB4l5y6Sa8&index=2&list=PLFuSO7p8sCy10Vk2DvJcxCy7xCidVhEXf
Sound skins official video:
https://www.youtube.com/watch?v=5PZx189lR2k
Car Audio Fabrication:
https://www.youtube.com/watch?v=oIzkhrkTZwk
4. The adhesive Toyota uses to hold the factory plastic sheeting on over the holes is the devil. In a perfect world, all the material should be taken off, but after far too much time trying I just left some on there and sound deadened over it. Not ideal, but I'm expecting / hoping it won't cause major issues.
5. The piece of styrofoam held in place with two bolts inside the door is also adhered with foam tape to the outer skin. It can be removed by working it back and forth and pulling it back towards yourself/up. Removing the foam adhesive is also a pain, but not as bad as the devil adhesive above.
6. When cutting pieces for the outer skin (inside the door), I found it easiest to do five pieces: two pieces going from the bottom of the door up to the cylindrical support bar (meet in the middle of the door), two pieces above the support bar, but in this case I ran pieces the entire width of the door, about 10" high. for the top strip I stopped at the edge of the door handle assembly. Finally, one piece wrapped around the support bar.
7. Others have suggested wearing long sleeves and gloves to protect against cuts from sheet metal. The shirt was somewhat helpful, but I didn't like the gloves. Going forward I'm going to wrap a strip of fabric around my wrist and then wrap it in duct tape. I cut both my wrists as I was trying to place the material in the bottom interior of the door. the space is tight and I cut them when turning my hands. My fingers survived unscathed.
8. Suggested tools: Snap off knife or utility knife (I preferred snap off knife, although I used both) (required), socket set (required), Phillips screwdriver (or drill with Phillips bit) (required), small flat head screw driver (required), seam roller - wooden or plastic (I recommend ordering online in advance. Home Depot does not carry them and I ended up getting a plastic one from Ace in a pinch) (required), panel tools, sharpie, small tape measure (smaller size is easier to manipulate with one hand inside of the door), cardboard or plywood to cut material on, rubbing alcohol or degreaser to clean metal, rags, scissors (useful if you need to cut material once it's applied and you need to peel it back), 1" leather punch or copper pipe for making clean holes, stool to sit on, old blanket to set your door panel on once removed, and Tupperware to keep all door hardware in while you work.
9. When prying off the small square access point on the trim to access the screw, use your screwdriver and put it in the corner, not the middle. It will pop off easier. You can see in the pic below I scratched the trim panel a bit when I tried to put the screw driver in the middle. Still pissed at myself for that one.
10. Make sure all clips are in the trim panel (not in the door) before trying to re-install the trim panel onto the door.
That's it for now - more to come as I move to other doors (hopefully next week), and eventually onto the floor.



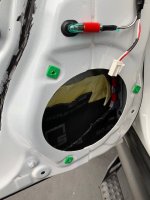


 I picked up a box of 12 sheets of M.E.S.A. dampening mats from a local shop instead of dynamat for 75$ and it seems fine. I'll probably pick up a bigger hush mat kit for the rear doors and cargo area.


