
You are using an out of date browser. It may not display this or other websites correctly.
You should upgrade or use an alternative browser.
You should upgrade or use an alternative browser.
Sp8Ball’s Mod Thread (Stealing Other Poster’s Ideas Since Mid-2010)
- Thread starter sp8ball
- Start date

sp8ball
New member
Keep up the good work, helpful for clueless owner like me :thumb3:
You can't be as clueless/overwhelmed/intimidated as I feel when I look at half of the things these guys do...
sp8ball
New member
Modification: Front Window Tinting
3M 20-percent Window Tint Film: $130 (plus tax) for front driver & passenger windows
D&L Window Tinting, White Marsh, MD
D&L Professional Window Tinting - Automotive - -
Difficulty Scale (1 to 10): One (driving to the store)
Sp8ball’s Personal Intimidation Factor (1 to 10): None (they’re the best around)
Install Time: 30 minutes (by someone else)
Reason for Doing It: Even up the appearance of the windows when viewed from the side, cut down on sun exposure during the summertime, as being exposed to harmful UV rays can cause…screw it – because it looks awesome!
Benefit: Looks great, cuts down on the heat impact on sunny days, and the tinting film allegedly will keep glass from flying around during an accident.
Cons: The front windows will be tinted with a film, while the rear windows are “dyed” with the tint in the glass at the factory…so they will not be an absolute perfect match (more obvious from the inside than the outside)
Other Products Considered: The shop carried three levels of tint - the 3M brand, another brand, and the shop brand. I went with the 3M (top level), and prices vary depending on what brand you choose.
_____________________________
Not much to say here – I’m posting a mod that involved me handing someone my debit card and saying “thanks”.
But I think there’s one nugget of wisdom to pass along in this: you can relax and just put your worries aside if you know you’re using the best service in town.
I was told that there were cheaper places to go, and that everyone guarantees their work…so why pay 10% more to go to D&L? Well, I chose a vendor with a top notch reputation, and never worried about the quality of the work being done. So if you’re going to do a mod like this – where the work falls entirely to someone who you’re paying to do it – always factor in reputation and peace of mind.
Since this is a boring post, I’ll add these two stories:
1) When I first go to the tint shop, I wanted to know what my options were for tinting the windows. But I’ve never had a car tinted before, and I had to humble myself and ask the stupid questions about how those options lined up with what was “legal” in our state. I thought the girl told me that for vans and SUVs, there was no legal issue for tinting. Then one of the guys came in off the shop floor, and when she asked him what they usually do for SUVs, he said they hit the rear windows with 20 and put limo tint on the fronts to black them out. I thought this was interesting.
I went outside to call my wife (OK, I was getting permission…big deal!), and she actually approved the limo tint idea…as long as I heard what I heard correctly. There were a couple of D&L corporate trucks in the parking lot (with limo tint), and they looked good so I went inside and told her I was ready to do it. But when I asked if that was legal, she said “not even close”. She then proceeded to tell me that, based on the county where I live, if I tinted my windows that way I would likely be in 3 weeks later getting it stripped out. I went with the “match the front to the rears” approach, which is still a hair illegal…but much less likely to get me pulled over.
2) I looked out in the bay while they were finishing up my tint job. I saw that the fronts were WAY darker than the second row windows. I panicked. Did I accidentally tell them to do limo tint on the front windows, from the earlier conversation? Was the tint difference between the factory tint and their tint sheets that big?
Nope. They just rolled the rear windows down in case the keys got stuck in the car…
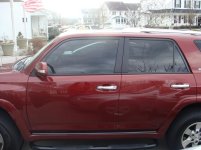
Anyway…here’s a pic. When the weather cleared a bit, it was dusk and overcast – not the best conditions to take a picture showing how cool your window tint is…
I’ll post more during the weekend.
3M 20-percent Window Tint Film: $130 (plus tax) for front driver & passenger windows
D&L Window Tinting, White Marsh, MD
D&L Professional Window Tinting - Automotive - -
Difficulty Scale (1 to 10): One (driving to the store)
Sp8ball’s Personal Intimidation Factor (1 to 10): None (they’re the best around)
Install Time: 30 minutes (by someone else)
Reason for Doing It: Even up the appearance of the windows when viewed from the side, cut down on sun exposure during the summertime, as being exposed to harmful UV rays can cause…screw it – because it looks awesome!
Benefit: Looks great, cuts down on the heat impact on sunny days, and the tinting film allegedly will keep glass from flying around during an accident.
Cons: The front windows will be tinted with a film, while the rear windows are “dyed” with the tint in the glass at the factory…so they will not be an absolute perfect match (more obvious from the inside than the outside)
Other Products Considered: The shop carried three levels of tint - the 3M brand, another brand, and the shop brand. I went with the 3M (top level), and prices vary depending on what brand you choose.
_____________________________
Not much to say here – I’m posting a mod that involved me handing someone my debit card and saying “thanks”.
But I think there’s one nugget of wisdom to pass along in this: you can relax and just put your worries aside if you know you’re using the best service in town.
I was told that there were cheaper places to go, and that everyone guarantees their work…so why pay 10% more to go to D&L? Well, I chose a vendor with a top notch reputation, and never worried about the quality of the work being done. So if you’re going to do a mod like this – where the work falls entirely to someone who you’re paying to do it – always factor in reputation and peace of mind.
Since this is a boring post, I’ll add these two stories:
1) When I first go to the tint shop, I wanted to know what my options were for tinting the windows. But I’ve never had a car tinted before, and I had to humble myself and ask the stupid questions about how those options lined up with what was “legal” in our state. I thought the girl told me that for vans and SUVs, there was no legal issue for tinting. Then one of the guys came in off the shop floor, and when she asked him what they usually do for SUVs, he said they hit the rear windows with 20 and put limo tint on the fronts to black them out. I thought this was interesting.
I went outside to call my wife (OK, I was getting permission…big deal!), and she actually approved the limo tint idea…as long as I heard what I heard correctly. There were a couple of D&L corporate trucks in the parking lot (with limo tint), and they looked good so I went inside and told her I was ready to do it. But when I asked if that was legal, she said “not even close”. She then proceeded to tell me that, based on the county where I live, if I tinted my windows that way I would likely be in 3 weeks later getting it stripped out. I went with the “match the front to the rears” approach, which is still a hair illegal…but much less likely to get me pulled over.
2) I looked out in the bay while they were finishing up my tint job. I saw that the fronts were WAY darker than the second row windows. I panicked. Did I accidentally tell them to do limo tint on the front windows, from the earlier conversation? Was the tint difference between the factory tint and their tint sheets that big?
Nope. They just rolled the rear windows down in case the keys got stuck in the car…
Anyway…here’s a pic. When the weather cleared a bit, it was dusk and overcast – not the best conditions to take a picture showing how cool your window tint is…
I’ll post more during the weekend.
Attachments
sp8ball
New member
Modification: Vinyl Blackout of Chrome Rocker Panel and Bumper Strips
3M Vinyl Application: $140 (plus tax) for all four strips
D&L Window Tinting, White Marsh, MD
D&L Professional Window Tinting - Automotive - -
Difficulty Scale (1 to 10): One for me (driving to the store), a bit higher for the vinyl installation guy
Sp8ball’s Personal Intimidation Factor (1 to 10): Five
Install Time: 90-120 minutes (by someone else)
Reason for Doing It: Black out the chrome, man!
Benefit: Looks great, reversible back to chrome (if I so choose), and I don’t have to tape anything off or take parts off the car to paint
Cons: Don’t know how durable it will be, especially the front bumper, and the rocker panel sections where feet may get dragged across it
Other Products Considered: Krylon Fusion Paint, Plastidip paint
_____________________________
OK, another mod where I just handed someone my credit card…I know.
But this one was way, way, way more interesting and daring.
It is, of course, inspired by the “Blacking out the Runner’s Chrome” thread that has been mentioned a couple of times now in my mod thread.
I was at D&L to get my windows tinted, and they advertise that they also do large vinyl appliqués on the sides of vehicles (we’ve all seen them, on buses and vans and PT cruisers). Well, while I was waiting for my truck to go into the bay to get the window tint job done, I asked if I could speak to one of the vinyl guys.
I took him out to the truck, showed him what I was trying to do, and he whipped out a tape measure and told me he’d get back to me in a few minutes with a price.
About 5 minutes later he walked into the waiting area and told me it’d be $35 a strip. I had gotten wind from the girls in the office that this kid knew his stuff and was the best vinyl guy in the outfit, so I told him to do it.
About 45 minutes later – well after the tint job was done – he calls me into the service bay to see his handiwork. He had done ONE strip (the rear bumper). But holy crap – it looked GOOD. Every slight contour, nook, and cranny was accounted for. He apologized to me for it taking so long – I told him, “You take as long as you need!” He also told me he underestimated how intense the job was, and that it should be $50/strip…but he’d honor the quoted price.
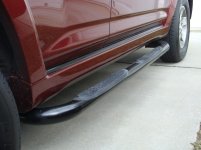
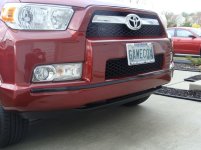
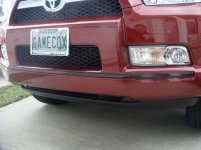
About 45 more minutes, and he was done. It looked great (see pics, below, even though my car is filthy), and I was happy that I had finally taken steps to black out the chrome – and done so in a way that didn’t require me to pick up a spray paint can (I’m impatient and overly aggressive with spray paint). And it’s reversible – so I can get that stuff peeled off if I ever decide that chrome is awesome.
The blacked-out strips are also visible in the nerf bar post, too.
3M Vinyl Application: $140 (plus tax) for all four strips
D&L Window Tinting, White Marsh, MD
D&L Professional Window Tinting - Automotive - -
Difficulty Scale (1 to 10): One for me (driving to the store), a bit higher for the vinyl installation guy
Sp8ball’s Personal Intimidation Factor (1 to 10): Five
Install Time: 90-120 minutes (by someone else)
Reason for Doing It: Black out the chrome, man!
Benefit: Looks great, reversible back to chrome (if I so choose), and I don’t have to tape anything off or take parts off the car to paint
Cons: Don’t know how durable it will be, especially the front bumper, and the rocker panel sections where feet may get dragged across it
Other Products Considered: Krylon Fusion Paint, Plastidip paint
_____________________________
OK, another mod where I just handed someone my credit card…I know.
But this one was way, way, way more interesting and daring.
It is, of course, inspired by the “Blacking out the Runner’s Chrome” thread that has been mentioned a couple of times now in my mod thread.
I was at D&L to get my windows tinted, and they advertise that they also do large vinyl appliqués on the sides of vehicles (we’ve all seen them, on buses and vans and PT cruisers). Well, while I was waiting for my truck to go into the bay to get the window tint job done, I asked if I could speak to one of the vinyl guys.
I took him out to the truck, showed him what I was trying to do, and he whipped out a tape measure and told me he’d get back to me in a few minutes with a price.
About 5 minutes later he walked into the waiting area and told me it’d be $35 a strip. I had gotten wind from the girls in the office that this kid knew his stuff and was the best vinyl guy in the outfit, so I told him to do it.
About 45 minutes later – well after the tint job was done – he calls me into the service bay to see his handiwork. He had done ONE strip (the rear bumper). But holy crap – it looked GOOD. Every slight contour, nook, and cranny was accounted for. He apologized to me for it taking so long – I told him, “You take as long as you need!” He also told me he underestimated how intense the job was, and that it should be $50/strip…but he’d honor the quoted price.
About 45 more minutes, and he was done. It looked great (see pics, below, even though my car is filthy), and I was happy that I had finally taken steps to black out the chrome – and done so in a way that didn’t require me to pick up a spray paint can (I’m impatient and overly aggressive with spray paint). And it’s reversible – so I can get that stuff peeled off if I ever decide that chrome is awesome.
The blacked-out strips are also visible in the nerf bar post, too.
Attachments
Last edited:
sp8ball
New member
Two Quick Administrative Notes Regarding This Thread
1) I really appreciate the kind comments and PMs from all of you. It's really nice to see the support for my new hobby.
2) My wife "found" this thread. In the 30 minutes since it's discovery, she'll just suddenly start shaking her head side-to-side and giggling a little. I think that she thinks I'm a dork. [Note: I don't think she's too happy about my plans for attacking the chrome on the roof rack end caps and the front and rear garnish pieces.]
Next up:
- AVS Bugflector II installation
- LED Puddle Lamps
- Toytec top plate spacers
I don't think you guys will care too much when I put on my Gamecocks hitch cover and license plate frame...so I'll hold off on documenting those "mods" in this thread!
1) I really appreciate the kind comments and PMs from all of you. It's really nice to see the support for my new hobby.
2) My wife "found" this thread. In the 30 minutes since it's discovery, she'll just suddenly start shaking her head side-to-side and giggling a little. I think that she thinks I'm a dork. [Note: I don't think she's too happy about my plans for attacking the chrome on the roof rack end caps and the front and rear garnish pieces.]
Next up:
- AVS Bugflector II installation
- LED Puddle Lamps
- Toytec top plate spacers
I don't think you guys will care too much when I put on my Gamecocks hitch cover and license plate frame...so I'll hold off on documenting those "mods" in this thread!

B'klyn_Mike
New member
All good mods sp8ball! :thumb3: And they happen to look great too! :cheers:
Mike :artist2:
Mike :artist2:
You can't be as clueless/overwhelmed/intimidated as I feel when I look at half of the things these guys do...
Just ordered up the Weathertechs based on your write-up, as I've been looking for a solution. FYI, for anyone considering them, 5% off (not incl shipping) if you are a AAA member, I ordered over the phone, not sure if you have call to get the 5% off.
I will say it again, this is really a great thread!!
Looking at your 20% tint, I feel that I should have gone darker than my 35%. That is one regret that I have about the tint, besides the fact that llumar 35% has some kind of green tint to it. Originially when I was getting them done, I was going back and forth between 20-30% or 35%, and playing it safe came out on top. So far no police troubles.
Also, I will just throw this out there if you are interested ingetting your front windshield done.... Some companies have tint that is ~80% like Llumar Air Blue that cuts down on heat, UV etc. while still keeping visabilty. It also helps my eyes handle the glare at night.
By the way, I don't recall you saying anything about the chrome around the fog lights. Are you keeping them, painting, or wrapping?
Looking at your 20% tint, I feel that I should have gone darker than my 35%. That is one regret that I have about the tint, besides the fact that llumar 35% has some kind of green tint to it. Originially when I was getting them done, I was going back and forth between 20-30% or 35%, and playing it safe came out on top. So far no police troubles.
Also, I will just throw this out there if you are interested ingetting your front windshield done.... Some companies have tint that is ~80% like Llumar Air Blue that cuts down on heat, UV etc. while still keeping visabilty. It also helps my eyes handle the glare at night.
By the way, I don't recall you saying anything about the chrome around the fog lights. Are you keeping them, painting, or wrapping?


BenfromdaYay
New member
Awesome thread! :cheers: You should write instruction manuals for living.
sp8ball
New member
ajwalks - I think you'll be happy. They're a great product and I get a lot of compliments on them. I tried to convince my mother-in-law to get them for her just-purchased 2009 Town and Country minivan, but the price scared her off. I think it's worth it!
Mason - that front window tint sounds pretty cool. I'm going to look into it. And yes, I have plans for the fog light bezels. I will likely just buy the TE ones and replace them. If you go to ToyotaPartSales.com and put in the part numbers (Left: 52128-35070...Right: 52127-35080), the grand total for TE versions is $34.40. I have that on my spreadsheet, but not on my immediate radar just yet.
BenfromdaYay - When I first got out of college and joined my current company, I used to write SOPs, test plans, test reports, and maintenance manuals for the Army for systems to get rid of recovered chemical weapons. Now I just manage and pretend that I still know all that stuff. And yes, I'm anal. Did you see my spreadsheet? Perhaps I have a mental illness.
mtbnole -I did get the AVS Bugflector II on Thursday, and installed it today. Mine was just fine, and looks good. I have a write-up (with pics) ready to go, but the site is being grumpy and slow and locking up whenever I try to add pictures.
Is anyone else having that issue late at night? Or just having trouble posting in general at night?
I also did one other write-up for fun...
AND I realized that my thread title is grammatically incorrect, and I've been upset about it for, like, three days.
It should read, "...other posters' ideas since mid-2010)"
Grrrrrrrrr...
Mason - that front window tint sounds pretty cool. I'm going to look into it. And yes, I have plans for the fog light bezels. I will likely just buy the TE ones and replace them. If you go to ToyotaPartSales.com and put in the part numbers (Left: 52128-35070...Right: 52127-35080), the grand total for TE versions is $34.40. I have that on my spreadsheet, but not on my immediate radar just yet.
BenfromdaYay - When I first got out of college and joined my current company, I used to write SOPs, test plans, test reports, and maintenance manuals for the Army for systems to get rid of recovered chemical weapons. Now I just manage and pretend that I still know all that stuff. And yes, I'm anal. Did you see my spreadsheet? Perhaps I have a mental illness.
mtbnole -I did get the AVS Bugflector II on Thursday, and installed it today. Mine was just fine, and looks good. I have a write-up (with pics) ready to go, but the site is being grumpy and slow and locking up whenever I try to add pictures.
Is anyone else having that issue late at night? Or just having trouble posting in general at night?
I also did one other write-up for fun...
AND I realized that my thread title is grammatically incorrect, and I've been upset about it for, like, three days.
It should read, "...other posters' ideas since mid-2010)"
Grrrrrrrrr...
azn-sensation
New member
Love the black vinyl work! Did the shop have to remove the bodywork or were they able to do it without pulling the chrome pieces off?
sp8ball
New member
Love the black vinyl work! Did the shop have to remove the bodywork or were they able to do it without pulling the chrome pieces off?
Did it on the vehicle.
sp8ball
New member
Status Update
OK, if I can get the internet gremlins to take the night off, and I can get my posts and pictures loaded up to the site, I should have the following posts going live tonight:
1) AVS Bugflector Install
2) My silly April Fools install (which isn't as funny now, since it's 2 days late)
3) Puddle Lamp LED bulb install
4) If I like any of the pictures I took this afternoon, I'll post a full-body shot of what the truck looks like as of today.
5) And an interesting bird poop encounter that I had today.
On Wednesday, Antman and I are getting together to do the Toytec Top Plate Spacer install. I should have a write up coming on that later in the week.
If the timeline that the toyotapartsales.com guys gave me holds true, I should get my color-matched door handles in the next 7-10 days. Once they arrive, i'll tackle that challenge and post about it.
I think I have the green light to get a cargo liner. (I should probably ask again...) I need to see what's available for T4Rs with third row seating, though. I know there's a Husky option, but not one from Weathertech. :crybaby:
Finally, Antman has done some really cool lighting mods to his truck that he is going to share with me (including footwell lights and Limited-esque door handle lights, I believe), and I may have him coach me as I attempt doing them to my T4R (if, ahem...if, um, if my wife sees them and likes them). We'll get them written up and posted as well.
Outside of some gratuitous pictures that I'll post once I get a new license plate frame and hitch cover...that may be it for a while!
Long-term, bigger ticket mods that I'd like to do include:
1) Thule Cross Bars and Baja Cargo Basket
- Already approved by wife, but as a Birthday or Christmas gift. That's, like, November or December! :moping:
2) Magnaflow Muffler (or Borla Exhaust?)
- This one will be tricky. I want a little bass-heavy growl when I accelerate (nothing to shatter the neighbors' windows or anything), but the wife thinks it sounds manly enough as it is and that I'm being a stupid boy. But she's a girl, so I can't really tell if I can trust her opinion on "manliness". Here's what I need - a good, performance based reason for slapping a new muffler on this thing. Something that will convince her with logic, like added horsepower or fuel efficiency or something. Post away - I'm listening.
3) New tires
- "You're not going to the desert or anything, so why do you need new tires?" (answer: because my tires are just OK, which means they aren't awesome!)
4) New wheels
- This topic makes her head explode, since the wheels on the SR5 are "perfectly fine, and I like them!" She just doesn't get it...
My only hope for salvation is to show her all of YOUR trucks...
{Note: I hope it doesn't sound like I'm being too hard on my gorgeous, uber-intelligent wife. She's the voice of reason in our house, and she's been super cool about the mods so far. And when we pulled into the driveway today and saw my 4Runner, she said, "it looks really good and mean." So...that means there's hope!}
OK, if I can get the internet gremlins to take the night off, and I can get my posts and pictures loaded up to the site, I should have the following posts going live tonight:
1) AVS Bugflector Install
2) My silly April Fools install (which isn't as funny now, since it's 2 days late)
3) Puddle Lamp LED bulb install
4) If I like any of the pictures I took this afternoon, I'll post a full-body shot of what the truck looks like as of today.
5) And an interesting bird poop encounter that I had today.
On Wednesday, Antman and I are getting together to do the Toytec Top Plate Spacer install. I should have a write up coming on that later in the week.
If the timeline that the toyotapartsales.com guys gave me holds true, I should get my color-matched door handles in the next 7-10 days. Once they arrive, i'll tackle that challenge and post about it.
I think I have the green light to get a cargo liner. (I should probably ask again...) I need to see what's available for T4Rs with third row seating, though. I know there's a Husky option, but not one from Weathertech. :crybaby:
Finally, Antman has done some really cool lighting mods to his truck that he is going to share with me (including footwell lights and Limited-esque door handle lights, I believe), and I may have him coach me as I attempt doing them to my T4R (if, ahem...if, um, if my wife sees them and likes them). We'll get them written up and posted as well.
Outside of some gratuitous pictures that I'll post once I get a new license plate frame and hitch cover...that may be it for a while!
Long-term, bigger ticket mods that I'd like to do include:
1) Thule Cross Bars and Baja Cargo Basket
- Already approved by wife, but as a Birthday or Christmas gift. That's, like, November or December! :moping:
2) Magnaflow Muffler (or Borla Exhaust?)
- This one will be tricky. I want a little bass-heavy growl when I accelerate (nothing to shatter the neighbors' windows or anything), but the wife thinks it sounds manly enough as it is and that I'm being a stupid boy. But she's a girl, so I can't really tell if I can trust her opinion on "manliness". Here's what I need - a good, performance based reason for slapping a new muffler on this thing. Something that will convince her with logic, like added horsepower or fuel efficiency or something. Post away - I'm listening.
3) New tires
- "You're not going to the desert or anything, so why do you need new tires?" (answer: because my tires are just OK, which means they aren't awesome!)
4) New wheels
- This topic makes her head explode, since the wheels on the SR5 are "perfectly fine, and I like them!" She just doesn't get it...
My only hope for salvation is to show her all of YOUR trucks...
{Note: I hope it doesn't sound like I'm being too hard on my gorgeous, uber-intelligent wife. She's the voice of reason in our house, and she's been super cool about the mods so far. And when we pulled into the driveway today and saw my 4Runner, she said, "it looks really good and mean." So...that means there's hope!}
sp8ball
New member
Modification: Bug/Stone Deflector Installation
AVS Bugflector II (for 2010-11 Toyota 4Runner): $55.39 (and free shipping)
Amazon.com
Amazon.com: Auto Ventshade 25053 Bugflector II Hood Shield for Toyota 4Runner: Automotive
[Note: Since I purchased this last week, the price dropped to $47.26]
Difficulty Scale (1 to 10): One
Sp8ball’s Personal Intimidation Factor (1 to 10): Two
Install Time: 7 minutes
Reason for Doing It: Protect the hood and windshield from debris
Benefit: Keeps both bugs and small rocks from hitting your hood, and provides an aerodynamic slipstream that will likely route these same items over your windshield (and hopefully over the entire truck); looks good (which can be rare for bug deflectors)
Cons: Rubber bumpers on the hood
Other Products Considered: None
_____________________________
This is something that I’ve never added to a car/truck of mine before, and I never thought about doing it until I saw the AVS Bugflector II installed on some user vehicles in this thread:
http://www.toyota-4runner.org/5th-gen-t4rs/64054-mud-flaps-ventshields-accessories.html
Until then, I viewed bug deflectors as horizontal pieces of ill-fitting blue-ish tinted plastic that were made for universal installation across all makes of cars.
Obviously, that has changed.
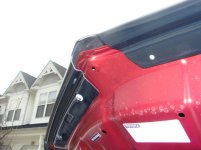
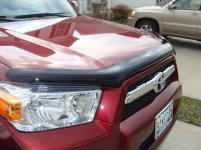
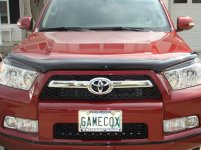
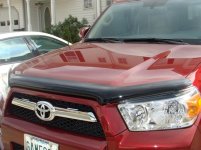
The AVS Bugflector II is curved and molded to the front end of the 4Runner, providing a low profile look that adds a bit of stylish uniqueness. This is particularly beneficial for folks who anticipate doing a lot of high-speed (50 MPH+) or interstate driving with their rig, due to the added level of protection.
I would NOT have bought or used this product if it was chunky or un-stylish. It is both, and it appears to be a high-quality product. Having already seen the item on a number of other members’ trucks, I was confident in my order. (thanks fins and adio3x!)The instructions make it super simple to install, and all it takes is a screwdriver.
The only “pucker” moment happened when I opened my hood to find I had 8 square holes along the hood border, 4 round holes, and…6 clips to insert.
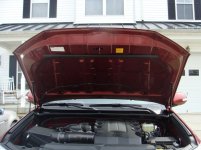
Fortunately, I decided to actually read (not skim) the directions (all three sentences of it) and look at the pretty pictures they included. It showed which 6 of the 8 holes to use. (note: It's the square holes, and the square shape of the clip probably should have given it away)
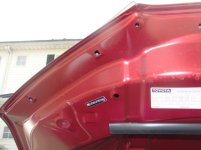
A Phillips head screwdriver in hand, I was on my way and done in no time.
You can be the judge about how it looks, but I am of the opinion that, if you’re looking to tone down the bling on the 4Runner by adding more black accents (tinting windows, chrome blackouts, etc), this is a nice, subtle addition.
AVS Bugflector II (for 2010-11 Toyota 4Runner): $55.39 (and free shipping)
Amazon.com
Amazon.com: Auto Ventshade 25053 Bugflector II Hood Shield for Toyota 4Runner: Automotive
[Note: Since I purchased this last week, the price dropped to $47.26]
Difficulty Scale (1 to 10): One
Sp8ball’s Personal Intimidation Factor (1 to 10): Two
Install Time: 7 minutes
Reason for Doing It: Protect the hood and windshield from debris
Benefit: Keeps both bugs and small rocks from hitting your hood, and provides an aerodynamic slipstream that will likely route these same items over your windshield (and hopefully over the entire truck); looks good (which can be rare for bug deflectors)
Cons: Rubber bumpers on the hood
Other Products Considered: None
_____________________________
This is something that I’ve never added to a car/truck of mine before, and I never thought about doing it until I saw the AVS Bugflector II installed on some user vehicles in this thread:
http://www.toyota-4runner.org/5th-gen-t4rs/64054-mud-flaps-ventshields-accessories.html
Until then, I viewed bug deflectors as horizontal pieces of ill-fitting blue-ish tinted plastic that were made for universal installation across all makes of cars.
Obviously, that has changed.
The AVS Bugflector II is curved and molded to the front end of the 4Runner, providing a low profile look that adds a bit of stylish uniqueness. This is particularly beneficial for folks who anticipate doing a lot of high-speed (50 MPH+) or interstate driving with their rig, due to the added level of protection.
I would NOT have bought or used this product if it was chunky or un-stylish. It is both, and it appears to be a high-quality product. Having already seen the item on a number of other members’ trucks, I was confident in my order. (thanks fins and adio3x!)The instructions make it super simple to install, and all it takes is a screwdriver.
The only “pucker” moment happened when I opened my hood to find I had 8 square holes along the hood border, 4 round holes, and…6 clips to insert.
Fortunately, I decided to actually read (not skim) the directions (all three sentences of it) and look at the pretty pictures they included. It showed which 6 of the 8 holes to use. (note: It's the square holes, and the square shape of the clip probably should have given it away)
A Phillips head screwdriver in hand, I was on my way and done in no time.
You can be the judge about how it looks, but I am of the opinion that, if you’re looking to tone down the bling on the 4Runner by adding more black accents (tinting windows, chrome blackouts, etc), this is a nice, subtle addition.
Attachments



Last edited:
sp8ball
New member
Modification: Baby Einstein Mirror Installation
Baby Einstein Lights & Melodies Mirror: Free (Baby Shower Gift)
Babies R Us (available for $29.99)
Baby Einstein Lights & Melodies Mirror - Kids II - Toys "R" Us
Difficulty Scale (1 to 10): Three
Sp8ball’s Personal Intimidation Factor (1 to 10): One
Install Time: 3 minutes
Reason for Doing It: To entertain the baby, and because I was told to do it by my wife
Benefit: Keeps baby happy/occupied, which will hopefully allow me to listen to my music or sports talk radio (and not The Wiggles); wife not upset with me
Cons: On the Man Scale, it easily wipes out my last three mods, and will require me to get new tires and wheels to make up for it.
Other Products Considered: I didn’t spend an enormous amount of time shopping for baby mirrors when we registered at Toys R Us, so I can’t really answer this.
_____________________________
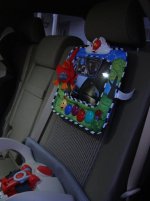
Yeah, this thing was a pain the butt to put in. Didn’t fit in my wife’s Acura TL. Didn’t fit in my Nissan Altima (which was sacrificed to the “Trade In” gods when I got my 4Runner). Since we have real live headrests in our trucks…it fits. And it stays.
I just know I’m going to get my 4Runner done JUST the way I want it (like two years from now), and somebody’s going to be checking out my truck and thinking it’s pretty hardcore, and then the light-up caterpillar at the bottom of this mirror is going to start flashing through the tinted windows.
Or I’ll be driving down the road, hit a bump, and suddenly hear random things from the backseat like “Red…Rojo” or “Can you count to three? One…Two…Three…Hooray!”
We were running it today, coming home from my mother-in-law's, and I thought I was being pulled over at one point. No - it was the caterpillar lighting up the sky worse than the U.S. Navy lit up Baghdad.
Perhaps this doesn’t belong in this thread after all…just some silliness to say "Happy April Fool’s Day!" (a couple of days late, but whatever)
Baby Einstein Lights & Melodies Mirror: Free (Baby Shower Gift)
Babies R Us (available for $29.99)
Baby Einstein Lights & Melodies Mirror - Kids II - Toys "R" Us
Difficulty Scale (1 to 10): Three
Sp8ball’s Personal Intimidation Factor (1 to 10): One
Install Time: 3 minutes
Reason for Doing It: To entertain the baby, and because I was told to do it by my wife
Benefit: Keeps baby happy/occupied, which will hopefully allow me to listen to my music or sports talk radio (and not The Wiggles); wife not upset with me
Cons: On the Man Scale, it easily wipes out my last three mods, and will require me to get new tires and wheels to make up for it.
Other Products Considered: I didn’t spend an enormous amount of time shopping for baby mirrors when we registered at Toys R Us, so I can’t really answer this.
_____________________________
Yeah, this thing was a pain the butt to put in. Didn’t fit in my wife’s Acura TL. Didn’t fit in my Nissan Altima (which was sacrificed to the “Trade In” gods when I got my 4Runner). Since we have real live headrests in our trucks…it fits. And it stays.
I just know I’m going to get my 4Runner done JUST the way I want it (like two years from now), and somebody’s going to be checking out my truck and thinking it’s pretty hardcore, and then the light-up caterpillar at the bottom of this mirror is going to start flashing through the tinted windows.
Or I’ll be driving down the road, hit a bump, and suddenly hear random things from the backseat like “Red…Rojo” or “Can you count to three? One…Two…Three…Hooray!”
We were running it today, coming home from my mother-in-law's, and I thought I was being pulled over at one point. No - it was the caterpillar lighting up the sky worse than the U.S. Navy lit up Baghdad.
Perhaps this doesn’t belong in this thread after all…just some silliness to say "Happy April Fool’s Day!" (a couple of days late, but whatever)
Attachments
sp8ball
New member
Modification: Replace Puddle Lamp Bulbs with LEDs
SuperBrightLEDs - $25.90 for both bulbs
Super Bright LEDs ? LED Lights, Bulbs, and Accessories
Difficulty Scale (1 to 10): Three
Sp8ball’s Personal Intimidation Factor (1 to 10): Five
Install Time: 10 minutes
Reason for Doing It: Throw a lot more light from the puddle lights located under the side view mirrors
Benefit: Lots more light, hopefully a longer lasting bulb, matches LEDs inside the car
Cons: None, unless you dislike the cool blue color of LEDs
Other Products Considered: Leave in the incandescent bulbs
_____________________________
Another LED lighting mod, and another tutorial stolen from Snooperstyle!
Got the know-how on how to do this mod from this post in the Interior LED Lighting Mod thread I mentioned earlier (when changing out the LEDs in the cabin).
Thanks to Snooperstyle and the others for putting this information out there. Bulb sizes appear on Page 4 of that thread. Here’s the information I took from there:
Replace the two puddle lights on the side mirrors with WLED-WHP9-T (You’ll need 2 of them)
(I chose white, but you can go with a color if you want)
Super Bright LEDs - Miniature Wedge Base Bulbs
Snooperstyle included a couple of pictures in his original post, as well. You’ll see similar pictures below, with a few extra added.
Step one: Tilt the mirror all the way to the inside of the car. HAVE A RAG ON HAND so you can put the mirror on top of the housing when you pull it out.
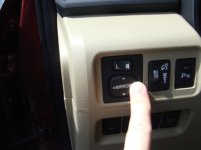
Step two: Insert your fingers behind the mirror and give it a good pull (this is where the intimidation factor came in for me, but it popped right off).
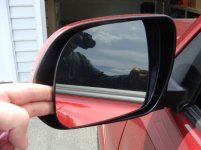
Step three: Put rag on top of housing, and put mirror on rag.
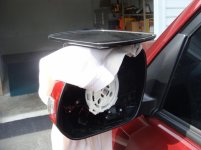
Step four: Locate two screws. Remove Screws.
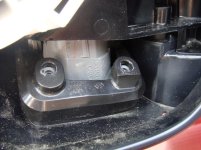
Step five: Reach underneath mirror housing and pull down on light cover. Should come off pretty easily.
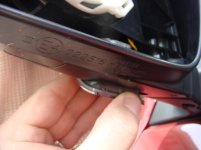
Step six: Twist light bulb holder out of lens housing.
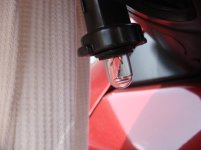
Step seven: Pull out old bulb. (The LED is longer than the original bulb - Don’t worry! It still fits)
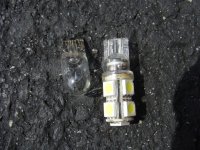
Step eight: Insert LED bulb.
Step nine: Hit the unlock button on your remote to make sure it works.
(Note: I learned this the hard way, when I put everything back together after doing both sides, and only one light worked. Turned out I didn’t seat the bulb completely. But, it lit up real nice, outside of the lens cover, when I tested it after re-seating it. I tried to take a picture, but the stupid camera was dead.)
Step ten: Twist back into lens housing. You should see the bottom of the LED bulb oh-so close to the lens.
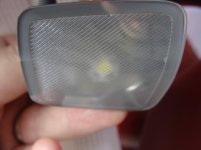
Step eleven: Push light fixture back into mirror and secure with screws. This may take a tiny bit of tinkering to get everything seated and aligned, but it’s very, very, very minor.
Step twelve: Replace mirror. There are a number of alignment tabs on the back of the mirror that line up with indentations and tabs on the white mirror holder. Just take your time, eye them up, and then push in the middle of the mirror several times, making sure you “work” all those clips to snap back together. I’d recommend using a rag to push in the middle of the mirror to make sure you don’t oil it up with your hand.
That’s it! World of difference in light, as it lit up the driveway when we came out to get in the truck this evening. I highly recommend this mod!
SuperBrightLEDs - $25.90 for both bulbs
Super Bright LEDs ? LED Lights, Bulbs, and Accessories
Difficulty Scale (1 to 10): Three
Sp8ball’s Personal Intimidation Factor (1 to 10): Five
Install Time: 10 minutes
Reason for Doing It: Throw a lot more light from the puddle lights located under the side view mirrors
Benefit: Lots more light, hopefully a longer lasting bulb, matches LEDs inside the car
Cons: None, unless you dislike the cool blue color of LEDs
Other Products Considered: Leave in the incandescent bulbs
_____________________________
Another LED lighting mod, and another tutorial stolen from Snooperstyle!
Got the know-how on how to do this mod from this post in the Interior LED Lighting Mod thread I mentioned earlier (when changing out the LEDs in the cabin).
Thanks to Snooperstyle and the others for putting this information out there. Bulb sizes appear on Page 4 of that thread. Here’s the information I took from there:
Replace the two puddle lights on the side mirrors with WLED-WHP9-T (You’ll need 2 of them)
(I chose white, but you can go with a color if you want)
Super Bright LEDs - Miniature Wedge Base Bulbs
Snooperstyle included a couple of pictures in his original post, as well. You’ll see similar pictures below, with a few extra added.
Step one: Tilt the mirror all the way to the inside of the car. HAVE A RAG ON HAND so you can put the mirror on top of the housing when you pull it out.
Step two: Insert your fingers behind the mirror and give it a good pull (this is where the intimidation factor came in for me, but it popped right off).
Step three: Put rag on top of housing, and put mirror on rag.
Step four: Locate two screws. Remove Screws.
Step five: Reach underneath mirror housing and pull down on light cover. Should come off pretty easily.
Step six: Twist light bulb holder out of lens housing.
Step seven: Pull out old bulb. (The LED is longer than the original bulb - Don’t worry! It still fits)
Step eight: Insert LED bulb.
Step nine: Hit the unlock button on your remote to make sure it works.
(Note: I learned this the hard way, when I put everything back together after doing both sides, and only one light worked. Turned out I didn’t seat the bulb completely. But, it lit up real nice, outside of the lens cover, when I tested it after re-seating it. I tried to take a picture, but the stupid camera was dead.)
Step ten: Twist back into lens housing. You should see the bottom of the LED bulb oh-so close to the lens.
Step eleven: Push light fixture back into mirror and secure with screws. This may take a tiny bit of tinkering to get everything seated and aligned, but it’s very, very, very minor.
Step twelve: Replace mirror. There are a number of alignment tabs on the back of the mirror that line up with indentations and tabs on the white mirror holder. Just take your time, eye them up, and then push in the middle of the mirror several times, making sure you “work” all those clips to snap back together. I’d recommend using a rag to push in the middle of the mirror to make sure you don’t oil it up with your hand.
That’s it! World of difference in light, as it lit up the driveway when we came out to get in the truck this evening. I highly recommend this mod!
Attachments








sp8ball
New member
Current Status
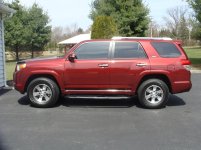
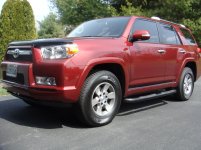
Ok, so here's some pics of where we stand as of right now.
Thanks to everyone for the kind responses and PMs. This has been a lot of fun!
(of course, I just realized that half of the mods listed in this thread were done on the INSIDE of the vehicle...DOH!)
Ok, so here's some pics of where we stand as of right now.
Thanks to everyone for the kind responses and PMs. This has been a lot of fun!
(of course, I just realized that half of the mods listed in this thread were done on the INSIDE of the vehicle...DOH!)
Attachments
Similar threads
- Replies
- 0
- Views
- 2K
- Replies
- 2
- Views
- 1K

- Replies
- 2
- Views
- 3K


- Replies
- 13
- Views
- 3K


