Spare Tire Cable/Winch replacement

So I recently had to use my spare for the first time. The experience was a PIMA!! I'm not gonna go into the details though of the whole thing. Bottom line is I was able to lower my spare about half way, and had to wrestle it out from the assembly. Once I got the spare on, I went back to raise the assembly, and no dice. I look under and the cable is frayed and terribly off tract. The assembly exterior cover broke off with a slight pull. Now I have an assembly thats stuck hanging down.

I'm pretty sure I'm just going to the replace the whole thing, and like others have mentioned there's an updated Chain Version of the assembly. The link is to the partznet site for the 5th gen (2011 to be exact)... can someone confirm that I have the right part and it's a straight forward swap, no modification? Also do I need just part 8 by itself, or part 8 AND 9 to replace it.

Not sure, but I don't think the part you link to is the correct one. I am pretty sure the original cable type assy., is no longer available from Toyota. The original part number, 51900-60280 will supersede to the newer chain type assy. That is what I got when I replaced mine on my '03 several years ago. It is hard to tell for sure, from the pics on the like you listed, but it looks like the one from the '11 mounts differently. And, the updated chain model, will bolt on exactly the same as the chain type. But be aware, it can be quite the PITA to get the old one out. I had to finally use an air chisel to cut the 6 bolts holding the assy., to the crossmember and replace them with new bolts and nuts to hang the new one.
 
So I recently had to use my spare for the first time. The experience was a PIMA!! I'm not gonna go into the details though of the whole thing. Bottom line is I was able to lower my spare about half way, and had to wrestle it out from the assembly. Once I got the spare on, I went back to raise the assembly, and no dice. I look under and the cable is frayed and terribly off tract. The assembly exterior cover broke off with a slight pull. Now I have an assembly thats stuck hanging down.

I'm pretty sure I'm just going to the replace the whole thing, and like others have mentioned there's an updated Chain Version of the assembly. The link is to the partznet site for the 5th gen (2011 to be exact)... can someone confirm that I have the right part and it's a straight forward swap, no modification? Also do I need just part 8 by itself, or part 8 AND 9 to replace it.


Not sure, but I don't think the part you link to is the correct one. I am pretty sure the original cable type assy., is no longer available from Toyota. The original part number, 51900-60280 will supersede to the newer chain type assy. That is what I got when I replaced mine on my '03 several years ago. It is hard to tell for sure, from the pics on the like you listed, but it looks like the one from the '11 mounts differently. And, the updated chain model, will bolt on exactly the same as the chain type. But be aware, it can be quite the PITA to get the old one out. I had to finally use an air chisel to cut the 6 bolts holding the assy., to the crossmember and replace them with new bolts and nuts to hang the new one.

The part you linked is not the correct part, the part number TechWrench posted is the correct part number and I also understand it now has a chain instead of the cable, when you look for the part look under "Body" and then "Carrier and Components", from the site you linked the part cost $129+, this site has it for $123+, you should be able to just get part #1, i.e. the carrier, but you may need the other parts as well if you can't salvage the other parts from your old carrier, I'm pretty sure you will need the bolts as TechWrench stated he had to cut his off the remove the old carrier, but you should be able to find them locally as well.

https://toyotaparts.mcgeorgetoyota....s-engine/body-cat/carrier-and-components-scat
 
Last edited:
The original part number, 51900-60280 will supersede to the newer chain type assy.... The updated chain model, will bolt on exactly the same as the chain type. But be aware, it can be quite the PITA to get the old one out. I had to finally use an air chisel to cut the 6 bolts holding the assy., to the crossmember and replace them with new bolts and nuts to hang the new one.

The part you linked is not the correct part, the part number TechWrench posted is the correct part number and I also understand it now has a chain instead of the cable..... you should be able to just get part #1, i.e. the carrier, but you may need the other parts as well if you can't salvage the other parts from your old carrier.

https://toyotaparts.mcgeorgetoyota....s-engine/body-cat/carrier-and-components-scat

First off, thanks for help, It's much appreciated! Just to clarify the understanding I have:

51900-60280 is the part number for the assembly for 03-09. While this used to represent the old cable type, it now directs to the updated chain assembly.
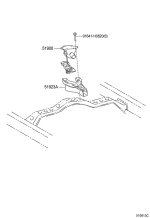
Also in the link, 1 is the assembly itself. However I'll be getting 1, 2, & 4 (might as well order the bolts instead of having to go get them separately) bc mine is rusted beyond belief. 3 represents the channel that the lowering arm goes into to connect to the bolt, correct?

Also, I've taken notice on all the warnings about uninstalling the old one. I don't have all my tools here at school. I feel that I'm gonna give it a shot and then have to take it to the shop to have them do it.... but hey at least I'll give it a try with what I got. :thumb3:
 
First off, thanks for help, It's much appreciated! Just to clarify the understanding I have:

51900-60280 is the part number for the assembly for 03-09. While this used to represent the old cable type, it now directs to the updated chain assembly.
Also in the link, 1 is the assembly itself. However I'll be getting 1, 2, & 4 (might as well order the bolts instead of having to go get them separately) bc mine is rusted beyond belief. 3 represents the channel that the lowering arm goes into to connect to the bolt, correct?

Also, I've taken notice on all the warnings about uninstalling the old one. I don't have all my tools here at school. I feel that I'm gonna give it a shot and then have to take it to the shop to have them do it.... but hey at least I'll give it a try with what I got. :thumb3:

Your understanding is correct, how ever a few items to consider. As stated in earlier posts, the base flange on the cable/chain lift assy., has six threaded holes built into it, which the mounting bolts, which pass through the supporting cross member from above and then thread into those holes in the lift flange. So, even it you try grinding the exposed bolt ends flat, the bolts will still be engaged by the threads in the flange. Also, there are six bolts, 4 of which are located more toward the center of the flange, and are not easy to access from below. This is why, I chose to cut them with an air chisel, working in between the flange and the cross member. I wasn't concerned about any damage to the old flange, since it was being discarded anyway. And, I chose to use a slightly smaller diameter set of bolts and nuts to replace the oem bolts, so if I ever have to remove the lift assy., again, it would be much easier to remove. This was my choice. If you do decide to go with the oem size bolts, just remember there isn't a lot of room above the cross member to get a ratchet wrench and socket in there to tighten them up. Especially if you are working on the ground, on jack stands as I have to. If you are lucky enough to have a full height shop lift at your disposal, the job gets a lot easier.
 
Last edited:
I gotta figure out how to do this without air tools! Not looking forward to it! Anyway... is it held on by just two nuts/bolts? For the life of me I can't figure this thing out.

2D28BF72-3936-4F3C-94ED-59B280ED315E_zpsexmdgbex.jpg
 
Where exactly are the bolts located? I only see the two coming down on both sides. I gotta figure out how to do this without air tools or a torch!


Check the attached diagram, you'll see the 6 holes at the top of the carrier assembly. You can't see them from the bottom
 

Attachments

  • 510813C.jpg
    510813C.jpg
    34.9 KB · Views: 2,024
Where exactly are the bolts located? I only see the two coming down on both sides. I gotta figure out how to do this without air tools or a torch!

If you had taken the time to read the threads on this issue, you would have all your answers. 4 of the 6 bolts are hidden from sight under the plastic cover. If you remove the cover, you will see the ends of them. All 6 bolts can only be accessed from the top of the cross member that the winch is attached to. The clearance between the top of the cross member and the body is barely enough to get a wrench in to try to turn the bolt. From the looks of yours, it is rusted enough that I doubt the bolts will just thread out without breaking or rounding the heads off. If you don't have the tools to cut those bolts, I suggest you take it to a shop that does.
 
Replace cable?

Given the pita needed to remove and replace the entire assembly, would it be possible to cut out the cable and wire in a new one? Just a thought. I have the same issue and trying to find a better solution. Also not thrilled at the $125 price point.

If we could tie in a new cable/chain, etc you could leave the assembly in place.The winch otherwise works fine, it's the cable that's frayed.
 
Given the pita needed to remove and replace the entire assembly, would it be possible to cut out the cable and wire in a new one? Just a thought. I have the same issue and trying to find a better solution. Also not thrilled at the $125 price point.

If we could tie in a new cable/chain, etc you could leave the assembly in place.The winch otherwise works fine, it's the cable that's frayed.

See my reply to the other thread, on this topic, that you posted the same question.
 
You can replace just the cable.

This message is for anyone searching for a solution in the future.

Turns out you can replace the cable alone.


I got into this today after reading a post on TW about how the cable snapped on the highway and dropped a tire on the car behind him. Its your liability.

https://www.tacomaworld.com/threads/check-your-spare-tire-carrier.497837/


If your winch is working its not too bad of a job. If its not working, spray the hell out of it with white lithium grease and try again the next day. It should move some. If not get a cutoff tool and some safety glasses.

Cable is 3/16. Get 3 feet. Get some wire cable end ferrules and cable wire clamps. Get a cable swager. Watch youtube and learn how to use it. Geta large shackle and a thimble. These are all common cable wire materials. Lowes has all of this stuff.

Here some pics you havent seen of the winch without wire to guide your way. See the notch in the wheel? Thats where you ferrule goes. Dont think it will hold? Watch this. Even 1/8 line can hold over 800lbs.

View attachment 302178

View attachment 302179

View attachment 302180

View attachment 302181

Loctite rust remover and repaint the two old parts you see there. System rated to hold over 1000lbs. Tire weighs 70.

Total cost $40, and no ripping the old one down. If you already have a swager, or rent one. $10. And you learned something new.
 
Last edited:
Benny123, I'll be acquiring the parts & tool you listed this week in order to attempt to rebuild my hoist. I had to cut the cable in order to get to my spare tire. Naturally, after much whiz wheelin' and air chizzlin' to get the remainder of the hoist off,,,it started to work. My local Toytoa dealership lists the hoist for $195, but would give me a deal at $150... (Charlie's Toyota in Augusta, Me.) I'm fab savvy, so I'll give this a try first!
 
This message is for anyone searching for a solution in the future.

Turns out you can replace the cable alone.


I got into this today after reading a post on TW about how the cable snapped on the highway and dropped a tire on the car behind him. Its your liability.

Check your spare tire carrier! | Tacoma World


If your winch is working its not too bad of a job. If its not working, spray the hell out of it with white lithium grease and try again the next day. It should move some. If not get a cutoff tool and some safety glasses.

Cable is 3/16. Get 3 feet. Get some wire cable end ferrules and cable wire clamps. Get a cable swager. Watch youtube and learn how to use it. Geta large shackle and a thimble. These are all common cable wire materials. Lowes has all of this stuff.

Here some pics you havent seen of the winch without wire to guide your way. See the notch in the wheel? Thats where you ferrule goes. Dont think it will hold? Watch this. Even 1/8 line can hold over 800lbs.

View attachment 302178

View attachment 302179

View attachment 302180

View attachment 302181

Loctite rust remover and repaint the two old parts you see there. System rated to hold over 1000lbs. Tire weighs 70.

Total cost $40, and no ripping the old one down. If you already have a swager, or rent one. $10. And you learned something new.

Awesome- wish I knew this 2 years ago
 
If I remember correctly, the bolts thread in from the top of the supporting cross member, and into the base plate of the winch assy., which has threaded holes for the bolts. If you cut the bolts with a chisel, between the base plate and the support cross member, there is no need to drill anything out. If you cut the shaft of the bolt, where it protrudes from the threaded hole in the base plate, then you would still need to drill the last bit of the bolt out to release the base plate. Since I was replacing the entire lift assy., I wasn't worried about how much damage I did to the plate, so I just cut it away using an air chisel. Once the old one is down, you can install the new one with the same type of bolts that the old one used, so they match the threads in the new base plate, or as I did, just replace the bolts with slightly smaller, in diameter, and use nuts to secure them. This way, if I ever have to remove it again, I don't have to cut the bolts again.

Resurrecting this thread to say thanks to [MENTION=937]TechWrench[/MENTION] and the rest of you for figuring this stuff out! Just bought my first T4R (04' Limited V6) and replacing the spare tire hoist was my first real project. Soon I'll be painting everything black and bolting things on....just as soon as I can convince my wife that it's all necessary :-)

Anyway I wanted to add my $0.02 to the conversation. I don't have an air hammer or chisel, but I used my Ryobi Multitool with a metal plunge cutting blade and cut the outside two bolts off. They were rusted on there pretty well and wouldn't break for anything. I drilled out what was left of the bolts to free the guide, and fortunately the other 4 bolts broke pretty easily and that sucker came right off.

I got the replacement part from a lexus dealer on ebay. Used smaller bolts & nuts like [MENTION=937]TechWrench[/MENTION] said and it worked like a dream. Happy to have my spare out of my trunk and out of the way. Thanks for all your help!
 
As I mentioned in my earlier post, the easiest way to remove those rusted bolts is to chisel them off, and install the new lift assy., with new bolts.

Do you know the size of the 6 bolts or can you direct me somewhere where I can find this information? Thanks
PalAl
 
My winch takes the tire down about 10” above the ground and then gets bound up. Any way to unbind the winch so it goes all the way? I don’t want to destroy it if it can be repaired.
 
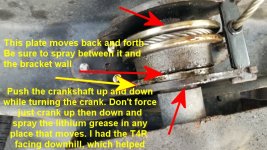
A week ago I took the spare down to get the TPMS replaced. When I tried to crank it up again it wouldn't go very far before binding. I think the 2 plates you see after removing the plastic cover are some kind of reduction gear, not a direct drive. They weren't rusted but looked dry.

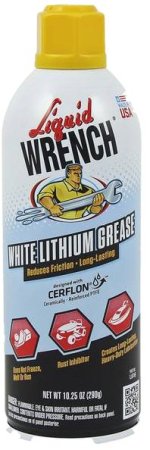
The plastic cover is easy to remove but is brittle. Once that was down and I could see those plates I started squirting spray lithium grease in every crack and crevice, working the crank up and down between sprays. I had to lift the crank shaft up and down, rotating back and forth to free it when it would bind up. It took about 15-20 minutes of fiddling with it before it freed itself.
 

Attachments

  • SpareTire Crank with text.jpg
    SpareTire Crank with text.jpg
    109 KB · Views: 836
  • Spare lithium grease.jpg
    Spare lithium grease.jpg
    35.4 KB · Views: 783

Members online

Forum statistics

Threads
278,310
Messages
3,554,080
Members
248,016
Latest member
Advally Service

Trending content

Back
Top