Vinyl Rear Garnish

sirhamlet

New member
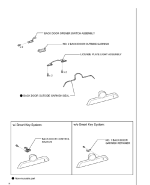
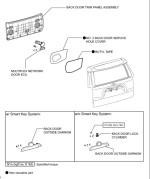
Instead of painting I decided to vinyl hood, front emblem, door handles and chrome strips. Now i'd like to do the rear garnish but before i take anything apart I wanted to make sure there wasn't anything that needed to be replaced once removed (use once item). Pic shows No. 2 back door service hole cover and states a Non-reusable part.
-Is this true for those who did remove their garnish?
-Anthing else I need to be aware of before i remove garnish?
-I'm assuming the Back Door Trim Panel assembly just pops off?

Thanks much!
 

Attachments

  • Garnish removal.PNG
    Garnish removal.PNG
    124.6 KB · Views: 6,515
Register to hide this ad
The "Service Hole Cover" is a thick, clear piece of plastic. Think of it like Saran wrap on steroids. The "Butyl tape" is a bead of gooey caulk like substance, similar to what is used to set windshields. Yes, you can grab the edge of the plastic and start to pull slowly, as the plastic starts to separate from the caulk, used a box cutter ON THE CAULK, the caulk will go back into place and the plastic can be reattached to the caulk. Just be gentle.

Word to the wise, try not to touch the caulk, it gets on everything and hard to get off. Pull off one section of plastic at a time, not the whole thing.

The rear panel just pops off. There is a small rectangle plate, in the rear panel. Pop that off with a screw driver, then you can get a hand hold. All the attachments from that panel are the pop in plastic type. (No screws), but the top of the panel fits into a lip if I remember correctly.

Another caution. In order to get the Toyota emblem and garnishment off, you will also have to remove the lock cylinder (non smart key), do NOT close the hatch until you have replaced the lock cylinder and reattached the electrical to the cylinder.

Good luck and be safe.
 
One more thing I just thought of. You will have to remove 4 maybe 5 nuts from directly under the "4 Runner" name plate, but the "Toyota Logo" portion of the garnishment, snaps in directly behind the center of the logo. After you remove the Nuts , the PLASTIC garnishment will start to move and you will want to use it as leverage to unsnap the logo part. RESIST. Do not pry up using the lower part of the garnishment. It will probably break. Get a plastic wedge and slid it around the Toyota logo prying it up gently until it comes undone.

Good luck and be safe.
 
Garnish Seal

one more question...

There's also a garnish seal.(pic bellow)..Does that have to be replaced with an OEM seal or if I'm carfull enough, could I re-use? If I can't re-use, is there something that i could get at a local hardware store that would be just as good. Thanks
 

Attachments

  • Garnish seal.PNG
    Garnish seal.PNG
    56.1 KB · Views: 5,227
I am sorry sirhamlet, I have a 2010, Sr5. I do NOT have that seal. The garnishment came off in one piece. Another difference between a LTD vs. an SR5 or maybe 2010 vs 2011? Damn, another mod!

Looking at your diagram reminded about the lights. When you pull the rear panel, at least on mine, there are two courtesy lights attached to the rear panel, they come off as a whole unit from the back. Pretty simple snap in design. Just a hassle holding the panel then reaching up there to disconnect.

The license plate lights have a screw as your diagram shows. I can't remember for sure, but I think you will need remove those lights also, sorry getting older and memory getting shorter.
 
I just did this on my 2011 LTD. There was no seal around the garnish for mine. I simply took it off, wrapped it, then put it back on. Everything mentioned above was my experience as well. The only piece I would add is that you only have to "open" the sealed area from the left side (looking at the hatch from the inside of the truck). I opened the larger area on the left and then reached my hand in to loosen the bolts. Use the razor blade method on the caulk and it will seal right back up.

Also, definitely try not to let the door close once you remove the electronic opening mechanism. That was a pain...=)
 
hi joemck7,
Thanks for the heads up.
-Did you re-attach the 4 r u n n e r letters back onto the vinyl? Did you use 3m double side tape? Does it seem to be holding up well? i was wondering if the letters would pull the vinyl away from the chrome. I've got some of the prime 94 (think thats the name) that may help the adhesion better.
 
hi joemck7,
Thanks for the heads up.
-Did you re-attach the 4 r u n n e r letters back onto the vinyl? Did you use 3m double side tape? Does it seem to be holding up well? i was wondering if the letters would pull the vinyl away from the chrome. I've got some of the prime 94 (think thats the name) that may help the adhesion better.

Just wondering, what color you going to vinyl?

If you don't know, there's a much cheaper and easier option using Plastidip. You just spray it right on and peal off the excess.
 
I wrapped the garnish in black and then applied new chrome lettering. I wanted the TE look without paying for a brand new garnish. The letters came with adhesive from toyota I am sure that 3m double sided tape will hold up just fine. The vinyl is really durable stuff. Everything is holding up well!

I will try and take some pictures and post them up.

hi joemck7,
Thanks for the heads up.
-Did you re-attach the 4 r u n n e r letters back onto the vinyl? Did you use 3m double side tape? Does it seem to be holding up well? i was wondering if the letters would pull the vinyl away from the chrome. I've got some of the prime 94 (think thats the name) that may help the adhesion better.
 
Just wondering, what color you going to vinyl?

If you don't know, there's a much cheaper and easier option using Plastidip. You just spray it right on and peal off the excess.


Hi deekoi,
I using 3m matt black. i have it on my hood, front garnish wing and the what used to be the chrome strips in front and back. i've tried the plastic dip on other cars and it works great but for the paint to really stick you have to sand the project and i wanted to have the option of peeling off the vinyl and have decent looking chrome. Plus the vinyl holds up really well against my wife's nails.
 
Hi deekoi,
I using 3m matt black. i have it on my hood, front garnish wing and the what used to be the chrome strips in front and back. i've tried the plastic dip on other cars and it works great but for the paint to really stick you have to sand the project and i wanted to have the option of peeling off the vinyl and have decent looking chrome. Plus the vinyl holds up really well against my wife's nails.

Ooic, nice! can't wait to see the finished product!

I used 3m matt black for my hood too and love it!
 
Finished Garnish

Note: As mention by other posters on this thread...Do not close the back door once you've remove the garnish.

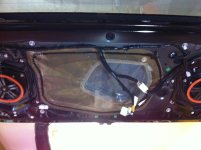
Pic 1 - Back inside panel removed. Showing the Back door service cover and butyl adhesive. Done correctly, you can remove half of the service cover to remove the 4 garnish nuts without having to purchase a new one.

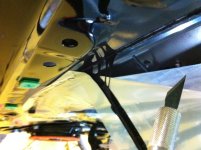
Pic 2 - Shows how to remove service cover without distroying it. Using an exacto blade cut across the butyl as your pulling the cover away from the door. you'll have the adhesive left on the door and the cover which will allow re-adhesion.

Once you remove the 4 nuts, your going to have to pop off the garnish. The bottom half comes off clean but the top part where the Toyota eblem is, takes a bit of care. just make sure you pull off strait up don't try to pry of a corner.

now your left with an emblem with a bit of adheasive. like others it takes a bit of work and a couple of blisters on your thumb to take it off. Try not to get to crazy with the goof off or you could damage the chrome garnish.

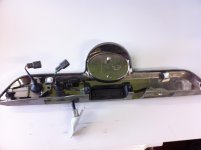
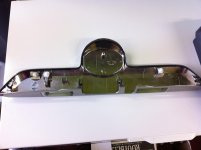
Pic 3- is just the back of the garnish. Notice the square white clip where the emblem would sit on the oposite side??? Thats the clip that gives you the problem of getting the garnish off.

Pic 4 - is the garnish with wiring harness remove. Makes wrapping easy without the extra wires and stuff.

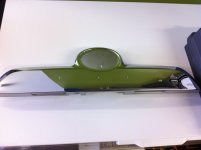
Pic 5 - is the cleaned up garnish

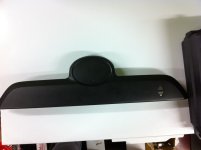
Pic 6 - is the garnish wrapped in matte black. Easy to do. Take your time.

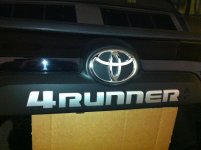
Pic 7 - is the finished product. We've had rain all this week and the my picture of the finished garnish looks damaged but it isn't it's just dirt. I'm really happy the way it turned out. Better than expected. I used Loctite clear outdoor double side tape. I think it has an adheasion rate of 1"=10lbs. Clear is the way to go incase you press the letters back on and it squeezes out. You dont want to have to cut away access as you may cut into your new wrap.


Pic 4 is the
 

Attachments

  • IMG_0600.jpg
    IMG_0600.jpg
    138.6 KB · Views: 5,067
  • IMG_0601.jpg
    IMG_0601.jpg
    135.9 KB · Views: 4,860
  • IMG_0602.jpg
    IMG_0602.jpg
    142.1 KB · Views: 4,954
  • IMG_0605.jpg
    IMG_0605.jpg
    144.8 KB · Views: 5,875
  • IMG_0604.jpg
    IMG_0604.jpg
    153.1 KB · Views: 9,138
  • IMG_0607.jpg
    IMG_0607.jpg
    174.4 KB · Views: 5,510
  • IMG_0619.jpg
    IMG_0619.jpg
    140.2 KB · Views: 5,236
Alright I have to ask this.

It seems that vinyl wrap is a popular option on this forum. However I have always stayed away from it because it just looks difficult to get right, and very hard to work with. But you guys do such a fantastic job! How did you learn/are there any online tutorials you used?

Thanks guys.
 
haha, I Just pulled mine tonight, and took pictures to post up on my thread, as I was trying to figure out how to do this myself only to find you already posted it! haha. Oh and the seal you were looking for, look on the pic of the back side, the seal is actually attached to it or built into it.
 
Ham, how did you line up your 4RUNNER emblem so nice after you wrapped it, and how did you re-attach the letter after? What specific type of tape did you use?
 

Members online

Forum statistics

Threads
278,309
Messages
3,554,071
Members
248,016
Latest member
Advally Service

Trending content

Back
Top