Vinyl Rear Garnish

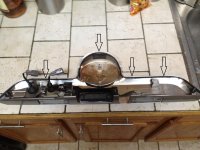
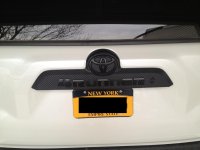
Here is mine, and the rubber grommet appears to be glued to the actual garnish piece.
 

Attachments

  • Rear Garnish.jpg
    Rear Garnish.jpg
    131 KB · Views: 1,387
Alright I have to ask this.

It seems that vinyl wrap is a popular option on this forum. However I have always stayed away from it because it just looks difficult to get right, and very hard to work with. But you guys do such a fantastic job! How did you learn/are there any online tutorials you used?

Thanks guys.

I purchased a couple of 12"X12" 3m vinyl and did a test run on a friend’s Ipad and Iphone. If you Google "how to vinyl 3m" you'll find several videos out there.

It’s easy to do and because it’s so resilient you can make a mistake and redo it with the same piece of vinyl.

Couple of things:
-Get a decent heat gun that you can adjust the temp. Not expensive
-Get a spray bottle and mix ¾ filtered water to ¼ Isotropic alcohol. You’ll use this to wipe down the item to be vinyl’d and after.
-be patient

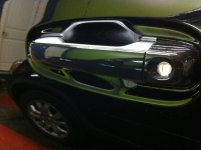
I’ve included a pick of the driver’s door handle that I did with a gloss black vinyl and it also came out great. This just shows how versatile and responsive the vinyl can be. I did all four handles with one 12”x12” piece. the glare from the flash distorted the key hole but it's perfectly round

**Sorry for the large pics. Phone camera
 

Attachments

  • IMG_0628.jpg
    IMG_0628.jpg
    139.6 KB · Views: 1,277
Last edited:
haha, I Just pulled mine tonight, and took pictures to post up on my thread, as I was trying to figure out how to do this myself only to find you already posted it! haha. Oh and the seal you were looking for, look on the pic of the back side, the seal is actually attached to it or built into it.

Yea. Once i pulled off the garnish i did see the seal and decided it didn't need to be replaced. I made sure that I wiped it down really well with a spry bottle of filtered water and isotropic alcohol. 1/3 Alcohol Also make sure you clean the back of the door were the garnish goes with the same mixture.
 
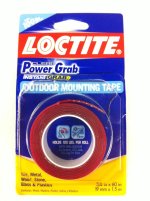
Ham, how did you line up your 4RUNNER emblem so nice after you wrapped it, and how did you re-attach the letter after? What specific type of tape did you use?

pic below of the product used to attach letters. it's a clear gum tape.

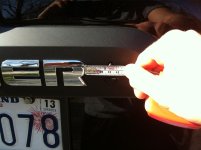
as far as lining up. I requested a picture from joemck7 with measurements (Thanks again Joe!)

1. The distance between each letter is .25" exactly

2. The distance from the "R" to the "Center of top of the triangle" is 1.25". To be clear, in the above picture, if you were to draw a line straight down from the top of the triangle, it would "hit" the 1.25" mark on the tape measure.
 

Attachments

  • mesurments.jpg
    mesurments.jpg
    130.3 KB · Views: 1,311
  • IMG_0621.jpg
    IMG_0621.jpg
    131.7 KB · Views: 1,261
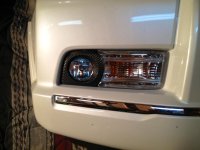
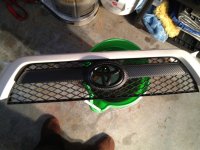
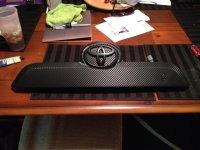
Here's what i got after a couple hours, Ham.... Have you done the chrome trim pieces yet? I want to do the front rear and both sides, but trying to see if im going to have to remove them first to do them. The front will be easy enough, as the whole front bumper is already off while the headlights are being retrofitted at TRS.
 

Attachments

  • Fog lights.jpg
    Fog lights.jpg
    124.6 KB · Views: 1,250
  • Front grill.jpg
    Front grill.jpg
    126.5 KB · Views: 1,230
  • Rear Garnish almost Finished.jpg
    Rear Garnish almost Finished.jpg
    133.9 KB · Views: 1,263
You've done a nice job! I've done the rear trim not the front. i'll be doing the front as soon as I get my Hella supertones. The rear bumper comes off fairly easy also. I would definately take the chrom trim off and wrap. Gives it a more cleaner look. my door handles are the only wraps that I tucked into the unit. If it does shrink and expose chrome i can always re-wrap and it only takes 5min.
 
You've done a nice job! I've done the rear trim not the front. i'll be doing the front as soon as I get my Hella supertones. The rear bumper comes off fairly easy also. I would definately take the chrom trim off and wrap. Gives it a more cleaner look. my door handles are the only wraps that I tucked into the unit. If it does shrink and expose chrome i can always re-wrap and it only takes 5min.

Thank you! Do you by chance have a picture of where everything is that would be needed for removing the rear bumper? Thanks!
 
For those of you who have removed the rear garnish, is there a way to hook the door mechanism back up temporarily so that the door is functional? I will need to use the truck while the garnish is off for a few days...
 
I have tried to answer your question correctly , but I simply cannot remember all of it. First, what I am about to say is for an SR5 and I think the TE is the same. Limited is different. Not sure what you have.

Take off the back plastic door panel. Separate the plastic film from the door frame and look. I remember that you will have to take off the lock mechanism to get the garnishment off. I think there is an electrical connection to the the lock mech and it is "separate" from the garnishment. I am pretty sure you can replug in the lock mech, then temp attach it to the inside of the door panel. You will not be able to use your key, but you can lock and unlock using the key fob buttons or the inside door lock buttons.

What I can't remember, however, is the door handle. It's under the garnishment, but not sure if it came off with the garnishment or if you had to remove it to get the garnishment off or what. I simply forgot. If not, by simply plugging in the lock so the latch solenoids will work again, you should be good to go. If you have to remove the handle, then?

If you do a search here about removing the rear garnishment, I do remember multiple threads with some pretty good instructions. They might mention that handle.......just a thought. Be Safe.

 
Thanks Jtraskell - I have an SR5 and after looking at the repair manual it appears as if you can just plug in the handle and the lock mechanism and be good to go - but wanted to make sure before I got it all apart to find out. The behavior of the electrical mechanisms are beyond what I feel comfortable estimating. Thanks again for your reply.
 
If all else fails, just close the door, it will be inoperable. But then when you want to reinstall the garnishment, make the necessary adjustments to open the door, and complete the project. I do remember that after taking the door apart and removing the garnishment, the door got closed accidentally, could not open until? I think until somebody crawled back there and plugged in the lock. I think. Bottom line, we were able to reopen the door. Good luck.
 
Looks great, is removing the rear garnish necessary for this wrap? I would assume that it would be possible to do without removing the garnish but I could be wrong.
 
Should be possible as the Toyota emblem and the 4runner letters are just held on with adhesive and can be removed while on the truck. Just make sure you take Jtraskell's advice as this was the trickiest part of what was an easy removal:

One more thing I just thought of. You will have to remove 4 maybe 5 nuts from directly under the "4 Runner" name plate, but the "Toyota Logo" portion of the garnishment, snaps in directly behind the center of the logo. After you remove the Nuts , the PLASTIC garnishment will start to move and you will want to use it as leverage to unsnap the logo part. RESIST. Do not pry up using the lower part of the garnishment. It will probably break. Get a plastic wedge and slid it around the Toyota logo prying it up gently until it comes undone.
 
Should be possible as the Toyota emblem and the 4runner letters are just held on with adhesive and can be removed while on the truck. Just make sure you take Jtraskell's advice as this was the trickiest part of what was an easy removal:

Sounds good, thanks for the info
 

Members online

Forum statistics

Threads
278,310
Messages
3,554,079
Members
248,016
Latest member
Advally Service

Trending content

Back
Top