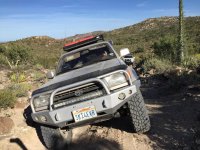
Warn M8000 and Shrockworks Bumper

I am so sorry! Passenger side!!!

No problem. I saw there's quite a bit of room in the area so I'm thinking you made brackets or something. I know the bracket that came with the bumper was meant for a top mount. I do like that area. Eventually I'll install it there. I'm thinking you haven't pulled too many rigs out of a ditch with that locking biner on the end of your line...haha

I don't like the way they look sticking up off the bumper either. If you can't get the box to fit in the bumper anywhere I would look into mounting it like I did. I bought pretty much all new wires off a place on ebay called Greg's Marine I think. Expensive yes, but they are really high quality and I didn't have to mess with making my own wires. Any wire in a very heavy gauge like that is going to be expensive already...

Thanks Unner. I ended up mounting it on top until I can design a bracket for inside the bumper where Spunk has his. There's a ton of room there but I think I'm going to have to use my mounting bolts/holes. This may not happen for a while. Tons of room where your's is but if I can get away without having to run extra long #2 awg wire I would like to do that. Not having to make your own heavy gauge wires is the way to go. I just had two made at West Marine for my Blue Sea Fuse Box. Thanks for your input. Much appreciated.

I'll keep you posted in the future and let you know what my permanent solution ends up being.
 
I can't add much in terms of insight, but I frigging love the Shrockworx front bumper, it is the perfect shape for our trucks!

(I still wish the fairlead hole was central though)
 
I can't add much in terms of insight, but I frigging love the Shrockworx front bumper, it is the perfect shape for our trucks!

(I still wish the fairlead hole was central though)

Completely agree with you on both accounts. Love the look of my bumper. I'm going to try and mount the solenoid in the passenger space where Spunk mounted his. I'm also going to talk with Shrockworks and see if they can fab up a bracket for future customers, and provide an access point for the wired controller. Most everyone is going for the "hidden winch" look these days. It makes for a cleaner looking rig.
 
Rock Rat,
I have my solenoid next to the battery. I fabbed a bracket that tucks under the plastic battery tray, sits nice in that location.
The wireless remote (awesome) is bolted to the inside fender edge between the air box.
 

Attachments

  • IMG_0281.jpg
    IMG_0281.jpg
    134.8 KB · Views: 887
  • IMG_0276.jpg
    IMG_0276.jpg
    132.8 KB · Views: 721
Rock Rat,
I have my solenoid next to the battery. I fabbed a bracket that tucks under the plastic battery tray, sits nice in that location.
The wireless remote (awesome) is bolted to the inside fender edge between the air box.

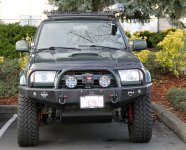
Here is a pic of the Shrock Works bumper:

Gorgeous looking rig. I looked at that space as well, but I'll be going to a dual battery setup, and more than likely that's where the second battery will go.

You did a great job with your installation. Very clean and professional looking. Thanks for posting!!!
 
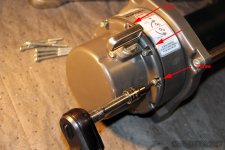
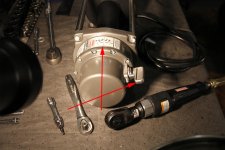
Just a little follow up for those looking at the Warn 8000 and the Shrockworks bumper. Because it's a forward mounted winch you will need to clock it about a little less than a 1/4 turn or else you'll have to reach way in the back to access the clutch. Look at the picture in the previous post and you can see it where it is in it's natural location.

Pictures should help...

You need to remove all of the bolts but DO NOT remove the clutch. Hold the collar and rotate the clutch so the first bolt lines up with the third bolt. Just shy of a 1/4 turn.
Winch_clock_1.jpg

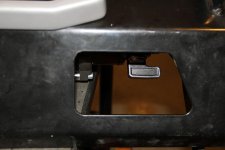
Here's what it should look like once it's rotated.
Winch_clock_2.jpg

close up picture of where it's located once it's clocked.
Winch_clock_3.jpg

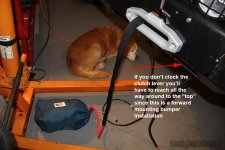
This gives you an idea of where you have to reach. You definitely don't want it sitting on the "top" of the winch in it's original location.
Winch_clock_4.jpg
 

Attachments

  • Winch_clock_1.jpg
    Winch_clock_1.jpg
    96.3 KB · Views: 793
  • Winch_clock_2.jpg
    Winch_clock_2.jpg
    96.3 KB · Views: 847
  • Winch_clock_3.jpg
    Winch_clock_3.jpg
    53.6 KB · Views: 715
  • Winch_clock_4.jpg
    Winch_clock_4.jpg
    108.6 KB · Views: 806
Rock Rat,
I have my solenoid next to the battery. I fabbed a bracket that tucks under the plastic battery tray, sits nice in that location.
The wireless remote (awesome) is bolted to the inside fender edge between the air box.
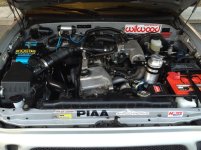
Hey Mike! I saw the Wilwood proportioning valve in that pic and thought, "hey, that engine bay looks familiar!"
lol (this is Jason, Davey's brother in law)

Thanks for all the info in this thread guys! I'm definitely subscribed for future reference, when the time comes for a winch.
 
Rock Rat,
I have my solenoid next to the battery. I fabbed a bracket that tucks under the plastic battery tray, sits nice in that location.
The wireless remote (awesome) is bolted to the inside fender edge between the air box.

Awesome looking setup! I think you need a build thread. :)
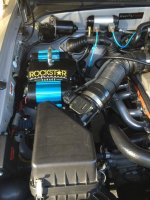
What is the large container mounted to your intake manifold?
 
Just a little follow up for those looking at the Warn 8000 and the Shrockworks bumper.

Rock_Rat,
Thank you for all your wonderful photos and data going into this install.
I have had a Warn 8000M sitting in a box for a while waiting to figure out what bumper I liked best and how to get it overseas without paying double the cost.
I have been pretty locked in on the Shrockworks bumper for the last month and believe this is the one I will be going with.
Keep up the great updates!!

Also what mods are done to the front frame rails to support this bumper and winch?
Thanks again. :)
 
Exhausted our advanced search feature for this combination and came up empty. A few hit and misses in the threads but nothing in the title or 3rd gen specific.

For those with the M8000 series (VR,S etc) AND a Shrockworks (...or other...not much difference in a winch mount) bumper looking for the following info:

  • Did you guys end up having to clock it?
  • Where did you install the control box?
  • Are any of you using the Warn 16296 retro plug? Hows it holding up and where did you install it? Pros/cons
  • Is the wireless remote worth the 100 bucks or just hard wire to switches and use the wired controller. (would rather have that as just a backup)

Thanks in advance!!

I recently installed the M8000 on a Shrockworks bumper.

I don't recall having to clock it, maybe because I went wireless
Installed on the passenger side
Not using a retro plug
I installed the wireless remote control and it is awesome / worth it!

And after installing the M8000, I ended up ordering a Warn synthetic rope...I should have spent the extra money up front and ordered it with the synth.

I hope this helps

~Mark
 
Last edited:
Warn M8000 Installed on Shrockworks Bumper

There are still some more things to do here but here are the photos of the Winch installed on the Shrockworks bumper. Unfortunately, I still ahev the solenoid box mounted on top of the bumper. My plan is to relocate it inside the bumper on the passenger side.

Short list just for this thread (long list in my build later on)

Extra Additions - $$$

Extra Requirments
  • Needed two new bolts for the Hawse in order to include the flipster and the lock washer. (2" x 3/8") The Warn bolts were too short.
  • Need to clock it to engage and disengage the clutch.

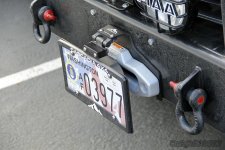
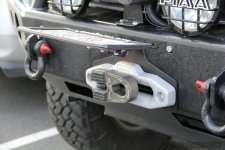
I'll include other details in my build. Love the flipster. Made in Canada with that high quality we can always expect from our northern neighbours. This is a must for those with a front plate requirement and a Hawse instead of rollers.

Enjoy the pics...

Nice looking front end. Just need to relocate the big box!
Winch Installed_1.jpg

Folds down nicely and conceals the winch.
Winch Installed_2.jpg

Here's the Flipster in the upright position for using the winch
Winch Installed_3.jpg

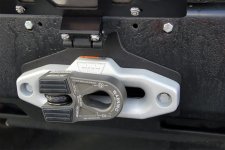
Factor 55 FlatLink E
Winch Installed_4.jpg

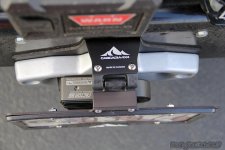
Good Birds Eye view of the Flipster over the FlatLink
Winch Installed_5.jpg
 

Attachments

  • Winch Installed_1.jpg
    Winch Installed_1.jpg
    143.2 KB · Views: 3,812
  • Winch Installed_2.jpg
    Winch Installed_2.jpg
    117.1 KB · Views: 1,482
  • Winch Installed_3.jpg
    Winch Installed_3.jpg
    104.9 KB · Views: 1,638
  • Winch Installed_4.jpg
    Winch Installed_4.jpg
    93.2 KB · Views: 1,441
  • Winch Installed_5.jpg
    Winch Installed_5.jpg
    85.8 KB · Views: 1,452
Rock Rat,
I have my solenoid next to the battery. I fabbed a bracket that tucks under the plastic battery tray, sits nice in that location.
The wireless remote (awesome) is bolted to the inside fender edge between the air box.

A 3RZ with Doug Thorley headers, very nice!
 
The solenoid doesn't look that bad on top. I dont like the way it hides the Toyota logo but hidden away would be better. Eager to see how it fits in the bumper on the PS.
 
Awesome looking setup! I think you need a build thread. :)
What is the large container mounted to your intake manifold?
Sorry for the late reply:

That aluminum tank is the PS reservoir. I bought the complete Howe Performance kit.

Works well.
 
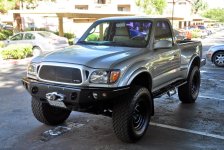
Did it all, SW bumper, M800 winch, clocked, syn cable, remote control, relocated box inside of engine compartment. Here is a photo from a week ago when I went down to Baja Mexico to Mission Santa Maria and the oasis.
 

Attachments

  • cata.jpg
    cata.jpg
    138.3 KB · Views: 1,350
All, just resurrecting my original thread. I still need to relocate my solenoid, however, my options are expanding as I'm beginning to second guess my thoughts on "needing" a dual battery setup. Mounting either inside the bumper or in the bay as a few others have seems to be a good option.

This won't happen anytime soon as there's too much fun to be had in the upcoming months!
 
So are you able to get the winch in there with the bumper mounted? I have heard varying results.
No way to do it without removing the bumper. There are other bumper designs (tube or open-top plate) where you can install a winch without removing the bumper.

-Charlie
 

Members online

Forum statistics

Threads
278,316
Messages
3,554,120
Members
248,016
Latest member
Advally Service

Trending content

Back
Top