What did you do to/in your 5th Gen today?!

Today I changed out the fluids in both diffs and the transfer case. at 45K miles the rear looked pretty murky, the front a bit less so and the transfer case actually looked surprisingly good. Switched to Amsoil synthetic fluid, first time trying it so we'll see how that goes.

While I was under there I went ahead and did the SCUBA mod and extended the breathers up into the jack holder area.

View attachment 303498

View attachment 303499

I also mounted my LED light bar behind the lower grille, but not wired yet so no pics of that...

I also just switched my front and rear diffs to Amsoil this weekend. I didn't change the transfer case yet cuz Amsoil doesn't list a compatible oil for it. Have to research this. What did you use?
 
How much are things like that, I assume since old military it's pretty high.

I found ours on CL. There is a Facebook Group m416/m101 Military trailers that has postings for them as well. You can also buy them on Military Auction Sites although m416’s are pretty rare on those. Usually the more sought after m416 can go from $500 - $5k depending on condition, modifications and location. The m101 which is bigger and heavier can easily be found for under $1k if you’re willing to put a little sweat equity into it. I paid just under $2k for ours but its extremely clean, no rust and has a custom lid that works with internal lift struts, and all new electrical that switched it from a 24v to typical 12v wiring. I’m figuring after about $1k for the axle swap (not necessary but a choice I’m making to run Toyota hubs and interchangeable spare between vehicle and trailer) and another $1k for a custom rack and I’ll get an equivalent or better than new “off-road” trailer that would cost between $6-8k.

You can obviously build your own for a lot less, but I do not have the tools, space, time or skills at this point to do it. Check out Expedition Portal, Ih8mud, and Steel Soldiers. EP also usually has a lot of trailers posted in their classifieds as well as some awesome builds that I personally got most of my inspriration and info from. PM me if you have any other questions and I can give you some more details. I am hardly an expert but over a year of reading and researching and you tend to stumble on some knowledge.

I also found mine on CL years ago. It sat in pieces in my garage for over 5 years before I finally got around to restoring it last year. So far I have about $2300 in it. Right now it's at a fabricator getting an extended tongue, a lid, and a hitch in the back. The goal is to carry two dirt bikes on it with a RTT. I kinda felt bad for a minute for taking it away from stock with it being so rare and all but I got over it. Can't wait til it's done. After I get it back I will put a battery system in it and have plans for many future mods.
 
Last edited:
Picked this up from the dealer. Have to get a few more parts before installing. Also work schedule is busy, so it will be a few weeks before I have a free day to get the install done.
0ea97e978b8427a097794e87e6fd4013.jpg


Sent from my iPhone using Tapatalk
 
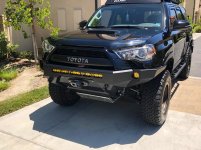
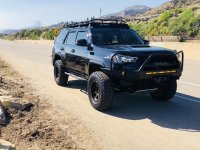
Swapped out Front bumpers. CBI originally sent me the wrong front bumper (No hoops). They made it right and built me the one i wanted. Spent the 4th swapping it out. I like the hooped one much better! Really pops the front end

First bumper


Second Bumper
 

Attachments

  • IMG_3518.jpg
    IMG_3518.jpg
    137.3 KB · Views: 1,070
  • IMG_3576.jpg
    IMG_3576.jpg
    139.2 KB · Views: 1,069
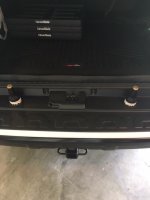
Watching / waiting for the Fourth of July parade got me thinking about Antman's rear bumper cup holder mod...so this was my morning activity for July 5th.

Three lessons learned I'll post in my full write-up:

1. Even with 2 3/4 hole saw the Dremel is needed to slightly enlarge the holes
2. Chalk works well for marking up your bumper before cutting.
3. Either measure & mark both holes before cutting the first to ensure they are symmetrically placed OR once the first is cut, validate your second measure against the cut on the first. My cup holders are 1/16" off in the distance from the front and it's noticeable due to where the cup holder lip sits. I love the mod, but this will drive me crazy for all eternity.
 

Attachments

  • IMG_2794.JPG
    IMG_2794.JPG
    67.6 KB · Views: 1,009
75w-90 all around

I also just switched my front and rear diffs to Amsoil this weekend. I didn't change the transfer case yet cuz Amsoil doesn't list a compatible oil for it. Have to research this. What did you use?

I used the Severe Gear 75w-90 in all three. My Amsoil rep said they don't call it out specifically as compatible on the site but it is rated for the transfer case and will be fine. According to a bunch of threads I have read here, most people are using 75w-90 in the t-case, so I feel comfortable with it.

I actually bought a 5 gallon drum of the stuff and did the front and rear diffs and t-case in my 2013 and my daughters 2003. If there's enough left, I'm planning to put in the the standard trans of my Pontiac Solstice and maybe the diff in that too.
 
Watching / waiting for the Fourth of July parade got me thinking about Antman's rear bumper cup holder mod...so this was my morning activity for July 5th.

Three lessons learned I'll post in my full write-up:

1. Even with 2 3/4 hole saw the Dremel is needed to slightly enlarge the holes
2. Chalk works well for marking up your bumper before cutting.
3. Either measure & mark both holes before cutting the first to ensure they are symmetrically placed OR once the first is cut, validate your second measure against the cut on the first. My cup holders are 1/16" off in the distance from the front and it's noticeable due to where the cup holder lip sits. I love the mod, but this will drive me crazy for all eternity.

1/16 inch?
You’re OCD, like me!

Is that Lagunitas IPA you’re using for a fit-check?
Good choice. :cheers:
 
I love the mod, but this will drive me crazy for all eternity.

Can't you just sand the holes 1/32" each. One towards the inbound side and one towards the outbound side as needed. Then the lip of the holder will hide the hole and you seal it with waterproof sealant.

Isn't the cup holder lip like a 1/4" or so? Surely you could move each one 1/32" and still have the hole covered.

Or is your OCD so bad that you like to peruse you work from the underside of the bumper as well just so you can sleep at night?
 
Can't you just sand the holes 1/32" each. One towards the inbound side and one towards the outbound side as needed. Then the lip of the holder will hide the hole and you seal it with waterproof sealant.


Isn't the cup holder lip like a 1/4" or so? Surely you could move each one 1/32" and still have the hole covered.


Or is your OCD so bad that you like to peruse you work from the underside of the bumper as well just so you can sleep at night?


Good points - this is exactly what I’ve been contemplating.

Currently the lip & fit keeps them in place. I’ve dremeled/sanded the holes on opposite sides to the point where if I go bigger I’ll need adhesive or sealant to secure them. There is enough lip on the holder for me to widen out the hole and make them even. In the back of my head is that it’s also in the upper 90’s here and I wonder how much the plastics will contract when it’s zero out this winter. So, the million dollar question is whether my OCD is worth the risk of screwing up an otherwise good install.

Oh, and OF COURSE I look at the bottom side so I can sleep at night!


Sent from my iPhone using Tapatalk
 
Blacked out front and rear Toyota Emblems with plasti dip, also plasti dipped my
Front and rear bumper accent adding a glossifier.
 
Currently the lip & fit keeps them in place.

Oh, and OF COURSE I look at the bottom side so I can sleep at night!

LOL, well, the former will change with the temp too. Can't help you with the latter. BUT... most flexible adhesives have temp ranges printed on the labels so that should comfort you as they are typically quite low and high.

Is the one on the right the one that is too far forward? It sort of looks that way, but could be the photo. IF, you can move that one back I would think that would be better than trying to push the left one forward. It will create spaces that are harder to visually measure off of.

If the pieces get close to an edge it's easier to see a difference.

ETA: Also don't rule out sanding or otherwise altering the unseen part of the holder itself. Maybe it has some plastic ribs, or some moldings that could be sanded for a better fit.
 
Last edited:
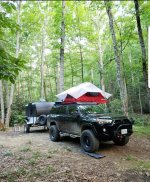
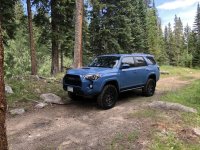
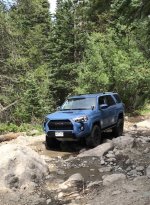
Went up to Middle St. Vrain trail Lyons, CO.
It was a good day.
 

Attachments

  • EE0E22FE-4259-45DD-9CC6-0A40A4C148BF.jpg
    EE0E22FE-4259-45DD-9CC6-0A40A4C148BF.jpg
    138.3 KB · Views: 654
  • 17752FFE-AB5F-4B5E-BBA5-48DBEF71D302.jpg
    17752FFE-AB5F-4B5E-BBA5-48DBEF71D302.jpg
    150 KB · Views: 648

Members online

Forum statistics

Threads
278,316
Messages
3,554,124
Members
248,016
Latest member
Advally Service

Trending content

Back
Top