Drove 11 hours home. Arrived at 2:30 am. Backed in to my garage. Closed the garage door prematurely and (somehow) snapped off the grill mounted Toyota emblem. :twitch:
Drove 11 hours home. Arrived at 2:30 am. Backed in to my garage. Closed the garage door prematurely and (somehow) snapped off the grill mounted Toyota emblem. :twitch:
Thank you. I am pretty proud. It took awhile and the learning curve to hide wires and essentially tear out the interior without breaking anything was a challenge but I can do it pretty easily now. My biggest lessons learned would be to make sure you have all the parts before you start the project or it'll take forever to get everything done.
Drove 11 hours home. Arrived at 2:30 am. Backed in to my garage. Closed the garage door prematurely and (somehow) snapped off the grill mounted Toyota emblem. :twitch:
Drove 11 hours home. Arrived at 2:30 am. Backed in to my garage. Closed the garage door prematurely and (somehow) snapped off the grill mounted Toyota emblem. :twitch:
Ordered a CBI rear bumper. Called my mechanic and learned he was in a motorcycle crash on Friday. Broken femur and pelvis. This may put my schedule back a bit. Anybody want to suggest a Northern California (or Colorado) shop that can help me with my build?
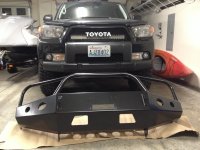
Ain't she purdy? Don't think I will have time to install it until next week though. The headlight trim pieces are in the body shop getting painted. Can't wait to get this bad boy on.
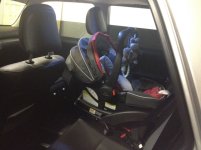
It will probably work with the seatbelt. The problem with the middle seat is there are no LATCH anchors at the seat bottom. The LATCH anchors make the car seat installation a breeze.
I did the same thing this past fall, except mine pitched out rather than in, and I was in the middle of the bush. Managed to scavenge parts for the rear sway bar tie rods to put everything back together to get me out. There are surprisingly few M10 nuts that aren't on absolutely critical parts. I always carry extras now.
Gees glad you weren't sporting around when that happened!
Proper torque, Loctite green, and check them regularly until you are confident they aren't self-adjusting. Then check them half as much EDIT: I am speaking of any bolt that may come loose not UCA's specifically
Hey guys, not sure if any of you are interested...but this is what I did after I torqued them to spec, drove around for a few days and rechecked the torque to make sure it didn't loosen up. I put on a thin jamb nut over it and just cranked it down a bit with a box wrench because I didn't want to disturb the main bolts torque preloading or whatever you call it, lol.
I know there's a bit of debate over how to properly install and torque jamb nuts, so I won't get into it because quite frankly I have no clue what is the right way; but, I figured an extra nut preventing the original nut from backing out probably couldn't hurt as long as you don't go crazy cranking it down.
As you can see it just covers the extra threads perfectly as if it was meant to be
The size and spec is: M14x1.5MM Pitch--7MM Height and 22MM Width
Tried using a crowfoot on your torque wrench? Grab a nut and bolt and torque to spec then put the crowfoot on your torque wrench and set it to adjust for the difference in the offset, now you have an open end torque wrench. just make sure the crowfoot is rated to handle the torque you are putting on it.
Or take 20 seconds to unbolt(10mm) the brake line bracket and move it out of the way so you can get the torque wrench and a socket on it.There's no problem getting on it to torque after you move it.
Formulas and measurements for using extensions like crowsfeet to equal the proper torque are above most people's paygrade unless you know to use them at a 90 degree angle.:shrug: