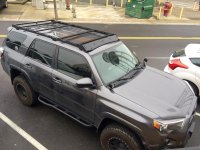
What did you do to/in your 5th Gen today?!

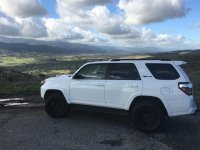
Pismo beach for the weekend
cf4a1d4489b6fcc4efd7e23768fb9eb3.jpg

Sent from my iPhone using Tapatalk


Ninja!!:fencing:
 
I've been wrestling with that question. Do you think running a ground wire from the bracket to the roof rail mounting bolts would suffice?
I just replaced my roof rack this weekend, and I would say the mounts would not be the greatest ground. The two bolts seem to be connected to a single plate that moves around like it is attached to some sort of insulation, possibly rubber. The point being, they are not directly connected to the sheet metal (painted or not) as far as I can tell.

Sent from my SM-G920V using Tapatalk
 
So, where did you run the antenna wire through to the radio? Did you end up drilling a hole?

I run an 18' cable through the trunk door jam, down the gutter and crossing the seal near the bottom, then along the edge of my trunk liner, under the back seats and rear floor mats by the transmission tunnel and under the front seats to connect to my Midland 75-822 car charger adapter. You can barely tell the cable is there and no drilling required.

In answer to the grounding question, I'll probably run some 10 gauge from what will be a stainless steel bracket to somewhere on the trunk. Probably not perfect, but will hopefully work well enough for what will be fairly short distance trail communications.

I'll be using a 2' Firestik FS2 and secure the bracket with a thumb screw. The antenna will be able to pivot down between the bars for parking garages and car wash etc. Will post pics when the project is finished and report on well it works!
 
I've been wrestling with that question. Do you think running a ground wire from the bracket to the roof rail mounting bolts would suffice?

That would be better than nothing, but I believe the roof may be somewhat electrically insulated from the rest of the chassis. Your best bet would be to run wiring along the roof rack towards the hatch and then ground the wiring inside/under the hatch as a lot of other people have done, using a new self tapping screw drilled into the sheet metal.

You could always try to ground it to the roof rack bolts, and see what your SWR is. If it's low enough, then that would be adequate.
 
What "season"? The outdoors season is literally just beginning.

The mountain biking season (and no, I don't have a fatbike to ride with in the snow). Bike is being put away, and snowboards are being prepped.

And as far as I'm concerned, there is no "outdoors" season, and I live in Toronto (Canada).
 
Last edited:
can you fold it back and open the hatch with the bikes mounted?

Sorry. Not my bike rack. I just happened to know which one it was. That being said, I believe you can open the hatch with the bike rack and bikes folded down. Everyone I know that has one loves it. However, I have never seen any of them actually use it in person. :wow:
 
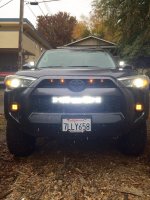
Installed a CaliRaised 30" bar behind the grille mounted with the Rago Fabrication brackets.

Installation was fairly straight forward although the video instructions on the CaliRaised site are atrocious as it related to the actual product. Great to remove the bumper and grille but it essentially ends without any info as to how to install the actual brackets/light bar. That said, it's not terribly difficult to figure out, but the provided screws that mount the light bar to the brackets were too long so I used the rubber spacers intended for the other light bar feet I didn't use. I watched their video for the 2016 tacoma and they used the rubber piece as a spacer too with a disclaimer about "not necessary for installation" which tells me they had the same problem. Why they are shipping these with the wrong hardware I do not know but just a heads up.

It worked fine using the rubber spacers (see below), but just felt silly and I will probably replace the screws due to the OCD in me. Additionally, the brackets push on the grille - I saw in another thread others have had this issue. I remounted about 5 times to make sure everything was mounted as far back as possible, but it's simply a design flaw.

In the end, I'm pretty happy, the light is super bright and install wasn't too bad beyond trying to understand the silly design issues - the switch it comes with feels super AUTOZONE, but will have to do until I have time to figure out how to make the AOB switch I have compatible... I know there's a million threads on here and I can tie it into the wiper heater switch, but I'm not sure if I can splice it into the wiring for the existing switch thereby using the current relay or if it needs its own relay? I'm an electrical noob.


I saw another user state that they had to cut the grill so that it wouldn't make contact with the bracket. Melissa Rago commented that they can walk people through installation so that contact with the grill does not happen. Did you try to contact them at all?

I'm about to attempt this and have my wife be the second set of hands. Since it is her 4R, I don't want any rubbing the grill issues. I may call Rago Fab before attempting to make sure that I get it right the first time.
 
I saw another user state that they had to cut the grill so that it wouldn't make contact with the bracket. Melissa Rago commented that they can walk people through installation so that contact with the grill does not happen. Did you try to contact them at all?

I'm about to attempt this and have my wife be the second set of hands. Since it is her 4R, I don't want any rubbing the grill issues. I may call Rago Fab before attempting to make sure that I get it right the first time.

I did not although I do recall seeing that thread as well. I would say it's worth doing. Mine rubs enough to certainly apply pressure to the grill and it appears to be digging in a little bit - when I have a few daylight hours in the coming weeks I will open it all back up and see if i can't figure it out, but I spent a good 30 minutes mounting and remounting (remounted probably 3 times on each side) to try and get everything set as far back as possible to no avail.

Let me know if you're able to install cleanly and I'll be motivated to revisit it!
 
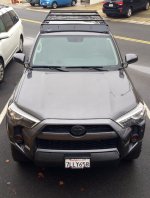
Prinsu Rack & CBI Ditch Light Brackets

Had a few hour break in the rain this weekend so I was able to install my CBI ditch light brackets and also semi-install my Prinsu Rack.

Still need to drill holes in the roof for the front foot mounts :cry2:... I did not want to do that since there was still rain in the forecast.

I'm hoping to finish up the final roof drilling and install the rest of cross bars this week sometime.

Here's some progress photos so far:

Photo Nov 20, 12 30 18 PM.jpg

Photo Nov 21, 9 54 19 AM.jpg

Photo Nov 21, 9 54 37 AM.jpg
 

Attachments

  • Photo Nov 20, 12 30 18 PM.jpg
    Photo Nov 20, 12 30 18 PM.jpg
    137.3 KB · Views: 934
  • Photo Nov 21, 9 54 19 AM.jpg
    Photo Nov 21, 9 54 19 AM.jpg
    133.8 KB · Views: 893
  • Photo Nov 21, 9 54 37 AM.jpg
    Photo Nov 21, 9 54 37 AM.jpg
    135.4 KB · Views: 1,007

Members online

Forum statistics

Threads
278,317
Messages
3,554,125
Members
248,016
Latest member
Advally Service

Trending content

Back
Top