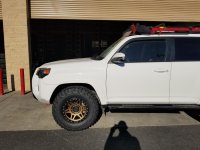
What did you do to/in your 5th Gen today?!

In person visit to BudBuilt

My son and I drove to Hudson, NC and visited Bud at BudBuilt. It was a unique experience. We spent time with Bud, his son, their new welder (straight off the NASCAR circuit), and Bud's friend who worked for George Barris in his youth. We heard great stories about the Batmobile, the Munster Mobile, and car builds for Elvis & Liberace. [MENTION=5646]BudBuilt[/MENTION]

Bud & company couldn't have been more welcoming, and I am very happy with my new DOM tube sliders. Photos linked below.

DOM Slider
KDSS Mount View
In Production 1
In Production 2
 
Last edited:
I like this. Can you tell me why you went with a solid panel over a flexible panel directly on the roof?
I am interested in how you are going to wire it; inquiring minds want to know. Thanks!

As far as why the hard panel over the flexible, no real reason. The hard panel was the perfect size and will fit in the prinsu, so I could take the crossbars out and drill into the sides to give a more low profile look.
The wiring runs through the grommet that the hatch wires run through, then i pulled back some of the headliner to run the wires over to the access panel for the passenger taillight for now. Once I am done wiring it up, it will come out of there, go into a charge controller, then back in and work it's way forward to the battery.
 
the stock running boards were the ones my wife wanted and it took about a month for the dealer to get it correct. These match the rear hatch area. I may try to talk her into new boards which will give it an aggressive look. I picked up the the stock roof rails which were finally painted black :reddance: and installed them today. I like the look of it even more now. Tomorrow dropping off the 4runner for the trd pro suspension installation.

The roof rails are next on my list, just got a spare set from another member so I can get them powder coated/painted black as well. Bye bye silver
 
The roof rails are next on my list, just got a spare set from another member so I can get them powder coated/painted black as well. Bye bye silver

It’s a nice look , I’ll post pix later . Hoping to pick up the 4Runner this evening once the trd pro suspension is installed
 
New tires and a lift. I love this truck more and more every day!

24019a1484af36f02650d8ccc1a2766a.heic


Sent from my iPhone using Tapatalk
 
Installed the Morimoto HID kit with 4500K bulbs. The photo doesn't really do it justice (OE on passenger side, HID on driver side), but it's a huge improvement from OE.

Install was easy. Most time was just spent routing/tucking wires and making sure things were positioned well.

<iframe src="https://drive.google.com/file/d/1ZWXRBaaubVvciP8p_N2AlM3XnKFJpUlt/preview" width="640" height="480"></iframe>
 
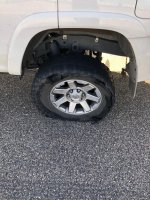
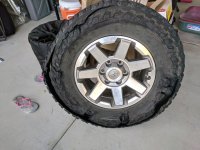
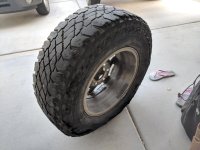
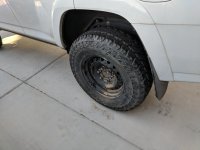
Cooper S/T Maxx (255/80) blowout & Lessoned Learned

Had a blowout coming home from Prescott today. Took her out to exercise the 4wd and low gears etc on some trails on the way up; everything was fine and then headed to Prescott. Had some lunch and came back down to Phoenix.

On the way home we stopped at the store and pick up a few items and headed home; my wife who was driving then says that the tire pressure light came on; It's came on in the past so I wasn't overly concerned but kept my ear out for any noises etc. We travel down the highway for about 10 minutes at 68mph then the truck starts to get squirrly and then the thumping starts and my wife managed to pull it over just at the exit and make a safe stop.

So, I'm going to admit that I'm a dumb ass and never had practiced changing the spare; especially with the lift on with 33's. I get out the book and proceed to get everything together, it's about 108 out and I know this is going to take a while. I struggled with the jack etc and next thing I know a very kind person stopped to help, his name was Saul. We get it lifted and take off the blown out tire and then realized that the jack doesn't go high enough to put the spare on.

This was one of the things I had "Planned to do" but clearly I didn't try it out first and now I'm the dumb ass on the side of the road. So, found a few books to give it the extra 1" or so and managed to get the jack high enough to get the spare on.

I totally failed in preparedness and safety (we got lucky using the books) and have learned a valuable lesson.

So, my tires are fairly worn and was planning on replacing them this summer, they have 40k on them, in case anyone was wondering. Surprised it was a sidewall blowout.

Anyway, don't be like me and do your homework first and carry the proper equipment with you etc.
 

Attachments

  • IMG_3079.jpg
    IMG_3079.jpg
    138.7 KB · Views: 910
  • IMG_20180623_180102.jpg
    IMG_20180623_180102.jpg
    133.3 KB · Views: 914
  • IMG_20180623_180134.jpg
    IMG_20180623_180134.jpg
    129.2 KB · Views: 914
  • IMG_20180623_180052.jpg
    IMG_20180623_180052.jpg
    128.3 KB · Views: 898
Last edited:
Had a blowout coming home from Prescott today. Took her out to exercise the 4wd and low gears etc on some trails on the way up; everything was fine and then headed to Prescott. Had some lunch and came back down to Phoenix.

On the way home we stopped at the store and pick up a few items and headed home; my wife who was driving then says that the tire pressure light came on; It's came on in the past so I wasn't overly concerned but kept my ear out for any noises etc. We travel down the highway for about 10 minutes at 68mph then the truck starts to get squirrly and then the thumping starts and my wife managed to pull it over just at the exit and make a safe stop.

So, I'm going to admit that I'm a dumb ass and never had practiced changing the spare; especially with the lift on with 33's. I get out the book and proceed to get everything together, it's about 108 out and I know this is going to take a while. I struggled with the jack etc and next thing I know a very kind person stopped to help, his name was Saul. We get it lifted and take off the blown out tire and then realized that the jack doesn't go high enough to put the spare on.

This was one of the things I had "Planned to do" but clearly I didn't try it out first and now I'm the dumb ass on the side of the road. So, found a few books to give it the extra 1" or so and managed to get the jack high enough to get the spare on.

I totally failed in preparedness and safety (we got lucky using the books) and have learned a valuable lesson.

So, my tires are fairly worn and was planning on replacing them this summer, they have 40k on them, in case anyone was wondering. Surprised it was a sidewall blowout.

Anyway, don't be like me and do your homework first and carry the proper equipment with you etc.

Did you have an air compressor with you?? If you did you could’ve let the air out of the tires to lower the vehicle enough to get your stock jack to work. Just an option for future use.
 
Did you have an air compressor with you?? If you did you could’ve let the air out of the tires to lower the vehicle enough to get your stock jack to work. Just an option for future use.

No. Sigh, I was totally a dumb ass and didn't bring anything but water with us and I totally know better to always bring my basics with me; it was a last minute thing to go but no excuses; should've had my stuff.

And Thank you for the Great idea on lowering the air pressure, I wouldn't have thought of that even if I had my compressor...clearly my mechanical skills are lacking. But, it is a great learning opportunity for me. :)
 
Interesting, so the car remote starts with the lock button? Do you have to unlock the doors before entering while it's running?

How complicated was the wiring?

Yea you just push the lock button 3 times and it remote starts, which is nice to let it get the heat or air conditioning working before you get in. It keeps the doors locked and you just push the unlock button to get in and put in the key, it never shuts off from opening the door like the factory remote start. Wiring was easy, just pull the panel below steering column off, unplug a couple connectors and plug the T-harness in, and splice one wireto the blue wire on a particular connector. then push a couple buttons and tell it to program to the BCM module. and your done.

Took 20 minutes
 
New Wheels and Tires

Test Fitted waiting on lift for final install 285/70-17 BFG KM3 on Method 312
 

Attachments

  • 20180613_180928.jpg
    20180613_180928.jpg
    132.4 KB · Views: 838
trying to fix a cluster panel issue

attempting to fix an issue I've been having upon startup. The cluster will go through a test for about 45 seconds or so (which obviously isn't normal). I took off the negative terminal in hopes that maybe a reset would make it stop but no luck. it just started out of the blue so i don't really know what caused it. Anyone have any suggestions or possible help? thanks in advance!

i have a video sample of the issue but i don't know how to post it or convert it from .mov :(
 
Had a blowout coming home from Prescott today. Took her out to exercise the 4wd and low gears etc on some trails on the way up; everything was fine and then headed to Prescott. Had some lunch and came back down to Phoenix.

...

So, my tires are fairly worn and was planning on replacing them this summer, they have 40k on them, in case anyone was wondering. Surprised it was a sidewall blowout.

Anyway, don't be like me and do your homework first and carry the proper equipment with you etc.

Holy smokes! Bummer! I would not have guessed that about the stock jack, either. I've got 255/75's, and have never tried my jack...

What pressure were you running. I think sidewall blowouts are often caused by heat, caused by too low pressure on the road. Had you aired down before going off road?
 
Yea you just push the lock button 3 times and it remote starts, which is nice to let it get the heat or air conditioning working before you get in. It keeps the doors locked and you just push the unlock button to get in and put in the key, it never shuts off from opening the door like the factory remote start. Wiring was easy, just pull the panel below steering column off, unplug a couple connectors and plug the T-harness in, and splice one wireto the blue wire on a particular connector. then push a couple buttons and tell it to program to the BCM module. and your done.

Took 20 minutes

Thanks, I'm definitely going to grab one of these
 
No. Sigh, I was totally a dumb ass and didn't bring anything but water with us and I totally know better to always bring my basics with me; it was a last minute thing to go but no excuses; should've had my stuff.
W
And Thank you for the Great idea on lowering the air pressure, I wouldn't have thought of that even if I had my compressor...clearly my mechanical skills are lacking. But, it is a great learning opportunity for me. :)

It happens to all of us, we’ve all been in some situation like that at some time or another. You never really stop learning, who knows maybe someday you’ll help somebody else in need with that little tip.
 

Members online

Forum statistics

Threads
278,317
Messages
3,554,128
Members
248,016
Latest member
Advally Service

Trending content

Back
Top