What did you do to/in your 5th Gen today?!

4 bolts

How do you adjust the spare tire holder to tuck the tire up higher?

Four metric #19 (standard 3/4") bolts on the Shrockworks tire carrier, requiring a deep socket, maybe 30 minutes of work because I'm slow. Remove the spare, remove the attachment point and lift it up a couple inches, reattach everything.

I'm glad I did this, because the spare nuts were bolted on so tight that I never would have got them off if I'd had a flat in the back country. I would've been so screwed.
 
Last edited:
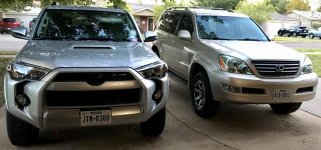
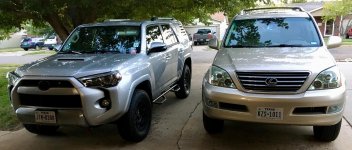
Lifted the front end of my GX. Its almost on par with my TRD now
 

Attachments

  • 46C3158A-510E-4893-BEE2-E9D47493EBD9.jpg
    46C3158A-510E-4893-BEE2-E9D47493EBD9.jpg
    146.8 KB · Views: 911
  • F0C87203-F658-4A23-94A6-A6F61BCC84E6.jpg
    F0C87203-F658-4A23-94A6-A6F61BCC84E6.jpg
    149.1 KB · Views: 930
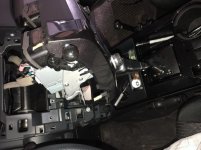
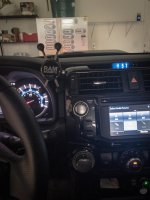
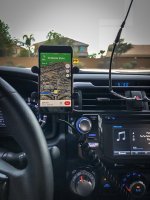
Installed a ram mount into the center console for my phone
I’m tired of it bouncing around everywhere when I’m on a trail
Should have done this a long time ago. Seems like a much safer option for regular driving too.
 

Attachments

  • 8AD32024-BDE1-434E-AE70-80F0D1793221.jpg
    8AD32024-BDE1-434E-AE70-80F0D1793221.jpg
    131 KB · Views: 822
  • 7FDADAFB-89C4-4021-8BD2-8D05FA5708B3.jpg
    7FDADAFB-89C4-4021-8BD2-8D05FA5708B3.jpg
    137.2 KB · Views: 839
  • FF484524-CCCA-4588-A801-3F3EC9D3ABE6.jpeg
    FF484524-CCCA-4588-A801-3F3EC9D3ABE6.jpeg
    108.9 KB · Views: 823
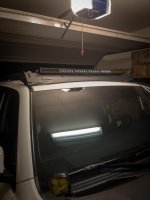
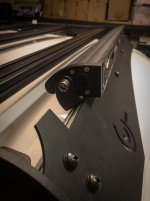
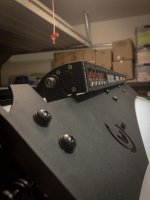
I tried to install my ExtremeLED bar tonight but the brackets don’t work. There isn’t enough room to allow more rotation.
:(
 

Attachments

  • 4CD7F790-AAFF-4F18-8067-5267C88E9B79.jpg
    4CD7F790-AAFF-4F18-8067-5267C88E9B79.jpg
    132.1 KB · Views: 821
  • DAD06ECD-108A-4398-B4A6-E4769957562E.jpg
    DAD06ECD-108A-4398-B4A6-E4769957562E.jpg
    133.1 KB · Views: 821
  • 7DBCCB5B-FEF8-4498-85B7-6FBE7D50C7F0.jpg
    7DBCCB5B-FEF8-4498-85B7-6FBE7D50C7F0.jpg
    137.7 KB · Views: 812
I tried to install my ExtremeLED bar tonight but the brackets don’t work. There isn’t enough room to allow more rotation.
:(

I'm having a hard time figuring out what surface you're attempting to mount it to. Wouldn't it make sense to drill and install on the front fairing face?
 
I'm having a hard time figuring out what surface you're attempting to mount it to. Wouldn't it make sense to drill and install on the front fairing face?

basically the prinsu fairing is attached to a 1x2 crossbar that is installed at an angle so you can just mount into the side of the bar.

i just need to get some lightbar mounts that have a little more height to them so that i can get a little more rotation out of the bar itself.
not a huge issue, its just that i wanted to get the thing installed tonight.
im impatient!
 
basically the prinsu fairing is attached to a 1x2 crossbar that is installed at an angle so you can just mount into the side of the bar.

i just need to get some lightbar mounts that have a little more height to them so that i can get a little more rotation out of the bar itself.
not a huge issue, its just that i wanted to get the thing installed tonight.
im impatient!

Instead of throwing those brackets away, you could get spacers and longer bolts. Your hardware store might have some.
 
Instead of throwing those brackets away, you could get spacers and longer bolts. Your hardware store might have some.

i thought that too but the actual height of the bracket is the issue. look at how the bottom of the light hits the bracket itself.
if there was a 1/4 inch more lift in the bracket itself it would be fine but
 
i thought that too but the actual height of the bracket is the issue. look at how the bottom of the light hits the bracket itself.
if there was a 1/4 inch more lift in the bracket itself it would be fine but

have you tried flipping the mount backwards? It might give you a little more clearance
 
basically the prinsu fairing is attached to a 1x2 crossbar that is installed at an angle so you can just mount into the side of the bar.

i just need to get some lightbar mounts that have a little more height to them so that i can get a little more rotation out of the bar itself.
not a huge issue, its just that i wanted to get the thing installed tonight.
im impatient!

Look at the prinsu or heretic studio lighting websites. the mounts for the heretic bars are meant for the prinsu rack, might work with your bar.

IMO you need it go back farther but not any higher, otherwise why even have a cutout fairing. The heretic bars fit SO good on the prinsu rack.

https://www.hereticstudio.com
 
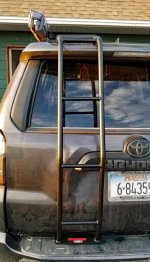
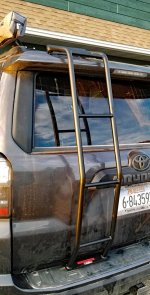
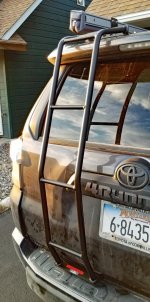
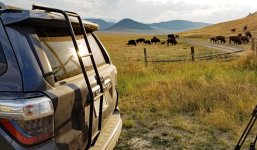
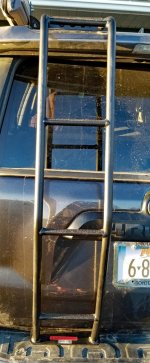
...Finally Got My Gobi Ladder!

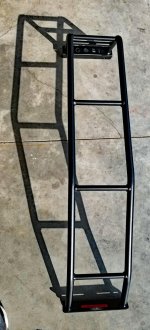
...Well, after only waiting 17 years...my Gobi ladder has finally arrived!...:eek:

....OK....maybe I'm exaggerating slightly....it only felt like 17 years!...:crybaby:

...I ordered it in early May, and it finally arrived in September.....:violin:

...I won't go off on a rant about it...enuff of us have done so already....and the end product is Great!...but it seems an odd way to run customer-service?...


...The install is pretty straightforward...but the instruction sheets seem to me to be overly complicated....but in the end, it all comes out as it should...

...It should take less than an hour for the 1st time ya do this...just to go back and double-n-triple check the info sheets and illustrations...but if I needed to do a 2nd one...it could easily be done in 15-20 minutes...

...I was surprised just how light it is...only 13 pounds...so there is no need to put on any beefier hatch-struts....

...Once mounted...it is Solid!...NO movement whatsoever....


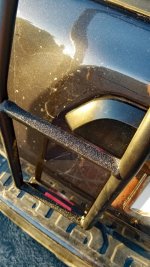
...I added some adhesive-backed non-skid tape to the top of the rungs, for two reasons. Obviously, for grip in wet and icy conditions, and then also to protect the paint from being scraped off and exposing the bare metal...

...I also got some clearcoat vinyl from a tint shop...and applied it behind the ladder on the rear-hatch to protect the paint...especially on the bottom of the ladder where the rungs are quite close to the hatch....

...Actually, the hardest part of the entire process was applying the clearcoat-vinyl behind the ladder...thanks to the many compound curves back there...


...Now I can start working on the roof platform....:dancin:
 

Attachments

  • 20180906_164715e.jpg
    20180906_164715e.jpg
    144.4 KB · Views: 1,038
  • 20180907_192524e.jpg
    20180907_192524e.jpg
    144.5 KB · Views: 1,049
  • 20180907_192536e.jpg
    20180907_192536e.jpg
    148.7 KB · Views: 1,056
  • 20180907_192547e.jpg
    20180907_192547e.jpg
    150.4 KB · Views: 1,062
  • 20180908_180242e.jpg
    20180908_180242e.jpg
    146.3 KB · Views: 1,050
  • 20180917_190327e.jpg
    20180917_190327e.jpg
    150.5 KB · Views: 1,029
  • 20180917_190336e.jpg
    20180917_190336e.jpg
    143.4 KB · Views: 1,033
...Well, after only waiting 17 years...my Gobi ladder has finally arrived!...:eek:

....OK....maybe I'm exaggerating slightly....it only felt like 17 years!...:crybaby:

...I ordered it in early May, and it finally arrived in September.....:violin:

...I won't go off on a rant about it...enuff of us have done so already....and the end product is Great!...but it seems an odd way to run customer-service?...


...The install is pretty straightforward...but the instruction sheets seem to me to be overly complicated....but in the end, it all comes out as it should...

...It should take less than an hour for the 1st time ya do this...just to go back and double-n-triple check the info sheets and illustrations...but if I needed to do a 2nd one...it could easily be done in 15-20 minutes...

...I was surprised just how light it is...only 13 pounds...so there is no need to put on any beefier hatch-struts....

...Once mounted...it is Solid!...NO movement whatsoever....


...I added some adhesive-backed non-skid tape to the top of the rungs, for two reasons. Obviously, for grip in wet and icy conditions, and then also to protect the paint from being scraped off and exposing the bare metal...

...I also got some clearcoat vinyl from a tint shop...and applied it behind the ladder on the rear-hatch to protect the paint...especially on the bottom of the ladder where the rungs are quite close to the hatch....

...Actually, the hardest part of the entire process was applying the clearcoat-vinyl behind the ladder...thanks to the many compound curves back there...


...Now I can start working on the roof platform....:dancin:

Something I’ve always wondered about these ladders:
When you climb up them don’t your shoes kick the hatch and scratch the paint?
Especially on the lower two rungs that are closer to the hatch.
Or do you climb up on your tippy toes?
 
Something I’ve always wondered about these ladders:
When you climb up them don’t your shoes kick the hatch and scratch the paint?
Especially on the lower two rungs that are closer to the hatch.
Or do you climb up on your tippy toes?

Yes, that sucks. I was thinking maybe a bracket could be made to pull the ladder back away from the hatch a few inches, and then push it back in for travel. Just a thought.
 
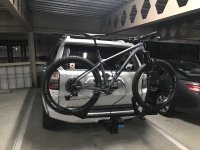
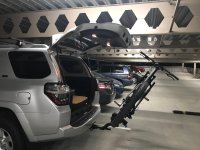
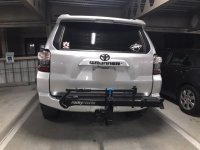
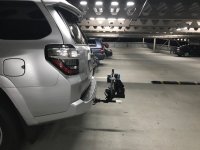
Installed a Rockymounts monorail solo bike rack. Haven't driven with it yet but I mounted up the bike and it felt solid. Cool thing about this rack is an extension can be bolted to the end of it to make it a 2-bike carrier should I ever need to carry another. It also can tilt away to allow the back hatch to open with a bike mounted.

Only down side is the two included locks that secure the hitch pin and bike cable to the rack are plastic and cheap feeling. A few solid hammer whacks would likely take them off. They're still enough to deter a lazy thief as long as I'm with the car. I don't plan on ever leaving the bike on it while I'm not around anyway.
 

Attachments

  • bikerack3.jpg
    bikerack3.jpg
    90 KB · Views: 1,410
  • bikerack2.jpg
    bikerack2.jpg
    88.4 KB · Views: 1,163
  • bikerack1.JPG
    bikerack1.JPG
    90.1 KB · Views: 1,198
  • bikerack4.jpg
    bikerack4.jpg
    76 KB · Views: 1,161
Installed a Rockymounts monorail solo bike rack. Haven't driven with it yet but I mounted up the bike and it felt solid. Cool thing about this rack is an extension can be bolted to the end of it to make it a 2-bike carrier should I ever need to carry another. It also can tilt away to allow the back hatch to open with a bike mounted.

Only down side is the two included locks that secure the hitch pin and bike cable to the rack are plastic and cheap feeling. A few solid hammer whacks would likely take them off. They're still enough to deter a lazy thief as long as I'm with the car. I don't plan on ever leaving the bike on it while I'm not around anyway.

Is that a TREK Marlin 5? If so, have you been happy with it?
 
Something I’ve always wondered about these ladders:
When you climb up them don’t your shoes kick the hatch and scratch the paint?
Especially on the lower two rungs that are closer to the hatch.
Or do you climb up on your tippy toes?
...To be honest....that point worries me a bit....which is WHY I put the clearcoat-vinyl back there.....

...But it also seems to me that they could have extended the base farther back to allow more clearance on those bottom few rungs....

...Perhaps if they did it could not support as much weight?....or it might put too much stress on the rear-hatch metal?....I dunno?....:shrug:
 

Members online

No members online now.

Forum statistics

Threads
278,317
Messages
3,554,128
Members
248,016
Latest member
Advally Service

Trending content

Back
Top