What did you do to/in your 5th Gen today?!

At long last... Wheels and lift have been ordered. Just have to figure out what rubber. Where the labor day deals at?


b501751e6b540fd3d14e9f14be32e982.gif
Discount is offering $100 off a set...but I think you have to use their credit card for it to apply.

Sent from my LG-US701 using Tapatalk
 
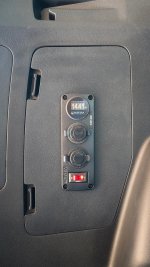
How do you take of the panel above the inverter??

The best way to do it without breaking tabs is to remove the factory accessory panel with the AC and DC ports. It's just a few tabs, use a flat head or trim tool. Then you can snake your hand in there and use a stubby philips head to remove the two screws. Lift up a few more tabs and your done. Others have done it by breaking the tabs but I didn't want to break anything if I didn't need to.
 
I'm currently deploy on an aircraft carrier, but i had my wife trade in our 2007 Limited for a new 2019 Off Road, and i couldn't be more excited to make it home to take it off road in 3 more months.

Most importantly, the dog approves of his new vehicle.
7cef84a6d9268903d25e37ebf1e15fd0.jpg
5c1449257d7da37fbdf6cbb6fbd45e9b.jpg


Sent from my SM-G892A using Tapatalk
 
My 2019 SR5 Premium came with the TRD wheel package but man I didn't care for the tires. I was originally going with KO2's but Discount screwed up and botched my order. The manager gave me a screaming deal on these, after rebate I'm about $600 out the door. Hoping to get $300-400 out of the Duelers as they had less than 500 miles on them. Probably a little more aggressive than I need here in the NW but man they sure look bad ass.

IMG_20190831_035325 by Michael Starmer, on Flickr
IMG_20190830_160206 by Michael Starmer, on Flickr
 
Came out from work today and started her up and the check engine light and trac control lights kept blaring at me.
Guess I’ll do some reading and try to figure it out tomorrow.
I haven’t a clue, but one thing comes to mind since I see a maintenance reminder in the info screen. Playing with the apps in the audio system I found a maintenance app. Might be one of the items it keeps track of is past due far enough that the computer is more urgently demanding service. Before I retired, a 2013 Ford F-150 I drove for a company did that after the truck was allowed to go past 15,000 miles between oil changes (oil level at full), so the truck started setting off lights on the dash and info screen.
 
Yesterday afternoon I was filling up at the gas station, and a black 5th gen pulled into the spot ahead of me. The driver came over and complimented my rig, said he'd seen my vehicle in the area many times before and was glad to finally get a chance to say hi.
 
I'm currently deploy on an aircraft carrier, but i had my wife trade in our 2007 Limited for a new 2019 Off Road, and i couldn't be more excited to make it home to take it off road in 3 more months.

Most importantly, the dog approves of his new vehicle.
7cef84a6d9268903d25e37ebf1e15fd0.jpg
5c1449257d7da37fbdf6cbb6fbd45e9b.jpg


Sent from my SM-G892A using Tapatalk

You sound like me.... probably on the same carrier. ha
 
Installed my Pro basket CL find. Got it cheap and it suits my needs for now. Would like to get a full ADV rack later. Missing the prices back in 09. The Baja rack I got for my FJ...I think I paid 650 for a full length track then...

Sent from my LG-US701 using Tapatalk
9b966db1fca903f069ee60df9aaf2064.jpg
 
Last edited:
Mounted my ARB 2500 Awning, onto my SSO Roof Rack.
Didnt come with any brackets, just had to make my own angle brackets out of 1/8" thick, used 3.
ARB%20Awning-X3.jpg
 
Mounted my ARB 2500 Awning, onto my SSO Roof Rack.
Didnt come with any brackets, just had to make my own angle brackets out of 1/8" thick, used 3.

Really nice setup! just wondering how you like it and do you think it provides enough space to be useful? I currently have the SSO rack as well and use a smittybilt XL RTT hanging over the passenger side. was considering the ARB 2500 with room for the driver side for a nice place to sit or cook if it rains/snows etc

The area under the RTT provides some shade but is too cramped to cook or do anything besides sit under it if I bought the room for it.
 
Really nice setup! just wondering how you like it and do you think it provides enough space to be useful? I currently have the SSO rack as well and use a smittybilt XL RTT hanging over the passenger side. was considering the ARB 2500 with room for the driver side for a nice place to sit or cook if it rains/snows etc

The area under the RTT provides some shade but is too cramped to cook or do anything besides sit under it if I bought the room for it.
Sadly, I have not got a chance to test it real world yet, but here is why I went with this setup...
I looked at 180 and 270 awnings, they are awesome,,, in ways.
They are much faster to setup, but, most do not let you pitch/angle the roof so rain run off can get tricky.
The 270s will not work with a 4R rear hatch, yes, I have seen the 23Zero pics of it on a 4R, but I dont buy it.
The hatch isnt going to open nearly all the way, its going to be pressing on the canvas, and might tear it up over time, plus I have the ladder on the hatch making that even worse.
Also,, I still think with those you will still need some side walls for any USEABLE coverage.
Rain rarely falls straight down, and shade moves around with the sun.
The setup costs me a third what the 270 would, and I personally think it will provide more usable coverage, especially in the rain.

The 2500 fits better than I thought it would, but it will hang out the front about 5" or so, the 2000 will fit really really well on the rack, but, you give up a good bit of coverage.

 
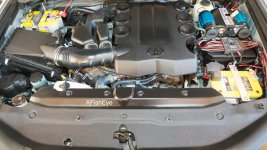
Off-Grid Engineering DC-DC Charger based Dual Battery system, sPod relocate, and power outlet back panel

1) I pay what you pay. Everything shown here was purchased with my hard earned money, no discounts, no deals.

2) Ask yourself if you need a dual battery system. If your battery did not die prematurely, you probably don’t need one. With all the stuff I run, my battery lasted less than two years.

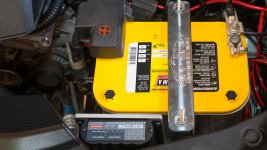
3) DC-DC chargers in a nutshell: your smart alternator will not allow for the full charge of your auxiliary battery using a traditional solenoid based systems. Full charge of deep cycle batteries prolong their life. The Redarc BCDC1225D charger will charge the auxiliary battery to the max and also allows for the connection of unregulated solar panels directly to the DC-DC charger. If you want to also go solar, just get solar panels and you’re good to go.

4) You can do the system cheaper by purchasing bits and pieces from here and there. You are paying for two top-notch quality battery trays, one includes a mount for the DC-DC charger. Matt from Off-Road Engineering is very responsive. I couldn’t get the auxiliary tray seated and thought I had the wrong tray, Matt responded in less than ten minutes. A complete kit with quality components and good customer support made the difference for me. I also purchased the power outlets kit from him.

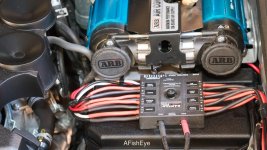
5) I connected my sPod to the auxiliary battery without moving it. sPod does sell a kit of long cables. I didn’t see it on their website, but if you call, they’ll direct you to it. On the 4Runner, the black (negative) cable was snug (length wise), but I made it work. The positive is long enough. Love my sPod Bantam and can see myself adding another one or two to the setup

6) Power outlets panel in the back is easy and simple to install (I connected it to the sPod). From firewall to the second row, run the cable under the floor panels (described in the forum numerous times). The last leg (from second row to the back) is time consuming so take your time. Don’t force anything, there are some thin wire looms inside the walls. No need to drill or break anything, remove the second row door weather stripping and run the cable through the crack using a metal wire as a guide. It will take quite a few attempts.

Redacted version of install:
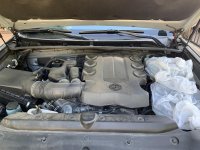
1) Cleaned engine bay, used Maguire’s Ultimate Black for all plastics

2) Undid all wiring to date (wasn’t bad at all to begin with, just wanted to tidy up some things)

3) Specific items of interest:

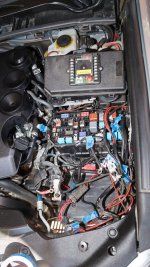
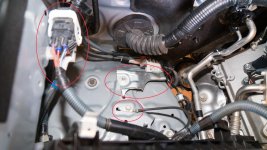
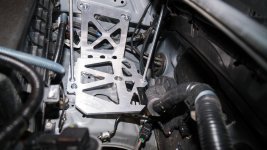
a) Auxiliary battery tray install is the time consuming item. You have to relocate one ground point, remove part of a wire loom conduit, and relocate one wire loom. The large relocated wire loom has to be removed from the main loom and this will provide enough slack to place it behind the tray

b) Primary battery tray install requires that you remove the metal post that holds the wire loom in the front. Remove the post and zip tie the wire loom forward

c) Wiring the Redarc and the batteries is mighty simple, these things come with instructions

d) Power outlets panel in the back is, well, power outlets panel in the back.

I have additional images and will be happy to answer specific questions
 

Attachments

  • 01.jpg
    01.jpg
    136.7 KB · Views: 1,073
  • 02.jpg
    02.jpg
    149 KB · Views: 1,095
  • 03.jpg
    03.jpg
    135.8 KB · Views: 1,109
  • 09.jpg
    09.jpg
    132.8 KB · Views: 1,076
  • 12.jpg
    12.jpg
    141.5 KB · Views: 1,065
  • 14.jpg
    14.jpg
    137.8 KB · Views: 1,080
  • 15.jpg
    15.jpg
    143.2 KB · Views: 1,060
  • 16.jpg
    16.jpg
    138.8 KB · Views: 1,085
Today, I installed the inexpensive Raptor-style lights from CarTrimHome. I took some installation tips from this video and added a few of my own enhancements. I’m pleased with the outcome.

On a side note, I’ve been thinking about the Ronnie Boy Fabrication LED market lights. I prefer them to the CarTrim lights. But there doesn’t seem to be a way to make contact with “Ronnie Boy.” I’ve tried to contact him through his Instagram account, but to no avail.

YouTube

efd39e1b51dbfcf4206a844600bebad2.jpg


Sent from my iPhone using Tapatalk
 

Members online

Forum statistics

Threads
278,316
Messages
3,554,122
Members
248,016
Latest member
Advally Service

Trending content

Back
Top