What did you do to/in your 5th Gen today?!

Attached my DMOS shovel to my Rod Vault using a Rod Vault clamp. Sits right next to my Maxtraxs mounts. Bring it winter!

Good morning, Snow Yeti. Cool Rod Vault set up. I have been looking for a solution to mount a RV or Yakima Double Haul without losing access to my rear hatch. Couldn't tell from your build list. Can you tell me how you modded the RV and are those the Rhino rack angled ski brackets? Any issues with clearance for the driver and passenger doors? Thanks in advance.
 
It's LED day.

Took 1/2 hour and installed my new Toyota LED fogs. Love the look. I know there are aftermarket ones that may/may not have better output, but I like the idea of a factory part. And at $125 it was a better deal than the Morimotos.

Untitled by Brian Praetorius, on Flickr

That cover on the passenger side is a PITA. Pretty sure I didn't reinstall properly, so we will see if it makes any sort of rattle etc.

LED T10s will be delivered today, so conversion of the exterior and interior lights will begin this afternoon
 
Installed RIPP high performance ignition coils and TRD CAI yesterday. It definitely wake her up
a0a3296c296cc58bbbf08f79668badf1.jpg


Sent from my iPhone using Tapatalk

How much the ripp ignition coils
 
It's LED day.

Took 1/2 hour and installed my new Toyota LED fogs. Love the look. I know there are aftermarket ones that may/may not have better output, but I like the idea of a factory part. And at $125 it was a better deal than the Morimotos.

That cover on the passenger side is a PITA. Pretty sure I didn't reinstall properly, so we will see if it makes any sort of rattle etc.

LED T10s will be delivered today, so conversion of the exterior and interior lights will begin this afternoon

Just don't take your bumper off to replace them. I found some people will make fun of you for doing that. :D. They are a very good fog light in terms of brightness and cutoff and they look much better than the halogens. My only issue is they are too blue/white. I wish they were more yellow. It's kind of backwards that my headlights are yellow and the fogs are white.
 
Just don't take your bumper off to replace them. I found some people will make fun of you for doing that. :D. They are a very good fog light in terms of brightness and cutoff and they look much better than the halogens. My only issue is they are too blue/white. I wish they were more yellow. It's kind of backwards that my headlights are yellow and the fogs are white.

Yeah, I had seen the posts about the whole thing. The passenger side was a pain but not too difficult. 4 screws in and out. Just gotta be willing to lay on your back for a few minutes.

I do have a plan to upgrade the headlights as well. Will likely go with TRS and their HID kit with the Phillips VX2 bulb. It's a pricy upgrade but the benefit is 30% higher lux than the Morimoto XB bulb....
 
Just don't take your bumper off to replace them. I found some people will make fun of you for doing that. :D. They are a very good fog light in terms of brightness and cutoff and they look much better than the halogens. My only issue is they are too blue/white. I wish they were more yellow. It's kind of backwards that my headlights are yellow and the fogs are white.

I know you're already set on OEM fogs, but you can get a warm white fog light (4000K) by using a Diode Dynamics yellow SS3 light and then swapping in a clear optic. These are my auxiliary high beams, but color for the fogs would be the same.

49688596162_642ed3f598_c.jpg


Swapping the optics is very easy:
<iframe width="560" height="315" src="https://www.youtube.com/embed/16Wqr4cxOEI"frameborder="0" allow="accelerometer; autoplay; encrypted-media; gyroscope; picture-in-picture" allowfullscreen></iframe>
 
Anybody else manage to turn a 30-45 min side step job in about 3-3.5hrs? haha

I took off the nfab steps and threw on some tyger steps but I had the tyger steps lined with bedliner. That proved to add a bit of a complex dynamic to things since it decreased the holes the bolts go into -super restrictive so the bolts didn't go where you wanted them to, the amount of bedliner made them difficult to mount to the mounting points, and **** was they heavy. To make things extra fun, the brackets were tweaked about 1/8" on the passenger side. So getting things to line up so you could feed the bolts in and get them 1/3 way in with your finger proved to be really hard. After a test fit on the passenger side, I lightly bolted up the rear bracket and noticed the middle and front holes didn't line up nicely with the holes. I thought maybe I ****ed up which sides they went on, etc., etc..

Big, long, pointless post.

TLDR; side steps aren't supposed to be that hard to install lol my fingers are also raw from handling the side steps which are freshly bedlined.

Edit: I also ran out of blue loctite and had to run to the store which had a long line. Just my luck.

 
Anybody else manage to turn a 30-45 min side step job in about 3-3.5hrs? haha

I took off the nfab steps and threw on some tyger steps but I had the tyger steps lined with bedliner. That proved to add a bit of a complex dynamic to things since it decreased the holes the bolts go into -super restrictive so the bolts didn't go where you wanted them to, the amount of bedliner made them difficult to mount to the mounting points, and **** was they heavy. To make things extra fun, the brackets were tweaked about 1/8" on the passenger side. So getting things to line up so you could feed the bolts in and get them 1/3 way in with your finger proved to be really hard. After a test fit on the passenger side, I lightly bolted up the rear bracket and noticed the middle and front holes didn't line up nicely with the holes. I thought maybe I ****ed up which sides they went on, etc., etc..

Big, long, pointless post.

TLDR; side steps aren't supposed to be that hard to install lol my fingers are also raw from handling the side steps which are freshly bedlined.

Edit: I also ran out of blue loctite and had to run to the store which had a long line. Just my luck.

Yup.
 
I finally went off roading in my 4Runner for the first time today!

Well, it was just a little U turn thing in the dirt for big rigs to turn around at the end of the dead end, but still!

There aren't many opportunities to off road in Central NJ.
 
Yeah, I had seen the posts about the whole thing. The passenger side was a pain but not too difficult. 4 screws in and out. Just gotta be willing to lay on your back for a few minutes.

I do have a plan to upgrade the headlights as well. Will likely go with TRS and their HID kit with the Phillips VX2 bulb. It's a pricy upgrade but the benefit is 30% higher lux than the Morimoto XB bulb....

I just upgraded to the Pro Led fogs too on Sunday, way brighter than the reg.
 
I know you're already set on OEM fogs, but you can get a warm white fog light (4000K) by using a Diode Dynamics yellow SS3 light and then swapping in a clear optic. These are my auxiliary high beams, but color for the fogs would be the same.

whatd you think of the headlight replacements on the market right now? morimoto, alpharexx, kustom54, etc. s

lightly off topic from fog lights but you seem to be much more knowledgeable on the topic of lights than i am, wanted to pick your brain
 
Put the wrenches and the keyboard down for awhile after my suspension debacle. Ripping the suspension out 3 times in a row, barking at the wrong person on here about it, I figured I needed to check myself.

Back into it meow.

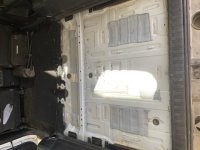
Ripped my second row out in preparation for my soccer practice mobile to cargo van conversion. Gonna rip off the goose gear low profile design. Would love to just buy their system but the are f**k’in high if they think I’m dropping a g on some fitted wood. I have zero carpentry experience but I figure this would be an “easy” start.

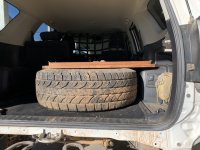
Just debating if I want to pursue the spare tire enclosure in the cargo area idea (sleeping platform on top). Suppose I could always redo it. Not a huge fan of having a tire swing out. Might take a que from the Jeep crowd. Thoughts?
 

Attachments

  • 2A7DA479-4E93-4DDA-B5D2-B8141165DA69.jpeg
    2A7DA479-4E93-4DDA-B5D2-B8141165DA69.jpeg
    88.2 KB · Views: 610
  • 1CFFD7D9-269D-4578-A0CF-4493A1767471.jpeg
    1CFFD7D9-269D-4578-A0CF-4493A1767471.jpeg
    106.5 KB · Views: 604
Last edited:
whatd you think of the headlight replacements on the market right now? morimoto, alpharexx, kustom54, etc. s

lightly off topic from fog lights but you seem to be much more knowledgeable on the topic of lights than i am, wanted to pick your brain

No experience with them, sorry. I do know that they use dedicated LED projector retrofits, which are infinitely better than the drop-in LED headlights that try to mimic halogen bulbs.
 
whatd you think of the headlight replacements on the market right now? morimoto, alpharexx, kustom54, etc. s

lightly off topic from fog lights but you seem to be much more knowledgeable on the topic of lights than i am, wanted to pick your brain

If you're up to the task of a true DIY retro, there are a few old threads on it. I've gotten lazy, but have two sets of headlights open and I've started the conversion to true OEM bi-xenon headlights using Lexus IS projectors. If you hop over to the HID planet forum, there is a lot of good info (not much on 4Rs though). The IS projectors are also side-load, but you have to find the correct year(s) donor to have bi-xenon capability as some models/years were HID lows with halogen hi's.
With the Alpharexx hl's, the retrofit is less cost effective than Morimoto XBs or something from K54/Lightwerkz (I'm closer to the East coast). For reference, Lightwerkz quoted me around $1k to do the IS retro plus the price of a new set of OEM 4R donor headlights. I think I'm in it for about half that including the donor set of headlights. Opening these headlights is a huge pain, the combination of shape and generous use of permaseal is a special kind of terrible.
 
Just debating if I want to pursue the spare tire enclosure in the cargo area idea (sleeping platform on top). Suppose I could always redo it. Not a huge fan of having a tire swing out. Might take a que from the Jeep crowd. Thoughts?

I just installed a Rig'd Supply tire swing. I ran a couple of Jeeps for a while so it does kinda bring me back to those days. I think for the functionality if you ever need your spare, its quick and easy to get to for sure. Also gives you more options to mount stuff to carry. Now....downside, I guess...If you need in the back you'll hesitate to make sure you need in the back for anything and if you forget something in the back after closing the tire swing, you consider heavily if you really need to go back. Overall its something to get used to.
 
Put the wrenches and the keyboard down for awhile after my suspension debacle. Ripping the suspension out 3 times in a row, barking at the wrong person on here about it, I figured I needed to check myself.

Back into it meow.

Ripped my second row out in preparation for my soccer practice mobile to cargo van conversion. Gonna rip off the goose gear low profile design. Would love to just buy their system but the are f**k’in high if they think I’m dropping a g on some fitted wood. I have zero carpentry experience but I figure this would be an “easy” start.

Just debating if I want to pursue the spare tire enclosure in the cargo area idea (sleeping platform on top). Suppose I could always redo it. Not a huge fan of having a tire swing out. Might take a que from the Jeep crowd. Thoughts?

I’m planning on picking up a Detours Knucklebone. Much cheaper and still does the job.
 

Members online

No members online now.

Forum statistics

Threads
278,317
Messages
3,554,128
Members
248,016
Latest member
Advally Service

Trending content

Back
Top