What did you do to/in your 5th Gen today?!

Finally finished my headlight retrofit utilizing Morimoto's MLED projectors for Lows/Highs and Profile Hi-Lens projectors in high beam area. Also threw in some Xenon Depot Xtreme VF led bulbs for parking/turn signal bulbs. The housings are OEM too, I decided to cut them open instead of trying to deal with the permaseal.

GaJOzPu.jpg


1eT6uhg.jpg


ml9eJPz.jpg


P3eDL7m.jpg
 
Assuming you are in Oxnard, CA, interested to see how easy this is to take out for your visual smog inspection...

Remarkably easy to say the least, two bolts at the mount are removed, and the hose from the catch can is moved to the Supercharger port. Can be done in less than 5 minutes.
 
Used 2inch Velcro to the handles, made an adapter to a metal wall shelf rail I found at Lowe’s. Throw in some bungies. Installs in a minute. May need a little tension to the roof but it’s pretty tight as is. I’ll add something to buffer the rail to the roof liner.

Wow, clever setup! Looks solid.
 
Finally finished my headlight retrofit utilizing Morimoto's MLED projectors for Lows/Highs and Profile Hi-Lens projectors in high beam area. Also threw in some Xenon Depot Xtreme VF led bulbs for parking/turn signal bulbs. The housings are OEM too, I decided to cut them open instead of trying to deal with the permaseal.

Looks great!
 
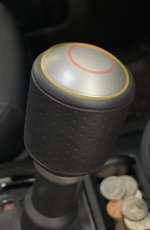
FJ Cruiser Shift Knob Swap

I just switched out my TRD shift knob on my 2020 TRD Pro....I wasn't a fan with how the OEM handle felt; awkwardly non-ergonomic for me. I got an OEM FJ Cruiser shift knob and added an 8 x 1.25 8mm set screw to extend it over the gear shaft(?).

For anyone else who's done this, do you know of anyone who has made an overlay for the top of the FJ shift knob? It's not curved like a sphere like the differential shift knob; it has a conical shape to it (I did the best I could to highlight the radii at the top). I'm thinking of just having a buddy do up a decal for it, I'm just not sure how it will fit over the conical shape.
 

Attachments

  • FJ Cruiser Shift Knob.jpg
    FJ Cruiser Shift Knob.jpg
    144.8 KB · Views: 613
Finally finished my headlight retrofit utilizing Morimoto's MLED projectors for Lows/Highs and Profile Hi-Lens projectors in high beam area. Also threw in some Xenon Depot Xtreme VF led bulbs for parking/turn signal bulbs. The housings are OEM too, I decided to cut them open instead of trying to deal with the permaseal.

GaJOzPu.jpg


1eT6uhg.jpg


ml9eJPz.jpg


P3eDL7m.jpg
Nicely done! Did you use a dremel with cutting discs to open the headlights? And how did you go about sealing them?
 
I recently went on vacation and ended up needing my hiking sticks, and didn't have them for lack of proper storage for them with the vacation packing.

So......I designed a stick mount that attaches to the cargo area holder without modifying the covers shell.

3TOM5JE.jpg


I 3d printed it with flexible TPU A95 filament and used 3m automotive tape on the top and back. It won't damage the shell or pull out cover.

CvqCNQa.jpg


dhLA4PB.jpg


23jPaka.jpg


I also added slots to run velcro wire wraps in case of vibration. Works much better than I thought it would.
 
Remarkably easy to say the least, two bolts at the mount are removed, and the hose from the catch can is moved to the Supercharger port. Can be done in less than 5 minutes.

That is awesome... another perk of having a supercharger. Sadly I don't have one... a catch can or a supercharger.
 
I recently went on vacation and ended up needing my hiking sticks, and didn't have them for lack of proper storage for them with the vacation packing.

So......I designed a stick mount that attaches to the cargo area holder without modifying the covers shell.

3TOM5JE.jpg


I 3d printed it with flexible TPU A95 filament and used 3m automotive tape on the top and back. It won't damage the shell or pull out cover.

CvqCNQa.jpg


dhLA4PB.jpg


23jPaka.jpg


I also added slots to run velcro wire wraps in case of vibration. Works much better than I thought it would.

Love it - how much for a pair?
 
Love it - how much for a pair?

I'm not sure yet. Give me some time to make sure the current design works well enough or if I need to make some modifications.

Currently it takes about 12 hours to print one pair, if I can get the first layer to adhere, which has been a challenge with the TPU material.

If I get a good final design, what do you think would be a fair price?
 
Just ordered the Accesorides remote start unit..can't wait to be able to cool off my 4R before getting in..not enjoyable when it's 100 degrees out.
 
Finally got all of the lights wired up. Took it out on a trail run Tuesday!
 

Attachments

  • 9FD289BA-01C9-46A6-89FB-510121B151121.jpg
    9FD289BA-01C9-46A6-89FB-510121B151121.jpg
    136.6 KB · Views: 872
Finally got around to installing my Mishimoto catch can. Had to modify some brackets for it to play well with the SC mount.

Please educate me on this if wrong....I thought a catch can was mostly beneficial for direct injected engines as it prevents carbon buildup on the valves.
What is reason for Cc on the 4r engine (i don't recall it being direct injection)
Thanks
 
Please educate me on this if wrong....I thought a catch can was mostly beneficial for direct injected engines as it prevents carbon buildup on the valves.
What is reason for Cc on the 4r engine (i don't recall it being direct injection)
Thanks


He’s supercharged, so it keeps that oil mist out of the blower.


Sent from my iPhone using Tapatalk
 
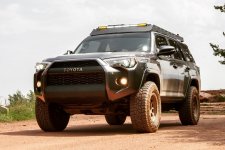
Took the keys back from my wife! (She informed me that, with her "new" knee brace, she can drive her RAV4 again!, so I get my Runner back!).
 

Members online

Forum statistics

Threads
278,316
Messages
3,554,124
Members
248,016
Latest member
Advally Service

Trending content

Back
Top