What Did You Do To Your 3rd Gen Today?

Status
Not open for further replies.
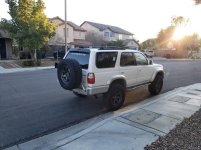
Actually Yesterday - Roscoe got his rusty frame repaired. You all know that place......on the passenger side rear where the control rod bolts to........
I needed to do it 2 1/2 years ago. Got the SAF-T-CAP and had my Mechanic Friend Craig weld it on. Much safer now.....and now I can wheel it some!
 
Finally got a spare tire!

4x Innovations bumper and spare!
 

Attachments

  • 20200131_163031 - Copy.jpg
    20200131_163031 - Copy.jpg
    81.2 KB · Views: 429
Replaced a leaky brake power booster with used one. Brakes good again. When replacing the brake booster taking out the charcoal canister and loosening the brakeline brackets from the fire wall helps.
 
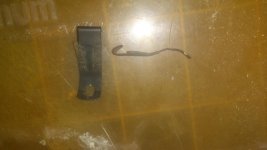
Weird sunroof parts...

Poked around in the sunroof area taking advantage of a nice day and found these little suckers floating around in the drain tray. There was one on each side in the front of the tray. I couldn't see where they would attach to or witness marks anywhere. Not sure if they are supposed to be bent like that or if they came dislodged and curled up in the process of things moving....they're both basically the same shape and have tiny bit of padding or tape coming off in a mirror image of each other. The tight bend looks factory but am questioning the arcing / jagged one on both. Anybody have any ideas where these go and what they do?
 

Attachments

  • 20200131_180815.jpg
    20200131_180815.jpg
    128.9 KB · Views: 426
Last edited:
Poked around in the sunroof area taking advantage of a nice day and found these little suckers floating around in the drain tray. There was one on each side in the front of the tray. I couldn't see where they would attach to or witness marks anywhere. Not sure if they are supposed to be bent like that or if they came dislodged and curled up in the process of things moving....they're both basically the same shape and have tiny bit of padding or tape coming off in a mirror image of each other. The tight bend looks factory but am questioning the arcing / jagged one on both. Anybody have any ideas where these go and what they do?


[MENTION=112124]ToyotaBrah[/MENTION] got it right... do you have a sunroof visor?..


If not can I buy those brackets off you?..


.
 
Thanks for the replies...it totally makes sense now, lol. Apparently my Runner previously had a sunroof visor, maybe it was popular in Texas where she rolled out for the first time? I originally thought this while washing the top and noticed a slight difference in the paint around the front of the sunroof but never linked these little brackets with that...wonder why it's gone? Sure infamousRNR, you can have them, whatever you think they're worth is good with me...
 
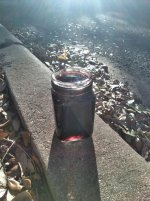
Why does steering pump fluid get So black?

I've had the steering pump flushed twice in 100K due to it whining for about 15 secs in our super duper austin winters, haha.

Has been quite but I decided to do a cheap 'suck & fill' with a turkey baster.

Here is a pic of how dark the fluid was, sun can't even shine thru it!
 

Attachments

  • Steering pump fluid Jan 20.jpg
    Steering pump fluid Jan 20.jpg
    125.4 KB · Views: 617
Thanks for the replies...it totally makes sense now, lol. Apparently my Runner previously had a sunroof visor, maybe it was popular in Texas where she rolled out for the first time? I originally thought this while washing the top and noticed a slight difference in the paint around the front of the sunroof but never linked these little brackets with that...wonder why it's gone? Sure infamousRNR, you can have them, whatever you think they're worth is good with me...

wow, looking through your photo dump, you done a lot of work and have the tools to do it, that engine bay so clean and open. im going to have to dig up your build thread
 
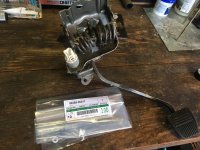
Went after my creaky clutch pedal

Spring bushings were toast, pedal tang and spring were very worn, will need to replace in the future. Also flushed brake, clutch master/slave and PS fluids.
 

Attachments

  • IMG_1965.jpg
    IMG_1965.jpg
    134.3 KB · Views: 594
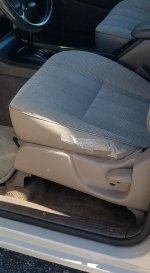
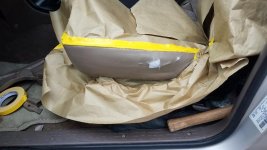
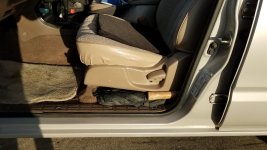
I did this poor mans seat repair last Wed, the material was from Walmart and I used 3m super 90 adhesive in 3 light coats, i had run out of time and I could have done the darts even and symmetrical, the glue bonded very well and I think the vinyl piping will help prevent it from peeling
 

Attachments

  • seat1.jpg
    seat1.jpg
    131.9 KB · Views: 561
  • seat2.jpg
    seat2.jpg
    87.6 KB · Views: 548
  • seat3.jpg
    seat3.jpg
    110.9 KB · Views: 559
Finished our 2,000 mile journey around CA through Lassen and Death Valley National Parks. Got to play in mud and snow, saving the best (or worst) for last - the Lippincott Pass in Death Valley.

Probably should have taken this sign as a fairly ominous warning:

4q_IBtsBCn0TzK6gPfNPegiQXhLOl-pSoR6QGPO_9S7gyJUxiutroyp0Bac7PTbzD3u3bSAgsjDofRG6-nm0eQZq43J0fM_fuSj-


But we didn't see it (it's on the way up, not on the way down), and didn't read this article until after the fact (4-Wheeling the Lippincott Mine Road in Death Valley - DesertUSA), and thus found ourselves pushing the mostly stock 4Runner down some pretty gnarly terrain:

BIpbFt8.jpg


The 4Runner did great, I guess the driver did too, since we made it down without falling off the cliff, scraping the sides, or putting a dent in the armor-less bottom:

fy6VDOB.jpg


I have to say that this 4Runner was just a blast on the trip, never once complaining or giving us any issues on the journey. Now I need to reciprocate and give her a bath:

6ynp9iU.jpg
 
Last edited:
Not all today, but over the course of the last month...
Sanded and Plastidipped the Rear Floor, Bumper supports and inside of bumper, all frame rails, rear differential.
Brake Fluid (the cheat way, didn't bleed the lines, just turkey baster-ed it out of the reservoir)
Transfer Case Fluid
Front Diff Fluid
New LEDs in the front marker lights and reverse lights (see pic, the difference is night and day....pun intended)
dateposted-public
 
pulled the steering rack to have it rebuilt only to discover the rack itself is bent. SOOOOOOOOO had to fork over some bucks and get a new OEM rack and pinion. I pick it up tomorrow:Cry:
 
Just started up my old rig that has been sitting for about five to six months. Squirted some Marvel Mystery Oil into each cylinder, installed a new battery, and she fired right up.
 
Spring bushings were toast, pedal tang and spring were very worn, will need to replace in the future. Also flushed brake, clutch master/slave and PS fluids.

I'm guessing you haven't stumbled across any threads about the coil spring bushings? We all have dealt with it. Simple solution is to just pop the coil spring out and replace it with a linear (normal) spring from a older manual Toyota. The hook up spots for the linear spring are there in your 4runner still. Others have used hardware store springs (search).

Only downside is a slightly heavier clutch feel but in a week you'll forget about it. Mine's been done for years now.
 
Installed my new OEM steering rack this morning, heading to get alignment done this afternoon. already feels buttery smooth! no noise anywhere!

CAtnMeHl.jpg
 
was finally able to check the cylinder pressures today and i'm not sure how I feel, it could be worse, but still...

1: 180 2: 198
3: 195 4: 195
5: 198 6: 195

Cyl 1 is the problem child, I tested it twice and got the same 180 each time.

What does this mean? :help:

I don't know if anyone ever answered you, but those compression numbers are good. All cylinders are with +/- 10 percent of the average compression reading. The fact that you have most of them within 5 psi is really quite good.
 
I'd started to get an occasional wiggle/oscillation at highway speeds, first noticed it late last summer. Often initiated by hitting a road heave, but once started, the whole truck would do a slow self-sustaining wiggle back and forth, about every second or so. I made sure I wasn't doing it by holding the steering wheel completely still with my leg - just to rule that out. On the plus side, it wasn't really something that would make you lose control, but not good either. I looked over *all* the suspension bushings very carefully. And really didn't see anything. Front suspension is good and tight, lower control arm bushings are all pretty new (one 1.5 years, one this spring) - using OEM. Upper control arms don't wiggle *at all* when turning from lock to lock. On the rear suspension, I pried at all the arms with a long screwdriver - it felt all tight. the only thing I could see was a *tiny* amount of wiggle on the axle end of the Panhard rod, like 1/3rd of an inch or so. No clunking, but able to move side to side a little.

I tried upping the tire pressure some - E rated BFG KO2's in 285/75/16 (33"). That helped a *little*, but once it got started on a wiggle it would still persist until shaken out of it (doing a slow swerve in the lane would do it).

So I got some new bushings for everything in the rear. It's a Sonoran Steel lift kit installed about 5 years ago, with an adjustable Panhard rod. I thought I'd do it in stages on the rear just to satisfy my curiosity about what was wrong. First up - the Panhard rod. The weird thing was that the end that wiggled (drivers side, on the axle) didn't look bad at all. Still seemed pretty firm. Not shelled out or anything. Anyhow, took out the old bushings, wire wheeled the heck out of it, repainted it (rust belt resident here, sigh) and put new bushings in. And test drove it at highway speeds. And? No wiggle. I tried initiating a wiggle, drove over some highway bumps, nothing. Some sharpish twitches at the steering wheel - it would wiggle once or twice in response but straighten right out.

So... apparently even a *TINY* amount of wiggle in a Panhard rod bushing can make the whole truck wiggle at speed.

I also stuck on the cat-back stainless steel Gibson exhaust kit I got in a group buy a few months back. That was a bit of a hassle - the pipes all seemed to have very loose slip fits - and the supplied clamps bottomed out on the threads before the joints tightened up in 2 of the 3 slip joints. And on the one that did at least start to tighten before bottoming out - it ended up stripping the threads before getting tight enough to stop the pipes from sliding apart again. So a bit frustrating. But the SS looks pretty nice, I hope it won't rust.

I also replaced the bushings on one of the rear control arms while the muffler was out. I have silicone bushings for all arms (and two new HD lower control arms) but the daylight was running short, so I just did that passenger upper control arm - made more accessible with the muffler removed. The old bushings looked pretty good still. I tried removing them 'politely' for a little bit - they weren't going to budge. So I resorted to the torch and burned them out. Then cleaned up all the rust (including the hard to remove scaled rust on the inside of the shell), paineted, installed new bushings with grease, reinstalled.

I'll get to the other three arms as soon as the weather is nice again.

 
I don't know if anyone ever answered you, but those compression numbers are good. All cylinders are with +/- 10 percent of the average compression reading. The fact that you have most of them within 5 psi is really quite good.

ya there were some discussion in the "supercharger" thread. I feel confident and will be installing the supercharger probably next weekend after my new bypass valve and extra vacuum line arrives. thanks!
 
Status
Not open for further replies.

Members online

No members online now.

Forum statistics

Threads
278,316
Messages
3,554,120
Members
248,016
Latest member
Advally Service

Trending content

Back
Top