What Did You Do To Your 3rd Gen Today?

Status
Not open for further replies.
nah! did u not use fiberglass?


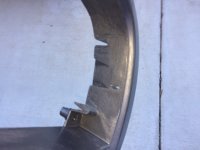
I opted out of using fiberglass...I had one instance of over-aggressive trimming
(that's the little hole)... That large indent and the V notch were on both sides. I used pieces off of the donor grill and epoxied them in to patch the holes, then used bondo to make the surface flat
 

Attachments

  • IMG_7240.JPG
    IMG_7240.JPG
    79.4 KB · Views: 342
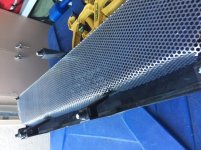
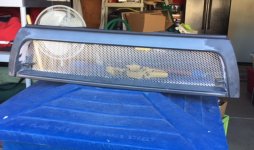
I worked on fitting the grill material today...I think it is looking good enough to consider finishing it up. I have been looking for a particular thread that had a pretty cool way to attach the mesh, but so far I have been unable to find it again. am debating on drilling through the frame with some (as flat as I can find) black bolt heads and nut and bolting it.

and of course, am getting down to figuring out which emblem to use...could be the toughest part of the mod...ha ha ha !!!
 

Attachments

  • image2.jpg
    image2.jpg
    57.4 KB · Views: 347
  • image1.JPG
    image1.JPG
    103.8 KB · Views: 334
All the next steps are now accounted for with today's delivery:
Winch, TJM Recovery kit, Flatlink E, rear diff breather extension. Need a gap in work and weather to align so I can jump on this.

 
I worked on fitting the grill material today...I think it is looking good enough to consider finishing it up. I have been looking for a particular thread that had a pretty cool way to attach the mesh, but so far I have been unable to find it again. am debating on drilling through the frame with some (as flat as I can find) black bolt heads and nut and bolting it.

and of course, am getting down to figuring out which emblem to use...could be the toughest part of the mod...ha ha ha !!!

i went to SEARS and they have thread nylon spacers. Then you can JB Weld them in. Use screw with washer to tighten it down. Its what i did.

No emblem for me though. I actually removed the 4runner emblem from the back to. Basically no where does it say toyota or 4runner lol
 
i went to SEARS and they have thread nylon spacers. Then you can JB Weld them in. Use screw with washer to tighten it down. Its what i did.

No emblem for me though. I actually removed the 4runner emblem from the back to. Basically no where does it say toyota or 4runner lol

Thank you for these pics!!

I found the thread I couldn't locate earlier, and the guy epoxied all thread where you used the nylon...same idea, but different approach. I like your idea because the attachment of the nylon looks like it has less of an opportunity to shift when drying
 
i went to SEARS and they have thread nylon spacers. Then you can JB Weld them in. Use screw with washer to tighten it down. Its what i did.

No emblem for me though. I actually removed the 4runner emblem from the back to. Basically no where does it say toyota or 4runner lol

I was wondering how much cleaner the back would look without the 5 or so emblems I have on mine. I have an aversion to chrome, so I plastic dipped all of them...thought about removing them, but didn't

am headed out to look for some of those nylon fasteners !!
 
Thank you for these pics!!

I found the thread I couldn't locate earlier, and the guy epoxied all thread where you used the nylon...same idea, but different approach. I like your idea because the attachment of the nylon looks like it has less of an opportunity to shift when drying

make sure if you do get threaded nylon. To run the screw through the threads before hand!!!!! also, you can let them drop to the very bottom or do what i did. Take foam so it acts as a spacer, because well.... gravity will try to bring the nylon down along with the epoxy. So two coats of JB is good habit for this. Also set your mesh , then mark each area with a marker where the nylon will go, so the screw goes through the hole.
 
I was wondering how much cleaner the back would look without the 5 or so emblems I have on mine. I have an aversion to chrome, so I plastic dipped all of them...thought about removing them, but didn't

am headed out to look for some of those nylon fasteners !!

you can get a regular one none threaded, then thread it your self
 
I was wondering how much cleaner the back would look without the 5 or so emblems I have on mine. I have an aversion to chrome, so I plastic dipped all of them...thought about removing them, but didn't

am headed out to look for some of those nylon fasteners !!

Today I monstaliner more stuff, back plastic trim. My grill and rock sliders.


small photos, but you can see the back trim no longer has the emblem
 
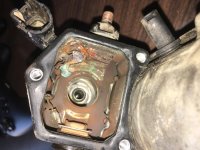
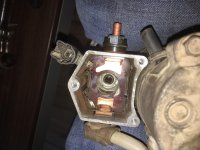
Did a little starter work.

I'm surprised my 4runner still started. That's some nasty ick
 

Attachments

  • IMG_2580.jpg
    IMG_2580.jpg
    131.4 KB · Views: 329
  • IMG_2582.jpg
    IMG_2582.jpg
    132.4 KB · Views: 313
make sure if you do get threaded nylon. To run the screw through the threads before hand!!!!! also, you can let them drop to the very bottom or do what i did. Take foam so it acts as a spacer, because well.... gravity will try to bring the nylon down along with the epoxy. So two coats of JB is good habit for this. Also set your mesh , then mark each area with a marker where the nylon will go, so the screw goes through the hole.

I found some at Ace...Home Depot and Lowes had non-threaded, so I looked a bit more.

I saw the foam you used as spacers, and saw how well that would work with the gravity problem....I am out of time this week, so will pick at it again when I get off work on Sunday...Ill let you know how it goes
 
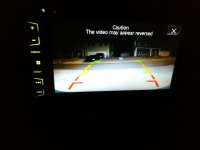
How about some pics of backup cam on the screen?
I'm gonna go out on a limb and say this was meant for me.
Taken tonight with my aux reverse lights. I could do without the guidelines since they're too high for my camera but other than that not bad.
 

Attachments

  • IMG_20170216_203910.jpg
    IMG_20170216_203910.jpg
    118.4 KB · Views: 395
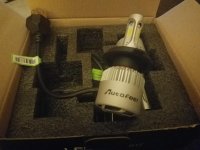
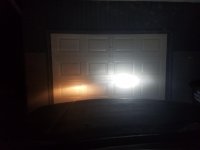
Cheap eBay led headlight comparison. Will post a further back picture later to demonstrate the throw of the led. These are a newer design that should throw a lot further than previous cheap led headlights.
 

Attachments

  • 20170216_211634.jpg
    20170216_211634.jpg
    126 KB · Views: 374
  • 20170216_212939.jpg
    20170216_212939.jpg
    124.9 KB · Views: 381
Cheap eBay led headlight comparison. Will post a further back picture later to demonstrate the throw of the led. These are a newer design that should throw a lot further than previous cheap led headlights.

Ugh that (lack of) cutoff!

At least you know they're cheap!
 
Status
Not open for further replies.

Members online

Forum statistics

Threads
278,316
Messages
3,554,120
Members
248,016
Latest member
Advally Service

Trending content

Back
Top