What Did You Do To Your 3rd Gen Today?

Status
Not open for further replies.
Tundra Brake Upgrade in progress.

e4aseraq.jpg
 
I ordered a new OEM rack and pinion, drums, shoes, and a set of TYC 2002 headlights. Will have a new set of OEM inner tie rod ends for sale shortly since I decided to replace the whole rack since this 213k beast will soon be my daily driver.
 
Installed new Denso Air Fuel sensor I picked up off of Amazon. Installing was surprising easy considering the amount if rust on the cat flanges. I spent more time fiddling with the plug than I did with the bolts. I did pretreat them over the last few months with PB blaster and a few other pentrating oils. I replaced the original nuts, which were pretty crusty, with new stainless hardware.


Then I drove a bit to see if the check engine light would come back on. Using my Bluetooth obd2 adapter and Torque on my Droid, I was not able to trigger the O2 sensor monitor. It looks like I need to drive at various cruising speeds of 20-40 MPH, I will do plenty of that running around this week as I am preparing to take the front end off my motorcycle and put it in the back of my Runner for a 1500 mile journey back to Texas. I have a great job at the company I worked for when. I left Texas, so I am really excited.

I also installed new stock length rear sway links. I was running 2nd Gen rear links with LC 7 wraps, but I took those off, so now the sway link hits under load. Now I have a backup set for the front. I am running 2 Gen rear links in the Front, my sway bar is nearly flat and I have almost zero body roll because of it. My motorcye weighs about 650 lbs plus all my gear, clothes for a month, my dog Lola,'and who knows what else I will stick back there.

I am going to be adding an Air Lift helper bag kit to the rear this week to help out with all that weight. I'll add pictures later on this week when I'm not on my tablet.
 
Fixed stripped threads in 2 skid plate bolt holes. Now all 9 bolts nice and snug.

washed, including engine and undercarriage

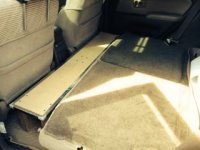
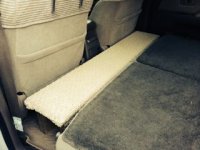
pillow rest, for camping
IMG_58872.jpgIMG_5891.jpg

twin cones, kenosha pass, only mod is no sway bars.
IMG_58992.jpg
 

Attachments

  • IMG_5891.jpg
    IMG_5891.jpg
    17.6 KB · Views: 663
  • IMG_58872.jpg
    IMG_58872.jpg
    17.5 KB · Views: 662
  • IMG_58992.jpg
    IMG_58992.jpg
    19.3 KB · Views: 673
Last edited:
So now that the deal is a little more solidified (bought a plane ticket) I figured I could post my next venture.

I have been looking for a rust free low milage 3rd gen for a while now that I can swap all of my stuff over too and this beauty came up on my cars.com email alert.

It is (as far as I can tell from the listed options) a SR5 with the "Extra Value Package #5" (locking rear diff) , "Leather Trim Package", "Color-coordinated fender flares", 5 Speed Manual transmission, and to top it all off a second Gen TRD supercharger! The truck has about 81k on the clock and has no rust. :hurt:

Here she be!

photo+2%25289%2529.JPG

photo+2%25285%2529.JPG

photo+1%25289%2529.JPG

photo+3%25285%2529.JPG

photo+3%25287%2529.JPG

photo+3%25288%2529.JPG

photo+4%25285%2529.JPG

photo+5%25282%2529.JPG

That is a killer find!
 
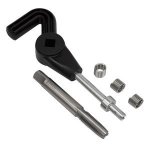
Thread repair insert. Heli-Coil.

How did you go about repairing the threads? Did you follow a write up?

last year I followed a suggestion to re-tap the threads for nominally larger metric m8- 1.25 x 25mm bolts. Toyota 4Runner Skid Plate Bolts. This has worked well. I kind of screwed up (ha ha, get it, threads, bolts, screwed up?) two of the holes because I wasn't patient. I should have cut the new threads slower and backed the tap out much more frequently than I did, especially when i encountered resistance. I don't have cutting oil any and didn't want to buy it. I used gear oil (75/90), motor oil, or WD40.
Recently I chased (ran the tap through) all 9 of the holes. This did clean up all but the 2 holes I had initially screwed up so I went ahead and repaired these.
I bought an M8 - 1.25 thread repair kit from an auto parts store.
3.jpg

Follow directions. Drill out existing threads with the proper size drill bit, in this case 8.3 mm. Yes, they exist but I didn't want to pay for or hunt down one. Closest standard size is 21/64ths = 8.33 mm. I used 5/16ths (20/64ths, 1/64 less) = 7.93 mm.
Slowly run the tap through, cutting/backing off/cutting/backing off. Clean out hole - compressed air, q-tip - chase threads, clean hole, chase threads, clean hole. Screw in the thread insert, break off tang, good to go. I was patient and slow this time. Very slow.

They are thread repair inserts, often referred to by the brand name Heli-Coil just as cotton swabs are referred to as Q-tips.
 

Attachments

  • 3.jpg
    3.jpg
    12.5 KB · Views: 765
Last edited:
Status
Not open for further replies.

Members online

Forum statistics

Threads
278,316
Messages
3,554,120
Members
248,016
Latest member
Advally Service

Trending content

Back
Top