What Did You Do To Your 3rd Gen Today?

Status
Not open for further replies.
It's getting all of that Arizona washed off of it lol. Stopped in Tucumcari NM on our way back from flagstaff.

104c659c97f40ce1578e1498b07c5d7b.jpg~original


Were you at that sloppy mud pit Expo? We were there Saturday, didn't see too many 3rd gens there.

There were some 3rd Gens there... We were camped about 2 min from the event in the NF trying to use the tree's as a wind/rain/snow block! We almost camped in the field, thank goodness we didn't! That turned out to be a mess! Even with the weather though, the event was still an awesome time!


We talked to you at the 4xinovations booth on Saturday. I was asking you guys about the swing out hinge flipped for the drivers side. Nice Runner, and nice talking to you all! Next year we should get a meet up planned out there or something.
 
Yesterday I mapped out half of the electrical connections for the new passive keyless entry and remote start security system I'm installing.

I had the problem with the steering column lock camshaft breaking, so rather than spend $250+ to buy the whole assembly, I cut it off and will just stop using keys all together. :madgrin:


I think that 1/2" difference is pretty typical after a lift.

It is? huh... Do you know why?

Of course after I realized it, when I drove the truck after that, I swear I could tell it was lopsided. :rolleyes:
 
Last edited:
It is? huh... Do you know why?

:

No. I'm not an expert on lifts, but I see this issue mentioned a lot. I think some of the kits even use a different spring for the driver's side and passenger side to correct it, but I may be wrong. If you dig into some of the FAQ threads on lifts I'm sure the info is there.
 
New radiator and cap, B&M 70268 inline with radiator, Airlift 1000 kit, and plugs and wires installed. Tranny drained and filled and new anti-coolant. Finishes off my maintenance check list and hopefully will run cooler and more level when towing.

Oh, also did a brake controller, 7 pin connector install, and retro fitted the headlights with the TRS Mini Stage III D2S X projectors awhile back. All in all loving it.
 
Last edited:
"O" gasket mod, MAF and Throttle cleaning, misc fluids

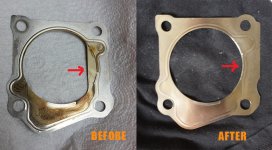
Finally got around to doing the O gasket mod and some much needed cleaning. As some suggested on here, instead of installing the TRD throttle body gasket, which is a thick paper, I just cut the original "D" gasket (which is metal) to a full "O" using a combination of a weak, beginner rotary tool and some scissors. Some grime actually created a "template" for me to follow which made it easy to cut and get a nearly perfect circle:thumb: lol.

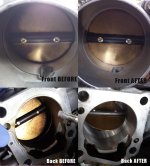
Figured while the throttle body was off I should clean it, as I had yet to do it since buying the 4r few years ago. I'd say it was time! The backside (end facing the engine) was much dirtier than the front (air filter side), although I spent a while really trying to get as much grime as I could. I followed JA's walkthrough and it was really easy.

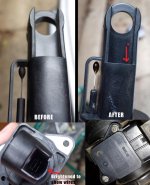
And since I just put a new air filter in last week, I cleaned the Mass Airflow Sensor as well. Using CRC MAF cleaner, I again followed JA's maf cleaning writeup. I tried to brighten/enhance the bottom left picture so you can see the two wires down inside the sensor that need to be sprayed with cleaner along with the amber-beaded wire that is more visible. There were quite a few mentions in the forums about people stripping the small screws that attach the MAF to the air intake, so I was prepared to get surgical, but luckily my screws came right out, with one of them even already being replaced with a flat-head screw.

Topped off the radiator, wiper fluid and removed a few wayward leaves, closed the hood and called it a day. Engine fired right up and sounds good! Here's hoping my hp and mpg go waaaay up!

 

Attachments

  • O Gasket before&after.jpg
    O Gasket before&after.jpg
    81 KB · Views: 1,016
  • Throttle Body cleaning before&after.jpg
    Throttle Body cleaning before&after.jpg
    105.1 KB · Views: 1,255
  • MAF before&after.jpg
    MAF before&after.jpg
    74.2 KB · Views: 1,027
Last edited:
What did you do to your 3rd gen today?

Haven't posted in this thread for a while. The mesh matches the mesh on my grille.
a94e426baf7b5b45d927c46521617a57.jpg
 
Last edited:
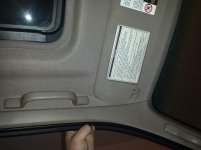
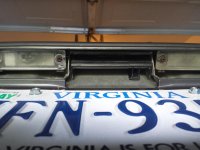
I added the second oh shit handle and changed the lens out for my license plate
 

Attachments

  • 20150520_192223.jpg
    20150520_192223.jpg
    137.5 KB · Views: 726
  • 20150520_183009.jpg
    20150520_183009.jpg
    126.5 KB · Views: 700
drove it 200+ mile, used it to haul another liftgate, rear seats, door mirrors and steering wheel, all of which are going on my truck and are already in thundercloud, so no painting.
 
Wasn't today, but over the last week I installed my MRT spot lights on CBI ditch light brackets, replaced the rear shoes, and did the 231mm TBU. The brakes are great now. It stops quickly and without shaking now. The parking brake also holds now as well. The lights are pretty impressive as well.


VS, just the low beams.


Finally got around to doing the O gasket mod and some much needed cleaning. As some suggested on here, instead of installing the TRD throttle body gasket, which is a thick paper, I just cut the original "D" gasket (which is metal) to a full "O" using a combination of a weak, beginner rotary tool and some scissors. Some grime actually created a "template" for me to follow which made it easy to cut and get a nearly perfect circle:thumb: lol.

Figured while the throttle body was off I should clean it, as I had yet to do it since buying the 4r few years ago. I'd say it was time! The backside (end facing the engine) was much dirtier than the front (air filter side), although I spent a while really trying to get as much grime as I could. I followed JA's walkthrough and it was really easy.

And since I just put a new air filter in last week, I cleaned the Mass Airflow Sensor as well. Using CRC MAF cleaner, I again followed JA's maf cleaning writeup. I tried to brighten/enhance the bottom left picture so you can see the two wires down inside the sensor that need to be sprayed with cleaner along with the amber-beaded wire that is more visible. There were quite a few mentions in the forums about people stripping the small screws that attach the MAF to the air intake, so I was prepared to get surgical, but luckily my screws came right out, with one of them even already being replaced with a flat-head screw.

Topped off the radiator, wiper fluid and removed a few wayward leaves, closed the hood and called it a day. Engine fired right up and sounds good! Here's hoping my hp and mpg go waaaay up!

How do you like the TRD O Gasket so far?
 
Got my Icon rear shocks put back on today... That's about it. Started theory crafting how to mount up my new Rally Armor mudflaps I got from [MENTION=83023]THatfield[/MENTION] in the classifieds. Thinking I'll use the factory bolts locations for the mudguards/running boards in the front, but in the rear probably drill some holes in my bumper (yikes).
 
[MENTION=123572]TheToyotaGarage[/MENTION] I didn't actually use the trd gasket, I just modified the metal one already on there, which is shaped like a D, to a full "O". I haven't driven it a whole lot just yet, a few errands etc, but engine sounds good and drives smooth. Overall a simple and useful mod imo.
 
Wasn't today, but over the last week I installed my MRT spot lights on CBI ditch light brackets, replaced the rear shoes, and did the 231mm TBU. The brakes are great now. It stops quickly and without shaking now. The parking brake also holds now as well. The lights are pretty impressive as well.

Do you have a link to the spotlights? I tried googling MRT Spotlight but got nothing.
 
Status
Not open for further replies.

Members online

Forum statistics

Threads
278,316
Messages
3,554,120
Members
248,016
Latest member
Advally Service

Trending content

Back
Top