What Did You Do To Your 3rd Gen Today?

Status
Not open for further replies.
Recently completed a 1200 mile round trip up to the Oregon coast in my 1997 LtD with 374,000 miles on original engine, transmission and radiator; at times in 100 degree heat. Mind you that the truck was fully loaded to the point of sagging in rear with myself, the wife, 3 kids and all the gear we could fit....and the A/C was on most of the time too.

Truck ran flawlessly the whole time and even took about 15 miles of coastal back-roads and trails.

Was interesting watching newer cars bog down on the mountain passes (even watched a crappy little Mazda Miata blow something on the engine that made a shit-ton of smoke start billowing out) while we flew past everyone in a 19 year old fully loaded 4x4 with nearly 400k miles on it.

I'm a firm believer in the proper and judicious use of the O/D button. It's almost comical watching people with new, lighter, more powerful vehicles struggle up the grades at a slow pace while some even overheat.

Since acquiring my truck, I've learned that they may not win any races, but when you use them properly—they excel where lessor vehicles seem to falter.

Kinda felt like a modern version of the Griswolds on vacation...but in a 4Runner.

Good times!

sunroof pic...


Installed CBI CB antenna mount, had wife hold hood, she asked what I was installing and I told her Dish Network and she believed me for about 30 seconds. Wired up FireRing, lost a clip to the plastic cowling somewhere, dropped F bombs, found it inside my boat for some reason. Beer.
 
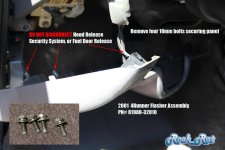
2001 4Runner Flasher Assembly

Replaced my Flasher Assy.

Takes about 30 minutes to an hour max. Location is behind the access panel on the rear top of JB1.

Steps
  1. Remove four 10mm bolts securing lower panel
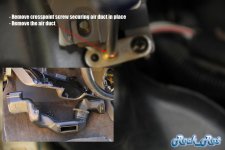
  2. Remove crosspoint screw securing air duct
  3. Remove two 10mm bolts securing JB1
  4. GENTLY pull JB1 towards you and with a pry tool remove the flasher assembly
  5. Install new flasher assembly and ops check
  6. Put it all back together

NOTE: DO NOT DISCONNECT YOUR FUEL DOOR OR HOOD RELEASE MECHANISM - It's NOT Necessary! DO NOT DISCONNECT YOUR SECURITY SYSTEM. Arrows in photo point to all three components.

The air duct is so simple to remove and install.

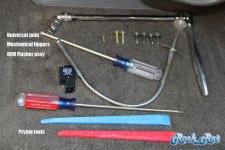
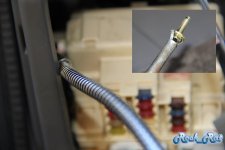
To install the upper bolt on JB1 I used mechanical fingers to get it started. Once aligned it was easy to get my universal in there and secure it down.

It took me 15 minutes to take it apart, another 10 cleaning all the dust, and about 15 minutes to re-install.

The hardest part of the job was forking over $43 for the flasher assembly!!
 

Attachments

  • Falsher Assy_1.jpg
    Falsher Assy_1.jpg
    86.9 KB · Views: 1,391
  • Flasher Assy_2.jpg
    Flasher Assy_2.jpg
    76.4 KB · Views: 1,400
  • Flasher Assy_3.jpg
    Flasher Assy_3.jpg
    136.8 KB · Views: 1,400
  • Flasher Assy_4.jpg
    Flasher Assy_4.jpg
    60 KB · Views: 1,400
Last edited:
Replaced Weather stripping

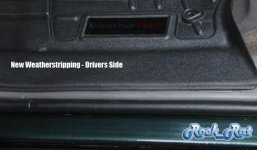
Replaced my drivers side weather stripping.
 

Attachments

  • Weatherstripping.jpg
    Weatherstripping.jpg
    63.3 KB · Views: 1,368
I could do this at some point. Mine isn't horrible, but at some point in its past life, someone tried to break in and sliced a good section of this up in the process. :gun6:

My driver side is pretty beat up and in the top corners it seems like the adhesive that holds it to the truck has given up. When you installed yours was there any glue or anything to hold it in place?
 
Just got back from a 1,300 mile road trip from Virginia to Kentucky to go visit some of the distilleries on the bourbon trail. The 4Runner did great, its awesome that at 180,000 miles I had no worries about making that trip. Anyone who enjoys bourbon should consider this trip. It was really fun and informative and I was lucky enough to catch Mr Jimmy Russell at wild turkey and got an autographed bottle.


My driver side is pretty beat up and in the top corners it seems like the adhesive that holds it to the truck has given up. When you installed yours was there any glue or anything to hold it in place?

When I pulled it off, the old seal left behind some grey non-hardening (somewhat sticky) sealant residue around the door. The new seal has the sealant injected into the weatherstripping where it slides onto the door surround. No purchase necessary.

Place the seal with the splice on the bottom (as shown in my photo) towards the front near the hinge and the "blue" dot towards the rear. Tap it on with palm of hand or rubber mallet. This ensures your drain holes are placed correctly.

The door sill (four screws) and the front and two other plastic interior panels need to be removed and snapped back on. (No fasteners)

PN# is 62312-35013. Cost without a discount is $109.23. I get a 10% discount, no tax in Portland OR.

Best to you!
Mike
 
When I pulled it off, the old seal left behind some grey non-hardening (somewhat sticky) sealant residue around the door. The new seal has the sealant injected into the weatherstripping where it slides onto the door surround. No purchase necessary.

Place the seal with the splice on the bottom (as shown in my photo) towards the front near the hinge and the "blue" dot towards the rear. Tap it on with palm of hand or rubber mallet. This ensures your drain holes are placed correctly.

The door sill (four screws) and the front and two other plastic interior panels need to be removed and snapped back on. (No fasteners)

PN# is 62312-35013. Cost without a discount is $109.23. I get a 10% discount, no tax in Portland OR.

Best to you!
Mike


Thanks, I'll definitely be doing this soon!
 
Got a few things checked off the list.

Replaced the front wheel bearings and seals. While I was at it I had the rear backing plate removed and I cut it, so it could be painted and re-installed. But now it's removable.

backingplate1.jpg


backingplate2.jpg


Installed my TC spindle gussets

spindle1.jpg


spindle2.jpg


And last, but not least, finally got the rear bump stops installed.

bumpstop.jpg


bumpstop2.jpg


bumpstop4.jpg


bumpstop5.jpg


bumpstop7.jpg


bumpstop8.jpg


bumpstop9.jpg
Oh my god im so jealous of the lack of rust under your trick :(
I hate living in the rust belt
 
Had the U-joints replaced and the driveshaft balanced. Turns out the PO had replaced the U-joints with cheap, sloppy ones and between those and an out-of balance driveshaft there was enough shake to cause the 60-70 MPH drumming noise that was making me crazy.

Shout out to Driveline Shop of Orange County! Those guys really know their stuff and the price was very reasonable. :thumb3:
 
Just got back from a 1,300 mile road trip from Virginia to Kentucky to go visit some of the distilleries on the bourbon trail. The 4Runner did great, its awesome that at 180,000 miles I had no worries about making that trip. Anyone who enjoys bourbon should consider this trip. It was really fun and informative and I was lucky enough to catch Mr Jimmy Russell at wild turkey and got an autographed bottle.


Man ohh man would I be in trouble! This is on my bucket list.
 
Yesterday I hit 310,000 miles with my friend with me and I was like " owwww man watch this" and after a little bit the numbers flipped we did a big YEA lol we got a few weird looks :party:
 
What did you do to your 3rd gen today?

Finally Installed my cargo box. I started working on it a couple months ago. As soon as I loaded it up and tried to open it again, the handle just popped out. I guess 14 wood screws wasn't enough)))

Made of 3/4 plywood, heavy duty double locking drawer slides. Lined it with rubber material. Multiple anchor points all around the thing.

8662c8898b7b556b9c21159c6ee36a13.jpg
 
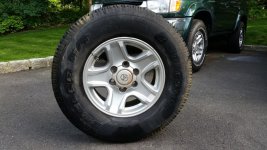
Went to the local salvage yard and bought an OEM 5 star wheel to keep as a spare. Only cost $50 and it's in pretty good shape.
 

Attachments

  • 20150613_165841.jpg
    20150613_165841.jpg
    140.3 KB · Views: 2,441
Installed new KYB struts/coils front and KYB shocks/springs in the rear yesterday. The ride is improved over the 14 year stock set up. Also replaced the A/F sensor (the one before the Cats) and it cleared my CEL. First time it's been off since I owned it. I'm pretty happy with myself.

Washed and waxed it also.
 
Status
Not open for further replies.

Members online

Forum statistics

Threads
278,316
Messages
3,554,120
Members
248,016
Latest member
Advally Service

Trending content

Back
Top