What Did You Do To Your 3rd Gen Today?

Status
Not open for further replies.
I got new polarizing film to do the negative LCD on my ScanGauge, I wanted it to match the clock and headunit in my 4runner. Looks much better IMO.
fb13412fcf617d6fa388d963e53a3916.jpg
Ok, we need a write-up!!

-Charlie
 
Just got done changing my oil. It's not always cool shit I do. lol

I was gonna do the rear breather but it's 103 in my garage right now so that'll have to wait till tomorrow morning. Then off to Coyote Flats for tomorrow night.
 
Ok, we need a write-up!!

-Charlie
It's really simple,
-You need to buy a sheet of Polarizing Film, I bought this exact same sheet from eBay: http://www.ebay.com/itm/252131811987
I would maybe get a more quality piece if I did it again, the film I got is fairly thin and I think a little thicker would give it a sharper black.
- Once you get the film, you need to disassemble your Scan Gauge, easily done with 4 philips screws on the back, it will just open up after the screws are out.
- Now you need to remove the polarizing film glued to the LCD, if you look close at the edges of the screen you will be able to see the layer of film on it. I used a thin razor and CAREFULLY worked it under the edge of the film enough to so that I could grab a hold of it with my fingers.Be careful not to scratch the LCD.
- Hold down the LCD with one hand while you slowly pull the film off.
-Once you get the film off you now need to take the disassembled ScanGauge and the new sheet of film back out to the 4runner and plug it in. You will notice that the absence of the film leaves you with a blank screen. Take the new sheet of film and place it in front of the screen and like magic your screen will alive again.
- Now if you have it in the correct position you with have the reversed LCD lighting. If it still looks the same as before, just rotate the polarizing film 90° to the left or right and you will get the negative effect. I used a dry erase marker to mark the position the film needed to be.
- Take it all back inside and use the old film you removed as a template to cut out the new film.
- Once it's cut, go back out side and make sure it's correct before you put it all back together.
- Now I reassembled it without taping the film back to the LCD, I just used the front bezel of the ScanGauge to sandwich it and it doesn't look any different. But if you want you can use some really thin double sided tape to tape the very edges to the LCD. But not needed IMO. Just line it up and snap the front back on and reinstall the screws.
- Put it back in the 4runner and enjoy the Negative LCD.

bf69cc60910a5be944df83502fe2db1c.jpg


Sent from my Nexus 6P using Tapatalk
 
Thanks for helping me spend my money. I was wondering what I was going do with that extra $299 in my wallet. Ordered. I'll look you up when I have more money I don't know what to do with. :thumb3:


Wait you guys spent $300 on that? a piece of stamped metal to cover the window???

Maybe im missing something, cause I dont get it.

¯\_(ツ)_/¯
 
Wait you guys spent $300 on that? a piece of stamped metal to cover the window???

Maybe im missing something, cause I dont get it.

¯\_(ツ)_/¯

Drop in the bucket. I have no problem spending money on my 4Runner.

Haven't seen too many hurst's with a roof rack.

Hurst.JPG
 

Attachments

  • Hurst.JPG
    Hurst.JPG
    83.7 KB · Views: 665
Drove it nearly 800 miles round trip (I like to drive), met the guys at 4xInnovations who were really cool, took home a couple o' souveniers. Awesome awesome doing business with 4x. Also, my son is enamored with their welder-bot.
20170616_131759_HDR_zpsj9i4tedq.jpg~original
 
Wait you guys spent $300 on that? a piece of stamped metal to cover the window???

Maybe im missing something, cause I dont get it.

¯\_(ツ)_/¯


Agreed. But it is a trendy mod that people will pay $300 for so why not charge that amount?


Sent from my iPhone using Tapatalk
 
Finally. Changed the t stat and sure enough the jiggle valve was clocked at the 12 o'clock position instead of at the 6 o'clock position. Changed upper and lower rad hoses while I was there. Went from running 206 engine coolant temp avg to 186
9fbf4639aee52e8494ce526baa0b89ff.jpg


Sent from my iPhone using Tapatalk
 
Today was all about high tech fabrication.. my front skid plate bar was tweaked pretty bad. My truck came without skids and I discovered why as things went on. It kinda looked like a Z. High on one end and caved in on the other. So I cut a straight section off a parts rig and planned to weld it in place.

Today I looked at my girlfriends KIA and my harbor freight ratcheting tie downs and had an epiphany. So I proceeded to use her car to pull and tweak my bar into shape. Surprisingly the tie down didn't break and fly back at my head as I guided her to stop pulling. I actually got this thing perfectly straight and then used my floor jack an a 4x4 to make it flat.

20 minutes of my time and I now have aftermarket skids ordered. :bigok:
 
Got back from the Slope yesterday so in the shop today. Verified all the parts for my leaky axle seal job and got a price quote of only $418 to do both axles. That's for them to pull them and all the press work. Yes, I could pull them myself and take them in, but then that's a lot of driving back and forth test fitting (grease test) if it's not exact the first time. I'll be changing the brakes myself though.

Because money is so tight right now, I debated with myself to have them only do the one that's leaking, and I pulled the ABS to verify it was. Yep. It was. So what the heck, I'll pull the other ABS and sure enough it's wet also. Just not made it through to the wheel yet.

I also took off my original shackle mounts and put them up on FB for sale. Painting the shackles red and will move them up to my bumper once they're dry. I never did before because these mounts are 1" thick where CBI shackle mounts on their bumpers are only 1/2". I cut out some 1/4" rubber washers to fill the gap so there isn't any noise.

9988225385cadb917c040ff82f2cde42.jpg


Sent from my SM-G920I using Tapatalk
 
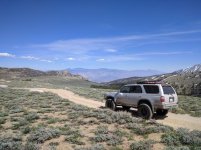
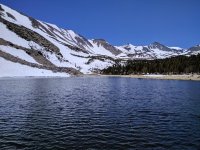
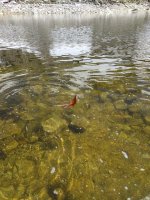
Used it to go here and catch some of these. Also had the A/T temp light come on for the first time. Bigger tires and 4.10 gears are a *****. Fluid is clear and not burnt so I let it cool down and used low range. Keep in mind the elevation gain is almost 6000' in 4 miles so I'm not worried about it. lol
 

Attachments

  • IMG_20170617_153132.jpg
    IMG_20170617_153132.jpg
    137.8 KB · Views: 441
  • IMG_20170617_135020.jpg
    IMG_20170617_135020.jpg
    139.3 KB · Views: 457
  • IMG_20170617_141215.jpg
    IMG_20170617_141215.jpg
    139.7 KB · Views: 538
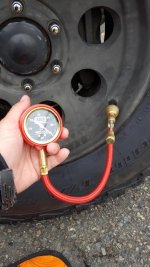
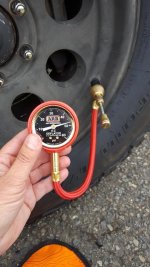
Holy guacamole Batman!! Got to use my ARB E-Z Tire Deflector!

I had an opportunity to try out my new ARB E-Z Deflator. I tried to hammer out all my Discount Tire woes yesterday.

Reimbursement for replacing 3 cross threaded tire lugs. A brand new free BFG KO2 285/75/16 spare. Five wheel tire rotation begun. ( 4X Innovations rear swing out bumper should be done by the end of the month). And they put new spline lugs on.

I was fueling up and decided to double check my tire pressure. Last time I was in there, they set them at 35psi. So I figured that is what the new tire would be at. Nope. 80psi!! No wonder why my drive to work felt a bit harsher than normal.

I can't complain too much. They stepped up to make things right and comped me a tire, so that's about $250 I didn't have to spend.

Anyway, I got a chance to bust out the ARB E-Z Tire Deflector and figure it out. It is a pretty cool piece of gear. I am glad I checked. Tires are too expensive to have to buy any sooner than necessary.
 

Attachments

  • ARB.1.jpg
    ARB.1.jpg
    91.1 KB · Views: 462
  • ARB.2.jpg
    ARB.2.jpg
    85.4 KB · Views: 438
Last edited:
I had an opportunity to try out my new ARB E-Z Deflator.


I was fueling up and decided to double check my tire pressure. Last time I was in there, they set them at 35psi. So I figured that is what the new tire would be at. Nope. 80psi!! No wonder why my drive to work felt a bit harsher than normal.

IDIOTS. Caps for effect I'm not really screaming. lol

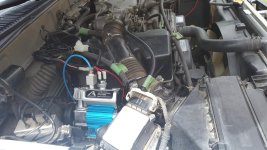
I was just airing down today and was thinking of an easier way. Pun intended. This is my set up.

cbhnmp6000.jpg


You push that little button on the side and it acts as a deflator. It takes me about 2 minutes a wheel to go from street pressure(38 PSI) to trail pressure(18 PSI). It takes me ARB compressor less time to air them back up. lol
 
Status
Not open for further replies.

Members online

Forum statistics

Threads
278,316
Messages
3,554,120
Members
248,016
Latest member
Advally Service

Trending content

Back
Top