What Did You Do To Your 3rd Gen Today?

Status
Not open for further replies.
Swapped on an early-style bumper.

tODEnur.jpg
You don't like the fat lip look? It's "safer"

Sent from my Pixel XL using Tapatalk
 
1/2 my shipment arrived...
<a href="https://ibb.co/knrqGd"><img src="https://preview.ibb.co/fHn82J/IMG_7651.jpg" alt="IMG 7651" border="0" /></a>
 
Over the weekend I did most of my SS1.2 lift install. Getting the rear shocks out was a nightmare. I ended up drilling holes through the dust cover, jamming a screwdriver through them and wedging it against the bump stops in order to get the damn top nut off.

I have a little more to do but am waiting on a few things from Mr. Amazon to get here to wrap it up. Should be finished by Wed.
 
Over the weekend I did most of my SS1.2 lift install. Getting the rear shocks out was a nightmare. I ended up drilling holes through the dust cover, jamming a screwdriver through them and wedging it against the bump stops in order to get the damn top nut off.

The Pro-tip here. Install a 1" body lift, prior to doing rear shocks. That way you can cheat and get a 12" 3/8 drive flex head in there.
 
Slowly putting together an emergency kit. I will mount the fire extinguisher under the passenger seat. I don't like having anything that could possibly interfere with the pedals under the driver's seat.

Got some Tred 800 boards on the way too.

gear.jpg
 
One of the best things about 3rd gen 4runners! Too old to tax! Registration and tax on a 2018 would be $800 a year around here. Ridiculous.


reg.jpg
 
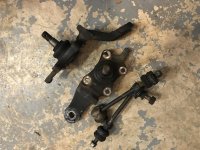
Installed new OEM lower ball joints, and sway bar links...the old end links were shot to hell, but the ball joints still felt decent..still changed them since i have no idea when the last time they were changed.
 

Attachments

  • EB813248-6C40-4853-AA28-C42154F6F5AF.jpg
    EB813248-6C40-4853-AA28-C42154F6F5AF.jpg
    136.1 KB · Views: 350
The Pro-tip here. Install a 1" body lift, prior to doing rear shocks. That way you can cheat and get a 12" 3/8 drive flex head in there.


This is what I have done with both of my 4runners. Body lift first, then lift after! It’s nice to be able to see what you’re doing in there to get a ratchet on that top shock mount bolt...The more you know.
 
This is what I have done with both of my 4runners. Body lift first, then lift after! It’s nice to be able to see what you’re doing in there to get a ratchet on that top shock mount bolt...The more you know.

How about a crescent wrench (to hold the shaft) and a ratcheting box wrench sans lift?
 
Well It was last week but I finally went for a pro clip phone mount. Its pretty expensive but it was worth it to me. no drill, custom fit for my phone and car, super solid.

calimobber-albums-pictures-picture51677-proclip-mount-3.jpg

calimobber-albums-pictures-picture51676-proclip-mount2.jpg

calimobber-albums-pictures-picture51675-proclip-mount.jpg
 
Last edited:
I’m working on adapting the crash bar to fit behind the early style bumper.

Let us know what you come up with. I don't like the fact that my front bumper is more ornamental than useful in a crash. Makes me want to get a badass front bumper just to get some collision protection :).
 
I also have the proclipusa for iPad mini. Of course the iPad mini is larger than a phone. And this blows the air flow dramatically!!!! However still like it.

Did you have to drill holes to mount the phone mount to the dash mount ? Because mine did not come with pre drilled holes.
 
I also have the proclipusa for iPad mini. Of course the iPad mini is larger than a phone. And this blows the air flow dramatically!!!! However still like it.

Did you have to drill holes to mount the phone mount to the dash mount ? Because mine did not come with pre drilled holes.

My other concern is how it clips behind the dash bezel (pro-clip's website is not very clear on that). Are there some tabs reaching behind the bezel? My bezel is that fake wood limited version, which is extremely brittle (and expensive to replace). I'm a bit hesitant to have the phone cantilevered off of it...
 
Alot!

Man, this weekend has been filled with lots of work on the 4runner.

Oil change (as well as oil changes on two other cars)
Coolant flush and fill
Reverse light LEDs
Replaced radio with aftermarket one
99+ cup holder mod!

I'm excited most about the cup holders considering all my other ones were broken. Never taking cup holders for granted!

A lot of the cup holder write-ups don't have working pics anymore, but I would like to add my input in case anyone stumbles upon this doing it for the first time (was my first time).

  • I got the e-brake assembly without that e-brake tub thing. Still fits but hugs the left of the rubber shroud and kinda squeaks when I pull up the e-brake. Otherwise, works perfectly fine.
  • I routed the ECT and Back window to the left side of the steering wheel. I had to splice pretty far back and unhook the harness off the plastic braces it was held to.
  • I did not tamper with the brace that holds the console down (the one you have to bend or else you drill into the frame). I just removed it entirely. Although it works, it is very flimsy. Doesn't bother me but I didn't want to make the effort and I'm ok with it.
  • To trim the console to fit, I sharpie'd the outline and went at it with strong garden sheers. Worked amazingly well.

Fun stuffffffff...........
 
I've been considering these - how does it affect the air flow from the left vent?

Not very much. Its super handy and you can slide it side to side very easy. If you need more air you can slide it over and cover the clock. I kinda keep it in the middle between them even though I have a clock on the radio.

My other concern is how it clips behind the dash bezel (pro-clip's website is not very clear on that). Are there some tabs reaching behind the bezel? My bezel is that fake wood limited version, which is extremely brittle (and expensive to replace). I'm a bit hesitant to have the phone cantilevered off of it...

they give you a plastic tool to pull it out just a smidge and it snaps in. It won't hurt the wood.

Did you have to drill holes to mount the phone mount to the dash mount ? Because mine did not come with pre drilled holes.

there is pre filled holes( screws included) on the mounts and the mounts just clip into the stock dash no holes drilled at all
 
Last edited:
A lot of the cup holder write-ups don't have working pics anymore, but I would like to add my input in case anyone stumbles upon this doing it for the first time (was my first time)....

[*]I did not tamper with the brace that holds the console down (the one you have to bend or else you drill into the frame). I just removed it entirely. Although it works, it is very flimsy. Doesn't bother me but I didn't want to make the effort and I'm ok with it.
[*]To trim the console to fit, I sharpie'd the outline and went at it with strong garden sheers. Worked amazingly well..

It's a very useful mod for the pre-99 4Runners. My recent writeup still has working pictures I think - http://www.toyota-4runner.org/3rd-g...roof-console-dash-bezel-upgrades-my-97-a.html.

I would recommend getting the back mounting bracket that came with the donor console, then nothing will be flimsy and you would not have had to trim the console.
 
Status
Not open for further replies.

Members online

Forum statistics

Threads
278,316
Messages
3,554,120
Members
248,016
Latest member
Advally Service

Trending content

Back
Top