What Did You Do To Your 3rd Gen Today?

Status
Not open for further replies.
spent some time blasting and painting in prep for new engine

<a href="https://imgur.com/wRyKbu3"><img src="https://i.imgur.com/wRyKbu3l.jpg" title="source: imgur.com" /></a>
 
With your advice, Charlie, I got removed the starter bolts.
As you said, both 14mm bolts go in from the transmission side to the front.
As you said, the top bolt was easy to find once I knew where to look.
I removed the driver side wheel and pulled back the platic flap and could see the bolt easily. I couldn't get to it due to a coil of hard brake line though.
I couldn't get to it from below either.
I climbed up on top of the engine and got that top 14mm starter bolt out using just a socket and handle. It would only go about a 16th of a turn with each twist but that was enough.

The three 17mm bolts on top of the bell housing were a bit harder.
The one at about 9:30 wasn't too bad, just above the slave cylinder.

The two 17mm bolts at 11:30 & 12:30 above the bell housing needed almost 30 inches of 1/2 inch extension.

The one at 12:30 required a swivel in addition to the extensions.

I first tried 3/8" but it almost twisted a quarter of a turn so I don't think anyone can remove those bolts with 3/8" extensions even with the 18 inch pipe I added to my socket handle. (The 30" of 3/8" extension is still a good idea though for starting and removing the bolts once loosened.)

Now I'm ready to remove the rear part, where the driveshaft is already out.
It seems I have three choices, all of which are four bolts.

Either I can remove the entire crossmember, or the center transmission bracket to the crossmember or just the transmission from that bracket.

Any suggestion as to which is the way most people choose?
 
Either I can remove the entire crossmember, or the center transmission bracket to the crossmember or just the transmission from that bracket.

Any suggestion as to which is the way most people choose?

Just remove the whole crossmember. Don't be surprised if it rusty and really stuck on there. Oh and obviously you want your transmission jack in place and secure (with straps) before removing the crossmember.
 
Just remove the whole crossmember. Don't be surprised if it rusty and really stuck on there. Oh and obviously you want your transmission jack in place and secure (with straps) before removing the crossmember.

Thanks for that advice as that is the last step before the transmission comes out, as everything else is out.

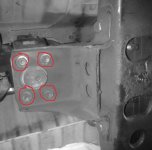
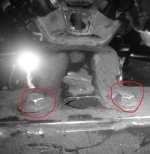
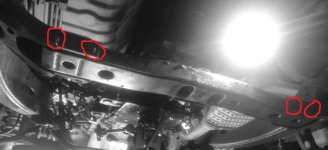
The choice is either the four bolts on the rear mount, or the four bolts on the rearmount bracket, or the four bolts on the entire crossmember.

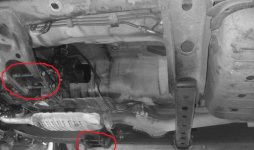
See pictures below.

Also, do you locktite the clutch bolts when going back in? (What color?)
 

Attachments

  • bracket01.jpg
    bracket01.jpg
    77.8 KB · Views: 442
  • bracket02.jpg
    bracket02.jpg
    85.6 KB · Views: 441
  • bracket03.jpg
    bracket03.jpg
    43.3 KB · Views: 442
Oil change last night, they always run better afterwards don't they? 5k int with Mobil1 Syn. Flushing out some of the PO small neglect, bit by bit.

I'm in the same boat as you, man. These things need love! I've noticed mine runs a bit better now that I've had it, and this one was pretty neglected. Haha.
 
Adjusted my spray nozzles to spray where they need to, thanks [MENTION=69868]LittleCaesar[/MENTION]. Those suckers are not easy to move around, my fingers are still sore!

Also reupholstered the driver seat. Not really thrilled with how it came out, the leather seems bunched up/wrinkly, but it looks like all the others I've sen in Youtube videos. Hopefully it'll even out over time.

Out with the old:


In with the new:


But my favorite part is that I eliminated the dangling lumbar switch that I've noticed on every 3rd gen I've seen so far. Bye bye loose switch:


Hello new switch:

 
Good to hear Leon. :cheer2:

My motor for the lumbar adjustment had a dead spot in it so it didn’t work so I, like you, didn’t install the switch again. Installing the leather would go much easier if one has access to a steamer , to stretch the leather. I didn’t even use hog rings for installation but instead opted to use zip ties. It isn’t factory but works well for me.
 
How's that dial indicator treating you? Would you recommend someone purchase the same one? If so, could you please provide a link to where you purchased it? Thanks!


HI Tim,
First of all..THANKS for your videos, your work on these videos help me tremendously. Some day when you get a 5th gen i will get one after you make videos for that version as well.

The link for the dial indicator I use is given below, it gets the job done and measurements are consistently repeatable. the stand i have is not the best ,I would recommend a flexible magnetic base holder or get one with a grip pliers attached, the base i have takes some time to get into position.
Get a good Mitutoyo or Starrett brand dial indicators, those are well worth the extra money.
The rod in the dial indicator just needs to be parallel to the direction of movement to get this measurement done.

Would recommend the flexible holder as you can use it for brake rotor run out measurement as well.

links:

what i use:
Dial Indicator | Ram International Enterprise Ltd

What i would like to get to make set up easier:
https://www.anytimesale.com/DIAL-INDICATOR-FLEX-ARM-GRIP-CLAMP-VISE-PLIER-BASE-p/203341.htm
 
My motor for the lumbar adjustment had a dead spot in it so it didn’t work so I, like you, didn’t install the switch again.

Just to clarify, I did keep the lumbar switch function (it makes a big improvement in terms of back support) - I just moved it from the seat back location (where it was for '96-00) to the side of the seat cushion, in the plastic trim piece, where Toyota finally put it in '01-02:


Installing the leather would go much easier if one has access to a steamer , to stretch the leather. I didn’t even use hog rings for installation but instead opted to use zip ties. It isn’t factory but works well for me.

Yup, I saw that trick. Not having a steamer, I put the leather out in the hot sun for an hour, so I think it did the same thing. I really had no trouble stretching the leather over the foam, my issue seems to be the opposite - too much leather, hence the wrinkles :D.
 
The choice is either the four bolts on the rear mount, or the four bolts on the rearmount bracket, or the four bolts on the entire crossmember.

See pictures below.

Also, do you locktite the clutch bolts when going back in? (What color?)
Remove the 4 bolts up into the mount (first picture) and the four bolts/nuts into the crossmember (third picture). Make sure the transmission is supported before you remove the crossmember bolts (third picture ones). Looks like you have a 2WD! You'll have it a lot easier (by 100+ lbs) than most of us on here.

Flywheel to engine should have thread sealant (if the bolt holes go into the crankcase like some toyota engines) or blue loctite. Pressure plate to flywheel shouldn't need loctite, they have lock washers. You can use blue there if you really want though.

-Charlie
 
Finally put the new tranny pan that's ben sitting in the garage for the last few months. Drain plug was stripped when I purchased my 3rd gen. I had tapped the old drain hole for a larger thread, but feel better about having it fixed for good.
 
Just to clarify, I did keep the lumbar switch function (it makes a big improvement in terms of back support) - I just moved it from the seat back location (where it was for '96-00) to the side of the seat cushion, in the plastic trim piece, where Toyota finally put it in '01-02:


Yup, I saw that trick. Not having a steamer, I put the leather out in the hot sun for an hour, so I think it did the same thing. I really had no trouble stretching the leather over the foam, my issue seems to be the opposite - too much leather, hence the wrinkles :D.

Ok, gotcha ya. Feeling like the dunce of the day.:dammit:

To keep this thread relative, I installed a new Toyo air filter for $10 today.
 
Remove the 4 bolts up into the mount (first picture) and the four bolts/nuts into the crossmember (third picture). Make sure the transmission is supported before you remove the crossmember bolts (third picture ones). Looks like you have a 2WD! You'll have it a lot easier (by 100+ lbs) than most of us on here.
Yup. 2WD.

Thanks for letting me know that I should just remove the crossmember, where I followed your advice and first removed the four 12mm bolts on the transmission mount, and then I removed the 4 long 14mm bolts and nuts on the crossmember.

The crossmember is now out of the picture (as is the swaybar).

I should take my further questions out of this thread, as I just opened a new thread on the current issue, which is what tool to buy to push the transmission away from the engine.

This is that thread.

Flywheel to engine should have thread sealant (if the bolt holes go into the crankcase like some toyota engines) or blue loctite. Pressure plate to flywheel shouldn't need loctite, they have lock washers. You can use blue there if you really want though.

Thank you for that advice. I'll buy some blue but I hope to not have to remove the flywheel.

Right now I'm stuck for an hour and a half just getting the transmission to back away from the engine where I'll get out of this thread and bring it over here. Thanks!
 

Attachments

  • bellhousing05.jpg
    bellhousing05.jpg
    58 KB · Views: 652
Switched the turn signals from the silly ones at the bottom of the bumper to the corners and replaced all the signal bulbs with LED's. The LED's caused hyperflash so bad that the lights wouldn't even shut off haha. For those interested, the Novita EP35 flasher relay fixes the hyperflashing with all LED bulbs.
The LED reverse lights I put in are brighter than my old headlights haha
 

Attachments

  • IMG_20180719_234422.jpg
    IMG_20180719_234422.jpg
    76.1 KB · Views: 626
Intake mod and seat function

Finally wired my passenger Audi seat (3rd gen 4runner seats destroy my back) the Audi was my commuter now it’s a donor I guess. Next i want to get the heat function going on them


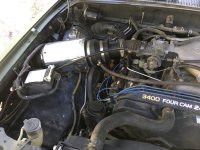
I also improvised a short ram air intake and took it straight to the side instead of going all the way to the front, I want to add an extra battery where the old filter was. I need to change one thing but it idles perfect and still acts the same so I think my improvisation worked this time. It’s loud though ¯\_(ツ)_/¯
 

Attachments

  • F12247E9-138C-4452-9C97-8F444C28E7B5.jpg
    F12247E9-138C-4452-9C97-8F444C28E7B5.jpg
    132.6 KB · Views: 597
Switched the turn signals from the silly ones at the bottom of the bumper to the corners and replaced all the signal bulbs with LED's. The LED's caused hyperflash so bad that the lights wouldn't even shut off haha. For those interested, the Novita EP35 flasher relay fixes the hyperflashing with all LED bulbs.
The LED reverse lights I put in are brighter than my old headlights haha

Which bulbs did you use for the reverse lights? I just put LEDs in mine from SuperBrightLEDs and I am pretty disappointed in them
 
Status
Not open for further replies.

Members online

Forum statistics

Threads
278,316
Messages
3,554,120
Members
248,016
Latest member
Advally Service

Trending content

Back
Top