What Did You Do To Your 3rd Gen Today?

Status
Not open for further replies.
Threw P0420, and noticed my tailpipe had a good bit of soot on it. Happened to me about a year ago (with new O2's) so I pulled the rear sensor, sprayed it with some brake clean and threw it back in which cleared my code. Planned on doing it again but I don't have a spare gasket, does anybody know if they're reusable or are they only good for one use?
I have no actual idea, but I feel like that gasket is one of those things you can eyeball and say "eh, yeah, this will do just fine for another round of use" but I'd probably only do it one time. Anytime thereafter I'd probably replace it. It's cheap enough so you could even replace it altogether.

Sent from my SM-S908U using Tapatalk
 
Drove it to the store this morning. Have some small maintenance things lined up for the next few weeks.

I need to post some pics from a Colorado/Moab trip I took back in December, can't believe that was 6 months ago already...

Also took a trip to Kentucky a couple weeks ago. She's still muddy from that trip.
 
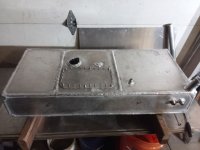
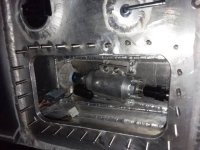
Got finished up to this point today (much more then one day of time into it), still have a few details left, Rear tank:
20230507_1602033.jpg 20230507_1600399.jpg
 

Attachments

  • 20230507_1602033.jpg
    20230507_1602033.jpg
    40.4 KB · Views: 210
  • 20230507_1600399.jpg
    20230507_1600399.jpg
    50 KB · Views: 208
Starter Contacts, Plunger, and Sway Bar Bushings.

I'd ordered a Victory kit from Amazon last June but when I opened it last week, all I found was what looked like used parts - and parts that didn't even come with the kit. Now having actually done the job, I can confirm that's exactly what it was. Like someone put their old and extra parts back in the box and returned it. Ugh.

I ordered the right parts from PartSouq. The plunger spring I had to buy locally but it was surprisingly inexpensive. I also grabbed rubber sway bar and end link bushings from PS. The poly bushings I put in 22 months ago continued to squeak even after regreasing.

qeTenF6.jpg


vZcCx5k.jpg


tLkc9hF.jpg


I saw this from the FSM that I hadn't heard about in any write-ups or videos. How am I supposed to measure 221 lbs-ft pressing down with a wooden block? Who do they think I am, Leon? I did my best to push squarely on the contacts with a block of wood I managed to find but I have no idea with how much force.

But she starts great. And fortunately the starter bolts only require 29 lbs-ft which I think I was able to get, even using all those extensions. I'm glad that's over!

tMA7fuH.jpg
 
I fixed my rear window glass.

The passenger side would fall into the tail gate once the window went about half down. I used the repair method in this thread ->https://www.toyota-4runner.org/3rd-gen-t4rs/135121-$2-window-regulator-slider-fix.html#post3795824 except I 3D printed a replacement wheel and used M4 hardware instead of the shower roller kit.

If anyone has a 3D printer and wants to go the 3D printed replacement part route I can send you the .stl.
 
What did I do in my 3rd gen today? I (and my 4Runner) survived my commute to work.

Lady in an SUV took a left turn in front of me... no other cars in sight so this is just a good old fashioned case of "not looking where you're going." I'm grateful that she pulled her head out of her ass with 2 feet to spare and swerved away. Unbelievable. I want to believe that my upgraded 4th gen horns helped :)

Dang dude, glad you were able to dodge that one. As much commuting as I do, I can relate. 4th gen horns ey?
 
Dang dude, glad you were able to dodge that one. As much commuting as I do, I can relate. 4th gen horns ey?

I think the 01/02 4Runners got the 'American' horns as well. Also on Tundras and Sequoias. Simple direct swap, much better sounding than the original palm buzzers.

Round 'trumpets', instead of the flat round style on the earlier 3rd gens.
 
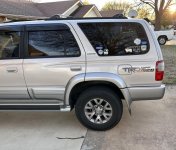
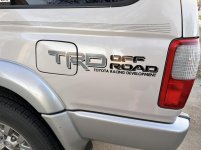
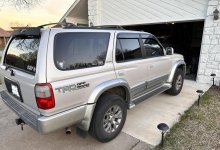
Finally added some TRD decals. Planned on doing it forever ago, back when the custom options seemed more plentiful. At one point I wanted to do some kind of Hilux Surf JDM-style graphics but couldn't decide. Found these on ebay, thought the colors went well with my aesthetic and didn't stick out too much. The silver is closer to the bumper colors.

+10 HP at least


Next up is repainting the salvage yard right rear bumper end the correct silver (181)
 

Attachments

  • IMG-2269 - Copy.jpg
    IMG-2269 - Copy.jpg
    93.6 KB · Views: 305
  • IMG-2270 - Copy.jpg
    IMG-2270 - Copy.jpg
    87.6 KB · Views: 296
  • IMG-2272 - Copy.jpg
    IMG-2272 - Copy.jpg
    129.3 KB · Views: 308
Finished changing the timing belt and a lot of other things

Got it a few weeks ago, just finished changing the timing belt, water pump, plugs, wires, etc.

Fired it back up and it runs great until it gets warm, and then misfire check engine light codes that didn't exist before... not very promising so far.
 
Got it a few weeks ago, just finished changing the timing belt, water pump, plugs, wires, etc.

Fired it back up and it runs great until it gets warm, and then misfire check engine light codes that didn't exist before... not very promising so far.

What codes exactly are you getting?
 
I swapped out those two stupid knobs on the inside right rear panel in the trunk area with ones that weren't half disintegrated nor nearly as discolored. Small change but satisfying.

Also swapped out the horns with deeper-sounding Hella units so I no longer sound like a small Honda.
 
I finally decided to sand down the clear coat cancer on my 4runner and re-spray it. First time I have ever painted a car and it is orange peel city. But I really like the color and the 4runner is strictly a offroad/winter truck now.

It is the Toyota Dark Army Green color (code:6v7)


huIZHcW.jpg


iZ4TjuK.jpg


And decided to go get it dirty 5 days after spraying (not recommended)

Gi6Cf43.jpg
 
Still Troubleshooting Driver's door lock

98 4runner limited
New actuator installed (and verified operational before installation).
New Master window/lock switch

And still the driver's side door lock does not operate, electrically, when pressing the lock switch on driver's panel. Now surfing the internet for an answer,.... again.
 
I finally decided to sand down the clear coat cancer on my 4runner and re-spray it. First time I have ever painted a car and it is orange peel city. But I really like the color and the 4runner is strictly a offroad/winter truck now.

Nice. I painted my tailgate recently so know that's a lot of work to paint an entire vehicle. Did you rattle can? I'm sure a sand and a buff in a couple of weeks and she'll shining like a new penny.
 
Nice. I painted my tailgate recently so know that's a lot of work to paint an entire vehicle. Did you rattle can? I'm sure a sand and a buff in a couple of weeks and she'll shining like a new penny.

I used a LVLP gun, first time using it. Should have practiced but what fun would that have been. Yeah, gonna let it cure another week and do a once over polish on it and call it good.
 
I finally decided to sand down the clear coat cancer on my 4runner and re-spray it. First time I have ever painted a car and it is orange peel city. But I really like the color and the 4runner is strictly a offroad/winter truck now.

It is the Toyota Dark Army Green color (code:6v7)

From internet pictures that looks great!

Did you do single stage or 2 stage? What brand of paint? Mind if I ask how much it cost? I'm thinking of doing this to my daily. It doesn't need to be show quality, but better than super bad peeling clear...
 
Put a new head unit in the truck. It's the Atoto F7XE single din 10". It's only going to live in the normal din slots until I complete my head unit relocation project but I really needed something considering the mic on my alpine crapped out on me.

Head unit was incredibly simple swap. Last owner left a metra harness that hooked up to the factory amp (I don't need anything fancy, the only music I really listen to is classical) and it was dead simple to swap it with the new radio harness.

The backup camera however was a whole other story. Took a while to get panels off to prepare for wire routing and I figured I should get the camera hooked up and tested out before I button it all up. Took ages just to figure out how to get the darn cord to go in the same hole that my license plate lights go. Got it through and my suspicion that the first cord coming off my camera was not long enough was founded. I got one of those cameras with the very slim 4 pin connectors because I knew pulling an RCA through the rubber connection from the hatch to the body would be a pita. Unfortunately the initial piece that this connects to is far from slim as it has the a module to convert the slim connection signal to RCA signal as well as the power wire and the ground wire. As far as I can tell that ground wire has to go in the body as I don't think the hatch is physically grounded unless I wanted to tap into one of the ground wires for any of the hatch accessories. Thankfully I found a source that appears to be the same 4 pin in a 6.5' extension cord format so that I can get that nice slim connection into the body. Will be here Friday and I'll make sure to test it before routing it. Really stoked on this whole setup as the head unit I bought has live rear view which could be handy while wheeling as well as a front camera input so I will be able to hopefully use that for self spotting. All of this is controlled from a remote mounted to my wheel. Also just plain looking forward to having a backup camera period. Always so paranoid with how high my truck is that some kid is going to sneak up in back of me in a parking lot, not to mention it will be handy when I have to back off an obstacle or away from a snow drift.

Once I get the cable situation sorted I also have to figure out which wires up in my kick panel are the hot reverse light and the hot tail light so I can tap them for auto backup cam and the dimming function on the headunit. There's so many damn wires in the harness that feeds the back >< Does anyone happen to know which of the wires I need up in the kick panel? Pretty sure the hot for the reverse light is red with a blue stripe at the back but is it also red with a blue stripe on the front? Also I think the tail light wire is solid green but there are a lot of solid green wires at that front harness of various shades, some have silver dots too.

Anyway here is the head unit still with the shipping wrap on it lol (it came with a screen protector that I need to put on now that I've verified the unit is working properly). Can't wait to get the relocation done as my climate controls are rather hard to access right now >< Love the size on this screen though and the attachment point for it is rock solid so I'm not worried about it flopping around while wheeling.
img_20230511_005814427-jpg.115272


Here's that harness that would not have fit through the rubber hose that goes from the hatch to the body.
img_20230511_010008144_hdr-jpg.115273
 
Status
Not open for further replies.

Members online

No members online now.

Forum statistics

Threads
278,316
Messages
3,554,120
Members
248,016
Latest member
Advally Service

Trending content

Back
Top