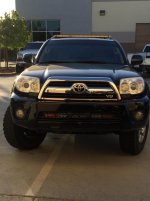
What did you do with your 4runner today?

If the majority of you driving is on the road the ball joints would probably be better. Less maintenance and sqeaking
 
Added single row light bar to stock roof rack.
 

Attachments

  • 4RUNNER.jpg
    4RUNNER.jpg
    129.3 KB · Views: 381
About a week ago now:

Installed New UCAs as my LR/SPC UCAs sh!t the bed. They wouldn't help me out , so I got some Camburg (replica) Ball Joint UCAs. Alignment turned out good. Drives fine. No problems. Oh, and finally removed the front sway.

Out with the old:
<a href="http://s1287.photobucket.com/user/wyanrard/media/4runner%20build%20thread/A4DDB1E6-0023-4B41-A7BD-38B5B8B8EBC6_zpse4pwyetw.jpg.html" target="_blank"><img src="http://i1287.photobucket.com/albums/a639/wyanrard/4runner%20build%20thread/A4DDB1E6-0023-4B41-A7BD-38B5B8B8EBC6_zpse4pwyetw.jpg" border="0" alt=" photo A4DDB1E6-0023-4B41-A7BD-38B5B8B8EBC6_zpse4pwyetw.jpg"/></a>

<a href="http://s1287.photobucket.com/user/wyanrard/media/4runner%20build%20thread/CDB13537-9E4F-409A-BDEA-DD6B1AC32AC8_zpshflnyhze.jpg.html" target="_blank"><img src="http://i1287.photobucket.com/albums/a639/wyanrard/4runner%20build%20thread/CDB13537-9E4F-409A-BDEA-DD6B1AC32AC8_zpshflnyhze.jpg" border="0" alt=" photo CDB13537-9E4F-409A-BDEA-DD6B1AC32AC8_zpshflnyhze.jpg"/></a>

New:
<a href="http://s1287.photobucket.com/user/wyanrard/media/4runner%20build%20thread/83B51ED0-CAFA-4EA1-A159-77075A7FE270_zps2ibvoswz.jpg.html" target="_blank"><img src="http://i1287.photobucket.com/albums/a639/wyanrard/4runner%20build%20thread/83B51ED0-CAFA-4EA1-A159-77075A7FE270_zps2ibvoswz.jpg" border="0" alt=" photo 83B51ED0-CAFA-4EA1-A159-77075A7FE270_zps2ibvoswz.jpg"/></a>

<a href="http://s1287.photobucket.com/user/wyanrard/media/4runner%20build%20thread/59CAC675-F3EF-4B35-9481-0E3E473F73D4_zps6cxnkei6.jpg.html" target="_blank"><img src="http://i1287.photobucket.com/albums/a639/wyanrard/4runner%20build%20thread/59CAC675-F3EF-4B35-9481-0E3E473F73D4_zps6cxnkei6.jpg" border="0" alt=" photo 59CAC675-F3EF-4B35-9481-0E3E473F73D4_zps6cxnkei6.jpg"/></a>

<a href="http://s1287.photobucket.com/user/wyanrard/media/4runner%20build%20thread/99A036F7-6BFD-4E1B-8441-45191C28522E_zpsl1z0cunm.jpg.html" target="_blank"><img src="http://i1287.photobucket.com/albums/a639/wyanrard/4runner%20build%20thread/99A036F7-6BFD-4E1B-8441-45191C28522E_zpsl1z0cunm.jpg" border="0" alt=" photo 99A036F7-6BFD-4E1B-8441-45191C28522E_zpsl1z0cunm.jpg"/></a>


I'll update more on the install on my build thread later today or tomorrow.
Y'all have a good weekend. :thumb3:
 
FULL SYNTHETIC OIL CHANGE
FILLED WIPER FLUID
WASHED AND VACUUMED
STAIN REMOVED FLOOR MATS
REMOVED PLASTI DIP FROM FRONT AND REAR GRILL SO I CAN REDO IT(WD40 WORKED WELL):thumb3:
 
did it make you angry?

Removing the plastdip? yes, lol.. not as fun as you'd think.. I tried just peeling but I guess a few seasons of 120degree weather baked it on. So I looked up how to get it off easier and saw the wd40. It worked quite well.


now to lay down some fresh coats.:cheer2:
 
Removing the plastdip? yes, lol.. not as fun as you'd think.. I tried just peeling but I guess a few seasons of 120degree weather baked it on. So I looked up how to get it off easier and saw the wd40. It worked quite well.


now to lay down some fresh coats.:cheer2:

lol i was commenting on the all caps

plasti dip is awful to get off, a pressure washer does ok though
 
lol i was commenting on the all caps

plasti dip is awful to get off, a pressure washer does ok though

oh, lol. I am required to do everything in caps at my job and sometimes I forget to take it off . I know a lot of people are anal retentive about that around here.

I tried the pressure washer, even after soaking with wd40 and it didn't take a spec off. Had to use the wd40 and plastic card to scrape it off.

 
oh, lol. I am required to do everything in caps at my job and sometimes I forget to take it off . I know a lot of people are anal retentive about that around here.

I tried the pressure washer, even after soaking with wd40 and it didn't take a spec off. Had to use the wd40 and plastic card to scrape it off.

i don't care about caps, i just wanna know why someones yelling at all of us haha.
 
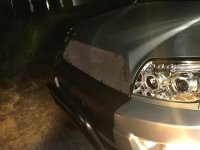
Almost done with the new grill. It was exciting at first....until day 5 came and the frustration kicked in while trying to make it fit...a coat of black paint is next
 

Attachments

  • image.jpg
    image.jpg
    135.5 KB · Views: 453
The resluts w/ the camburgs if anyones curious.

This might be half OCD (or a six pack down), and half being an alignment tech before the "laser" alignment days, but I'd much rather see a uniform alignment side to side. Toe, Caster, and Camber should all the same side to side. When I did things the "correct" way, at least toe was 1/8" in on both sides, or it wasn't correct. We used a rack with a 1/8" spike to determine where it needed to be and adjusted side to side slowly until it was within spec. Hard to explain, but I'd be annoyed that one side was .1 and the other was .03, There's really no excuse but laziness. I also can't tell you guys how many times I had to redo the alignment because even though I was at 1/8" the steering was crooked.
 
My ICON Stage 1 arrived.....well, it was actually on the truck and I waited 1.5hrs at the FEDEX Ground Warehouse until the truck returned from doing it's deliveries and he unloaded them for me right outside the gate. I had missed delivery 3 times and had scheduled some time this weekend to knock it out.

I started after my wife went to bed at 930pm and had intended to just pop off the bottoms of the rear X-REAS shocks and jack up the front tonight; however, I ended up completely pulling the front shocks/coils. Tomorrow all I have to do is install the front coils and finish the rear. The instructions said to pop a tie-rod, but I just completely removed the sway bar in order to get it out of the way.

I have to tell you....those ICONs are pretty!!!

Anyone needs some properly removed X-REAS shocks with about 20-30k on them? :)
 
oh, lol. I am required to do everything in caps at my job and sometimes I forget to take it off . I know a lot of people are anal retentive about that around here.

I tried the pressure washer, even after soaking with wd40 and it didn't take a spec off. Had to use the wd40 and plastic card to scrape it off.

Next time you have to do it, try 3M adhesive remover. Works like magic..just wipes right off.
 
I spent 6 hours detailing it yesterday. Inside, outside, engine bay. The full treatment: wash, clay bar, polish, and wax. It was desperately needing a detail after only getting machine washes for the last three years since moving to Chicago.

oTZc6CJ.jpg


37wwxsr.jpg
 
Took the new puppy for his first truck ride (his big sister, too, of course)

7ee3f0350d46a8276eb63713ac260219.jpg
Gave it a nice wash inside and out (long over due).
 

Members online

Forum statistics

Threads
278,316
Messages
3,554,113
Members
248,016
Latest member
Advally Service

Trending content

Back
Top