What did you do with your 4runner today?

Not half bad!
yqety2yd.jpg

I'm thinking of doing the same thing. I have black, white, red and clear. Don't know what color I should use
 
I cranked the driver's seat up as far as it would go and took a peek at the welds...

Right side:


Left side:


:censored:

As you can see, the left side weld is completely broken. If I had the money right now, I would just swap in leather power seats, but since that's not an option right now, I guess I am taking my driver's seat out and getting that left side welded back together. Hopefully the repair holds out until I can fund the leather swap, maybe next year.

I spent the last few days reading through all the frustrating driver's seat threads on here, YotaTech, and Toyota120. If I had seen all of those earlier, I may have looked harder for a Limited. :doh:

Both pictures were taken looking up at the corners of the seat from the rear floor. I raised the seat height all the way using the handle, then pulled back the carpeted flap that protects the mechanisms from people's feet in the rear.

I discovered the broken weld right away by shaking the seat while looking underneath. The weld point is at the end of the round bar that supports the rear half of the seat. That bar attaches to the mechanism that pivots up or down when the seat height lever is adjusted. I'm willing to bet that the left side is more likely to break because of the stress on that side of the seat when entering/exiting the vehicle. I guess it wasn't designed for us fat Americans. :doh:
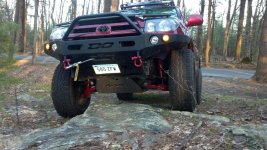
Mine does the exact same thing.

I took the seat out and my weld was broken too. So I fired up the welder and re-welded it. Result= no more shaky seat. It feels much more sturdy.
(figured I'd follow up in this thread as well. I linked to the write-up a few posts ago)
/B]


[/B]


Video evidence:

Before

After

 
Last weekend (I know its a little late) added a 1/2" body lift... (thanks emelianenkov!). I am hoping the extra 1/2" on top of the Daystar 2.5/1.5" spacer kit will allow 275/70R17's to clear with little to no rubbing.


This weekend, blacked out the headlights.


Also locked down a sweet deal on a brush guard off CL...my dad is going to pick it up this afternoon since I am 5 hours away.
 
Saturday was mostly dedicated to getting the 4runner further sitting right. Everything went perfect besides me forgetting the spacers when we put the wheels and tires back on. I had to wait for my friend to bring them to me so we could move it. Other than that it drives like a dream and has zero pull and I cant produce any rub under flex. I was considering painting the wheels black but I'm having other thoughts. I think I may go with gun metal or just clean them up and leave them as is. Let me know what you guys think. Sorry some of the pictures a garbage, the glass lens cover for my camera phone is cracked. More updates soon.


554767_1876589561631_1585330725_n.jpg~original

313701_1876589241623_383069663_n.jpg~original

388164_1876679323875_1114711764_n.jpg~original

20130420_183704_zps1ec12295.jpg~original

388089_1876589001617_1081532612_n.jpg~original
 
Maplight Mod

Did the maplight mod and I really like having the extra lighting up front. Using JA’s instructions worked great but I opted for a variation with the switch but running power to the dome light because I do not have a sunroof and I didn’t want to take the whole dash apart again. Like most I do not use the sunglass holder for sunglasses but I keep my garage door opener, rear light remote, and sat remote in there so I figured I would add my switch there too. I was quickly reminded that plastic gets brittle over time and ended up busting the 2 flanges that hold the top part to the trim part, the gear for slowing the opening of the compartment, twisting a metal clip, and breaking 1 of the plastic clip holders off in the process. After using a few choice words, I did the mod on the unit, drilled a hole for the wires to the switch, mounted the switch, fished a wire from the middle dome light, did all my connections, tested it, and everything worked. Just an FYI, the middle dome light uses a 3 wire ribbon cable that that is white and you will need to separate out the middle wire as that is the one used in this mod. Now to fixing everything that I broke. I super glued the 2 flanges and the gear piece with multiple applications and letting it all set in a 48 hour period so the thing is now stronger than it was originally and functions perfectly. I did not want to clip it back in place because who knows, I may need to get back in there and don’t want to deal with the clips so I measured everything and drilled 2 holes through the top of the compartment into the metal supports of the roof, used 2 black screws and done. When open, screws are not noticeable and everything functions just like it did and I don’t have to worry about the metal clips being loose or not able to access the area in the future.
 
Painted the other side to match but didnt pull the spring and shock out because im lazy today. I have 1 red and 1 black coil and uca but at least I painted all the stuf you can see at the same time. Something had been wrong with the shock I broke for a long time because changing it tightened everything up a lot. Had to get some poser shots.
mohegan park 2.jpg
 

Attachments

  • mohegan park 2.jpg
    mohegan park 2.jpg
    148 KB · Views: 506
Received my reverse lights LEDs from whitebeauty within two days of ordering and took about 2 minutes to install
 
Reset the zero points? This done by disconnecting the battery?

-Daniel Kent

search the forum for "zero points calibration" and you will find multiple threads indicating the steps to take to do the procedure. It just takes two jumper wires and a pattern of steps. It takes make 5-10 minutes to do nothing techincal at all just a matter of following the directions. If you have trouble finding info PM me I'll send you a PDF of the steps.

Just a quick question, is there any benefit in having tall skinnies over wider tires, or vice versa?

Its a controversial topic. The idea of running tall skinnies puts all the weight of the vehicle on a smaller contact patch insurring max traction out of the tire. where as a wide tire spreads the weight load over a wider area.

However, A wide tire will travel over more narrow rocks without sliding off where as a tall skinny tire may slide off the rock or have to traverse around it.

I've seen both options on the same trails and can only determine one thing. Offroad tires are offroad tires they all work and function awesome. I personally prefer the wider tires.

Also in mud situations a tall skinny tires typically digs to the bottom and finds traction compared to a wider tire is going to float more in mud and require lots of wheel speed to either keep momentum or get to a bottom to gain traction.

again in that situation seen them both and they both do there job.
 
Got my steering wheel cover and decided to do some stitching today..very happy with the result

[/QUOTE]


Looks nice. Link? I'm returning the one from Amazon. It had this huge gap at the seam that I just couldn't get past. The fact that my wife didn't like it (too big for her hands) had nothing to do with it ;-)
 
I took the girls to school but when I got there, one of the backpack straps had got caught up in the rear hatch latch. I tugged on the handle and it would give a tiny bit then you could hear the closing mechanism work to shut everything tight again. Tried pulling the backpack to no avail. Finally emptied it and sent her own her way realizing I might have to take the inside panel off to fix this.

Did some searching on this site and although there was quite a number of posts about this, I never noticed one about something stuck in the latch. I didn't read all of them so might of missed it. Anyway, some posts mentioned pushing at the bottom while pulling on the handle. I tried that but still no luck. I then tried using a padded pry bar on the inside and it gave a bit again but I was unable to pull the strap out. Rolled the window down and pulled on the handle while gently prying some more and that did it. Thank goodness. I like how the closing mechanism works but I see there have been numerous failures so will have to keep a close eye on it in the future as well as making sure everything is out of the way when shutting the hatch.
 
Looks nice. Link? I'm returning the one from Amazon. It had this huge gap at the seam that I just couldn't get past. The fact that my wife didn't like it (too big for her hands) had nothing to do with it ;-)

A buddy of mine order few from eBay...on the tag it says "circle cool" steering wheel cover...maybe search on eBay..it looks small fit at the beginning but once heat apply to it stretches...
 

Members online

No members online now.

Forum statistics

Threads
278,316
Messages
3,554,120
Members
248,016
Latest member
Advally Service

Trending content

Back
Top