What did you do with your 4runner today?

Worked on replacing the serpentine belt/tensioner/idler pulley. Man this is a major job on the V8! Have to pull fan/shroud/PS pump/alternator/cam cover to get the tensioner out. Started Saturday night for 3 hours, Sunday for 4 hours, and just ready to pull alternator today. Took 3 hours just to get fan unbolted and off of the hub.
Yeah, I know most of you with V8s have done this whole job in an hour and a half!

Finished this up, went back together very quickly compared to teardown. The fan removal was biggest PITA, was stuck on the pilot and took much prying to get off. If not for fan it would'nt have taken so much time.
 
Finished "winterising" the truck as best I can.

I had to remove the wheels for the final places, and while they were off I cleaned them entirely and lightly coated with ACF 50

This week I have changed both rear calipers and pads and checked the handbrake adjustment.

The handbrake still isn't great, I can only assume the shoes are 14 years old and hardened, or something.
 
I just ordered the transfer case skid from them around Labor Day and I’m still waiting for the correct one to arrive. Check your shipment carefully to be sure you get the 4th Gen set. They sent me a 5th Gen set. The parts are not marked as to vehicle fitment nor are the boxes. The dimensions are not on their website, and the photos on the website are the exact same for the 4th & 5th Gen t-case skids even though the parts are different sizes. So there is no way to know you got the wrong parts until you try to install them.

Also, the pieces come separately, so I didn’t realize right away that both pieces were wrong, not just the cross piece.

I will add that the driver’s side of the RCI crosspiece is poorly designed. I don’t know what others’ experience has been, but I would give getting the driver’s side crosspiece installed a solid 8.5+ on the PITA scale b/c it’s so tight to the fuel tank skid. Bring your patience and a hammer.

holy shit so you weren't wrong about the driver side bolt! FML! I am going to give it another try another day or just wait for the fuel tank skid to come in and do it together. It looks like the oem fuel tank skid presses up against the cross member piece. Maybe the RCI fuel tank skid doesnt wrap around like that?
 
installed some new Diode Dynamic SS3 driving spot pods. my 30" bar won't fit in the Lil B bumper. im working on selling that (if you are interested in central tx let me know) but i am moving to these for now. I think i'll get a 20" bar for the bumper at some point but i wanted to fill out the 4 pod spot


3wYqI1Q.jpg
 
also [MENTION=114846]Bluesky 07[/MENTION] was one bolt bigger than the other? passenger side was 14mm and driver side was 13mm...did this happen to you?
 
holy shit so you weren't wrong about the driver side bolt! FML! I am going to give it another try another day or just wait for the fuel tank skid to come in and do it together. It looks like the oem fuel tank skid presses up against the cross member piece. Maybe the RCI fuel tank skid doesnt wrap around like that?

Yes, the driver’s side of the crosspiece should be L-shaped at the top to fit with the factory fuel tank skid. I hope it’s better with their version.

I think the bolts were the same size.
 
Just did the steering wheel bluetooth mod on my 08 urban runner hopefully tomorrow will be warmer so i can get started on the new raptor grill.
 
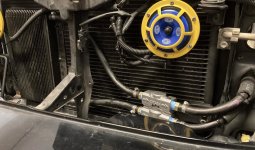
I swapped out my tru-cool tranny cooler for a B&M cooler and added a Derale thermo valve bypass. I was running at 110*F on cold days. It will be 6 months before I can really test it pulling my boat.

The valve is mounted by a single screw on the AC line bracket with loctite
 

Attachments

  • 3EF1C9F5-6496-477C-96AF-4CC0D7894862.jpg
    3EF1C9F5-6496-477C-96AF-4CC0D7894862.jpg
    142.2 KB · Views: 421
Last edited:
Went to Hollister Hills yesterday. Did some rock-crawling for the first time now that I have skids and sliders. They definitely came in handy. I wish I took some pics of the crawling though but my spotter/photographer was to busy keeping me from messing up my truck.

tSgqKP1.jpg

D6b0gWr.jpg

jbqdGOX.jpg

rqEkTZ7.jpg
 
Yes, the driver’s side of the crosspiece should be L-shaped at the top to fit with the factory fuel tank skid. I hope it’s better with their version.

I think the bolts were the same size.
Will let you know how it goes with their fuel tank skid. I was checking out rci pics on their website and it looks like the rci fuel tank skid fits better with their transfer skid plate than with oem fuel tank. I don't think there is anything to press up against that crossmember bolt.

Sent from my SM-T220 using Tapatalk
 
Great question, and yes. Learned all this the hard way. :doh:

The bolt hole on the end of the crosspiece is centered on the 5th Gen, as shown here. On the 4th Gen part, it's offset to the rear.

U4xIW2s.jpg


For the skid plate itself, I could do a side-by-side since the 4th Gen part arrived today. These are standing on their sides so the measurements are front edge to rear edge. The 4th Gen plate is several inches longer and comes with a hardware bag containing spacers that are used the ensure it clears the exhaust. (Note: I should have had both arrows pointing to the right since the front edge of both pieces is on the left. I regret any confusion.)

Nth3am1.jpg


Installation tips:

1. Get out your floor jack if your have one and use it to hold the parts up while you bolt them on. No jack? Block them up with wood or have a helper. These suckers are heavy.

2. The passenger side frame bolt replaces the lower factory bolt for the exhaust hanger, so that hole is relatively clean. But the driver's side bolt hole is unused from the factory so it's likely got rust, dirt, and whatever else in it. If I was doing this over again, I would use compressed air to blow out the driver's side bolt hole then either spray some Fluid Film in there or put some anti-seize on the bolt - something to get the bolt in there a little easier. I ended up cranking it a quarter-turn or so at a time (tough to get a wrench in there) using so much force I was worried about breaking off the bolt.

Oof, I think RCI may have sent me the correct crossbrace (bolt hole is offset) but the actual guard is incorrect. I did have to specify that mine is a V8 so not sure how much that makes a difference. It is 17.5", which, judging by your pics, that it's for a 5th gen. However, the tag for the bolts look different than yours. Guess I'll try installing it this weekend and we'll see.

0XUIFT5.jpg

QmUbRJC.jpg

hkqlw6h.jpg
 
Oof, I think RCI may have sent me the correct crossbrace (bolt hole is offset) but the actual guard is incorrect. I did have to specify that mine is a V8 so not sure how much that makes a difference. It is 17.5", which, judging by your pics, that it's for a 5th gen. However, the tag for the bolts look different than yours. Guess I'll try installing it this weekend and we'll see.

Crosspiece looks right but the length & lack of u-shaped metal spacers with the bolts are a concern unless the V8 is very different underneath.
 
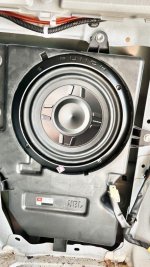
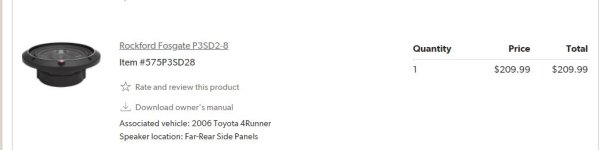
Replaced blown oem sub with aftermarket sub:

- Ordered me a new sub from crutchfield for $210 (pandemic pricing) that fits right into the oem enclosure.
- No cutting was required to the enclosure.
- Modification required: drill new holes for new sub (or use self drilling screws) & splicing wires (super easy).

Used the following two videos for instructions:
-First video is great for overall instructions to get to the sub.
-Second video is good for wiring part.

2003 - 2009 Toyota 4Runner OEM Subwoofer Install / Replacement - YouTube

4th Gen Toyota 4Runner JBL subwoofer replacement- the easy way. - YouTube
 

Attachments

  • IMG_3165.jpg
    IMG_3165.jpg
    71.1 KB · Views: 440
  • Capture.JPG
    Capture.JPG
    27.4 KB · Views: 446
Had driven 1500 miles or so after my top end rebuild (headgaskets, timing system, oil pump) and had occasionally smelled burning oil. Dug in and found that my passenger valve cover was leaking *bad* and that I was around a quart of oil low.

DlwOUvVl.jpg


Took it back to the shop that I'd just spent $6k at and they said that when the valve cover came off it was warped. I'm not sure how this would've happened besides them prying on it too hard and screwing it up. They wanted to charge me $390 in parts for the job (had to order new VCs), but said they wouldn't charge labor....I took the car back and ordered a used valve cover for $50 that I'll be installing this weekend. Pretty frustrated that they clearly knew about the issue when giving it back to me (see: all that gasket maker at the back of the cover) and just let it ride.
 
Last edited:
Replaced blown oem sub with aftermarket sub:

- Ordered me a new sub from crutchfield for $210 (pandemic pricing) that fits right into the oem enclosure.
- No cutting was required to the enclosure.
- Modification required: drill new holes for new sub (or use self drilling screws) & splicing wires (super easy).

Used the following two videos for instructions:
-First video is great for overall instructions to get to the sub.
-Second video is good for wiring part.

2003 - 2009 Toyota 4Runner OEM Subwoofer Install / Replacement - YouTube

4th Gen Toyota 4Runner JBL subwoofer replacement- the easy way. - YouTube


Was looking at this on Crutchfield the other night also. Curious what you think of the results/sound? Is it a pretty noticeable change?
 
Drove it in the snow for the first time! The General Grabber A/Ts seem A+ so far in the snow. It was only an inch of snow but I honestly couldn't break traction accelerating or braking in my short drive to the gym.
 
Drove it in the snow for the first time! The General Grabber A/Ts seem A+ so far in the snow. It was only an inch of snow but I honestly couldn't break traction accelerating or braking in my short drive to the gym.
Loved my Grabbers in the snow when I had em. But trust me, they'll break traction if you try :D
 

Members online

Forum statistics

Threads
278,316
Messages
3,554,120
Members
248,016
Latest member
Advally Service

Trending content

Back
Top