Bogrun
New member
URD Y-Pipe and Gibson Stainless Exhaust
I did a complete overhaul on my exhaust this weekend. It turned out that my tail pipe rotting off was really the least of my worries. The stock Y-pipe on our trucks is a two piece design and they meet right before they join to the head pipe. Well that connection was completely shot, and not only that, but the connection from the Y-pipe to the head pipe was also completely shot. I quickly realized my problem would not be solved with just a muffler and tail pipe and I would need from the Y-pipe back.
So, I bought a URD Y-pipe and bought some new O2 sensors because there was no way I was spending the time to remove the likely stock sensors.
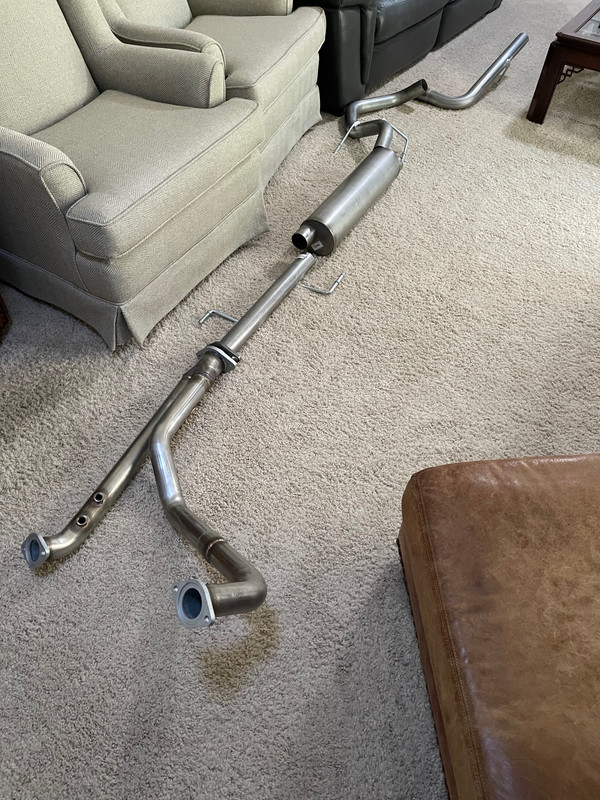
To make everything bolt-in I went with a Gibson exhaust since it included the headpipe, muffler, and tailpipe and it was on sale for the 4th. I just had to pick up a donut gasket for the Y-pipe>headpipe connection and some M10-1.25 nuts for the header studs and I was ready to install.
The week prior I had been dousing the studs and nuts on the old Y-pipe in penetrating fluid to hopefully make them come off without too much effort. Surprisingly, they all were in relatively decent condition which is why I even felt confident buying all this hardware in the first place. They still needed some persuasion from the torch but they came off in one piece and no drilling ray2:. The rotted connection on the old Y-pipe actually completely gave out with the impact driver hits while removing the nuts which actually made the removal a bit easier. The only modification I had to do was bash the hanger on the driver sider cat with a hammer so it would fit through the frame. No cutting needed. With the old exhaust out I could fully assess the damage;
2 leaks coming from Header>Y-Pipe connection. Gasket decimated both sides.
1 Leak from Y-Pipe>Y-Pipe connection. Flange rotted, gasket decimated.
1 Leak from Y-Pipe>Headpipe. Donut gasket nonexistent
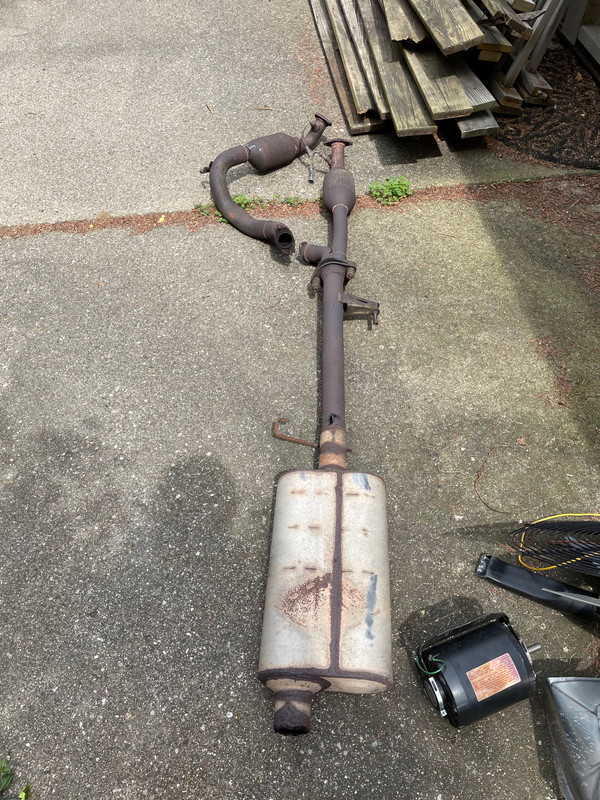
4 Leaks (Holes, rot) in down pipe to muffler.
------------------------
8 reasons my exhaust sounded like someone blowing a raspberry :doh:
The URD Y-Pipe went in super easy and so did the Gibson exhaust. It's a bit fiddly installing any exhaust just keeping everything loose enough to get it aligned and everything but it only took maybe an hour of adjusting to get it right. I kept the tailpipe off at first to paint it black so I did the first start while it was just an axle dump. I was not expecting it to sound so rowdy, it absolutely screamed! What better way to let the neighbors know you have a new exhaust, right?
Once the tailpipe was painted and installed I took it for a drive and it's insane what a difference it made. The strangest part is both how much quieter it is inside the cab and how much louder it is outside and especially behind the truck. The Gibson muffler is really tame and drivable when you're in gear and at speed but has that typical deep guttural work truck sound when you get on it. Especially when making a turn or just from a stop it really makes some noise. But once you're cruising, it just amazes me how much quieter it is than what I've been dealing with before. I really had nothing to compare it to so I just thought the 4Runner had a super loud engine because that's really the only thing that seemed like it made noise before. Now I hardly hear the engine at all, all the sound is coming out the back.
I love the sound though. I was planning on swapping out the Gibson muffler for the Flowmaster Super 10 and Aero Resonator I bought but I don't think I need it anymore aggressive. The Gibson is nice and refined and makes the 4Runner sound like a real truck now. I can't return the Super 10 or Aero Resonator because I painted them so if anyone wants them, send me a message and we'll work something out. I don't want them just sitting around.
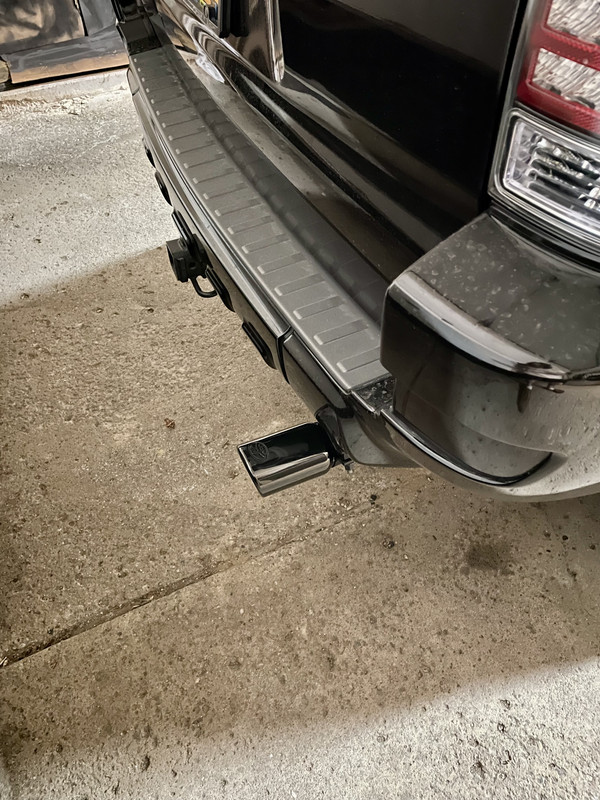
I'm going to fabricate a side exit for my tailpipe using some of the extra tubing Gibson sent me so when I do that I'll take some more detailed photos of the installed hardware. Right now my exhaust tips sticks out like 1-2" too far so that's my motivation to get that finished.
To end off, I'm also waiting on a MAF recalibration chip from URD tuned for my aFe intake and exhaust so I can reap the full benefits and performance of my new parts.
I'm hoping for a decent increase in fuel efficiency too as it should lean out the fuel mixture with the added air the intake is bringing in.
While it was more expensive and involved than I was hoping... I have to say this is worthy of being in my top 5 favorite mods I've done to my 4Runner simply because of how much of an improvement was actually made. I'll post more photos when I install the URD MAF cal but you can at least see the old vs the new and how the exhaust tip currently sits (not horrible but meh)
I did a complete overhaul on my exhaust this weekend. It turned out that my tail pipe rotting off was really the least of my worries. The stock Y-pipe on our trucks is a two piece design and they meet right before they join to the head pipe. Well that connection was completely shot, and not only that, but the connection from the Y-pipe to the head pipe was also completely shot. I quickly realized my problem would not be solved with just a muffler and tail pipe and I would need from the Y-pipe back.
So, I bought a URD Y-pipe
and bought some new O2 sensors because there was no way I was spending the time to remove the likely stock sensors.To make everything bolt-in I went with a Gibson exhaust since it included the headpipe, muffler, and tailpipe and it was on sale for the 4th. I just had to pick up a donut gasket for the Y-pipe>headpipe connection and some M10-1.25 nuts for the header studs and I was ready to install.
The week prior I had been dousing the studs and nuts on the old Y-pipe in penetrating fluid to hopefully make them come off without too much effort. Surprisingly, they all were in relatively decent condition which is why I even felt confident buying all this hardware in the first place. They still needed some persuasion from the torch but they came off in one piece and no drilling
ray2:. The rotted connection on the old Y-pipe actually completely gave out with the impact driver hits while removing the nuts which actually made the removal a bit easier. The only modification I had to do was bash the hanger on the driver sider cat with a hammer so it would fit through the frame. No cutting needed. With the old exhaust out I could fully assess the damage;2 leaks coming from Header>Y-Pipe connection. Gasket decimated both sides.
1 Leak from Y-Pipe>Y-Pipe connection. Flange rotted, gasket decimated.
1 Leak from Y-Pipe>Headpipe. Donut gasket nonexistent
4 Leaks (Holes, rot) in down pipe to muffler.
------------------------
8 reasons my exhaust sounded like someone blowing a raspberry :doh:
The URD Y-Pipe went in super easy and so did the Gibson exhaust. It's a bit fiddly installing any exhaust just keeping everything loose enough to get it aligned and everything but it only took maybe an hour of adjusting to get it right. I kept the tailpipe off at first to paint it black so I did the first start while it was just an axle dump. I was not expecting it to sound so rowdy, it absolutely screamed! What better way to let the neighbors know you have a new exhaust, right?
Once the tailpipe was painted and installed I took it for a drive and it's insane what a difference it made. The strangest part is both how much quieter it is inside the cab and how much louder it is outside and especially behind the truck. The Gibson muffler is really tame and drivable when you're in gear and at speed but has that typical deep guttural work truck sound when you get on it. Especially when making a turn or just from a stop it really makes some noise. But once you're cruising, it just amazes me how much quieter it is than what I've been dealing with before. I really had nothing to compare it to so I just thought the 4Runner had a super loud engine because that's really the only thing that seemed like it made noise before. Now I hardly hear the engine at all, all the sound is coming out the back.
I love the sound though. I was planning on swapping out the Gibson muffler for the Flowmaster Super 10 and Aero Resonator I bought but I don't think I need it anymore aggressive. The Gibson is nice and refined and makes the 4Runner sound like a real truck now. I can't return the Super 10 or Aero Resonator because I painted them so if anyone wants them, send me a message and we'll work something out. I don't want them just sitting around.
I'm going to fabricate a side exit for my tailpipe using some of the extra tubing Gibson sent me so when I do that I'll take some more detailed photos of the installed hardware. Right now my exhaust tips sticks out like 1-2" too far so that's my motivation to get that finished.
To end off, I'm also waiting on a MAF recalibration chip from URD tuned for my aFe intake and exhaust so I can reap the full benefits and performance of my new parts.
I'm hoping for a decent increase in fuel efficiency too as it should lean out the fuel mixture with the added air the intake is bringing in.
While it was more expensive and involved than I was hoping... I have to say this is worthy of being in my top 5 favorite mods I've done to my 4Runner simply because of how much of an improvement was actually made. I'll post more photos when I install the URD MAF cal but you can at least see the old vs the new and how the exhaust tip currently sits (not horrible but meh)