What did you do with your classic T4R today?

Got the e-locker installed

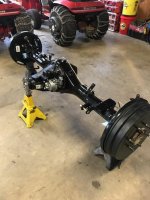
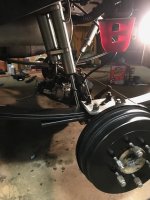
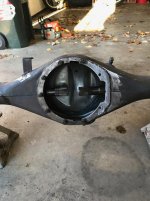
I finally got my new axle under the truck! Brand new 4.88 e-locker from marlin w/ 2nd gen 4Runner axles. The old axle had a Detroit Locker in it which was great off road but terrible on the street, so this selectable should be the best of both worlds! I still have to wire it though.
 

Attachments

  • IMG_0482.jpg
    IMG_0482.jpg
    133.7 KB · Views: 284
  • IMG_0507.jpg
    IMG_0507.jpg
    130.9 KB · Views: 285
  • IMG_0520.jpg
    IMG_0520.jpg
    128.2 KB · Views: 281
  • IMG_0524.jpg
    IMG_0524.jpg
    123.9 KB · Views: 271
Killed Code 52

Not today, but a few weeks ago I was finally able to kill code 52, hopefully for good. Gas mileage is up significantly and hard restarts gone.

2dvkkzU
 
Last edited:
I just got a 95 5 speed last week. Pulled the trigger (begrudgingly) today on a Transmission rebuild. I guess the fun stuff has to wait.
 
I finally got my new axle under the truck! Brand new 4.88 e-locker from marlin w/ 2nd gen 4Runner axles. The old axle had a Detroit Locker in it which was great off road but terrible on the street, so this selectable should be the best of both worlds! I still have to wire it though.

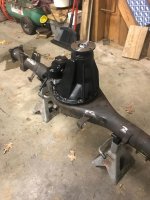
Nice! I did my sons 92 4runner last year. I have a detroit in mine and like you said its tough on the road. The Elocker was the perfect alternative. Looks like you built up the mounting area. Nice job, enjoy
 
Added to my offroad supply list:

22,000 lb snatch block
1 upper ball joint
1 lower ball joint
1 inner tie rod
1 outer tie rod
1 CV axle
1 front brake hose
1 rear brake hose
1 radiator hose (which doubles as either top or bottom for mine)

About $210 well spent for peace of mind on the trail. And I got higher end quality parts so when I do a maintaince change at some point I'll only have to buy the other half and keep one each of the best on hand for a trail repair.
 
Recently Installed:
Custom sliders -- will upload pictures soon they came out pretty sweet IMO (but I paid for them too haha)

On Hand-
New OME Tbars
poly bushings for all the things (full energy suspension kit)
Upper and lower ball joints -- Three-Five from Japan luckily found/purchased at my local NAPA

In the mail:
New OEM Rotors
OEM paper gaskets for hubs (if needed)
two new OEM bolt/nut setups for the tbars (mine are not loosening up easily so I figured I'd have them on hand)
OEM caliper rebuild kit
Brake fluid and grease for the wheel bearings/hubs

Need to purchase:
New pads, any non-oem recomendations? Was going with the semi-metallic and was thinking of just getting these from Marlin
Brake Pads Late Style | Marlin Crawler, Inc.

anyone have thoughts on them or other brake pads? I'm open to options I've used hawk and EBC before both with good results

Not mentioned, multiple days cleaning out my dad's 25x50 shop to get this thing in there for a long weekend of wrenching soon.

Sliders:
KqzBhPa.jpg


OMyyji1.jpg


EB773Je.jpg
 
Last edited:
Installed a 2nd gen tire carrier on my ‘92. Managed to install it mostly by myself, with the only help coming from my wife when it came time to align the tire for the holes while I supported it.

Made a bracket to help carry the load inside the quarter panel.

72771d0fc1a43dd3575939a728de285a.jpg
8f3fe6be2de654b75e5d64a8059e33d4.jpg
2a694860b2817cc378c823286474f39b.jpg


Sent from my iPhone using Tapatalk
 
Out of storage

Took my '90 T4R off the storage lot where it's been for 6 years while I was in Switzerland. Tires needed replacing and it was covered in moss, but runs. And no mouse nests in it!

mm
 

Attachments

  • tiny_IMG_7026.jpg
    tiny_IMG_7026.jpg
    145.1 KB · Views: 399
not today...... but maybe later today...... i changed out my water pump after doing an engine swap (dont ask why i didnt do it before putting the new motor in) and now that its back together i have to change the timing belt and tensioner out because its slipping out slightly due to there being slack in the belt..... 3rd time taking it apart not to mention having to take the intake manifold off to find a hissing which i am sure is coming from a vacuum leak but cant seem to find out where.
 
Spend on..

Some brand new 31's BFG tires All terrain. 600$ for all $. Now I Just need to buy Ball joints Install tires and its ready for some roads. 1992 4runner
 
Rattle

I tried once again to troubleshoot the mystery rattle in the front end - today's order was installing new cv axles to see if the radial play was causing the noise...alas, no. Owning an old vehicle is a lesson in patience! Luckily wine helps :wink2:
 
I tried once again to troubleshoot the mystery rattle in the front end - today's order was installing new cv axles to see if the radial play was causing the noise...alas, no. Owning an old vehicle is a lesson in patience! Luckily wine helps :wink2:


Is it the metallic/tin-sounding rattle when on wash board roads? I've narrowed it down to a thing called the "spindle bushing". Google it. It's a brass bushing that supports the outer shaft of the CV axle I believe. I still haven't gotten around to mine and it's been making the noise since at least 2006. Since that time I've chased the noise and replaced all front bearings and races, cv's, inner/ outer tie rods, upper/lower ball joints, sway bar bushings and links, added a dual steering stabilizer, changed all control bushings to Poly urethane... And the noise remains.

If you lay under the truck, move the outer CV boot/body inboard/outboard as well as up and down in relation to the whole spindle/rotor/bearing/hub. You'll see the play caused by that $20 bushing.

Hard part is the whole spindle and hub has to be torn down to the bones to replace. If you ever tackle it, please update with pictures.
 
I tried once again to troubleshoot the mystery rattle in the front end - today's order was installing new cv axles to see if the radial play was causing the noise...alas, no. Owning an old vehicle is a lesson in patience! Luckily wine helps :wink2:

Did you check the idler arm, I've been thru several. Makes a creaking sound, or mine did. Good luck, you'll find it.
 
Updoot with pictures

Completed work:
New upper and lower ball joints, new energy suspension upper and lower control arm poly bushings, new OME torsion bars with new hardware, new rotors, new pads, full system brake bleed, and and outer hub bearing repack.

It was my first time doing pretty much all of this. I had an FSM and I can't stress enough to read every word, I had to take things back apart multiple times (not a huge issue and I took my time) but it could have been avoided.

Second, be gentle with threads...

Torque arm stud on one end got boiked, this was me with an impact not un-pinching the nuts.

p5ykYNz.jpg


Nut:
BA9cx0u.jpg


If anyone needs the size M18x1.5
6QNmAAZ.jpg


All new threads the entire way down, new OEM nut spun right on. Job complete
iq2BYzI.jpg


pretty much assembled minus tbar and caliper
NhU9uIF.jpg


Completed, getting aligned tomorrow and letting it settle for final height adjustment.
HYfUqqs.jpg


Took about 4 days and I could probably do it in 2 knowing what I was doing now. FSM and grease for poly bushings are your friends....
 
Last edited:
[MENTION=166993]COMTB[/MENTION] how was it for you putting in those upper arm bushings? I did mine years ago and it was a pain even with a full shop at my disposal. Had to press one way, then the other. Then think I had to chisel and cut out the rubber from the sleeves as the sleeves needed to be used with the new bushings! Was this your experience?

The rears were much easier with the right tools. My suspension feels pretty darn tight so I always recommend this to others. Good job rebuilding the entire front. Should be good for a long ass time
 
[MENTION=166993]COMTB[/MENTION] how was it for you putting in those upper arm bushings? I did mine years ago and it was a pain even with a full shop at my disposal. Had to press one way, then the other. Then think I had to chisel and cut out the rubber from the sleeves as the sleeves needed to be used with the new bushings! Was this your experience?

The rears were much easier with the right tools. My suspension feels pretty darn tight so I always recommend this to others. Good job rebuilding the entire front. Should be good for a long ass time

Putting in the bushings was fairly simple. The process of melting the old bushings out was a PITA for me.

I was able to pretty much press them in by hand until it hit the taper then a combination of sockets and the spacer/nut that goes on the torque arm got them on there the rest of the way. Using insane amounts of grease on the poly bushings was key, I had it coming out of everywhere when I was pushing them in but so far there's no squeaks. We'll see when I start getting them wet/dirty.

Good to hear about the rears, I have the full poly bushing kit but needed to get it aligned so started with the CA's (and I figured they were the worst to do).

It's going in for an alignment this morning and I spoke with them about what I did recently so they are going to shake down the entire front end and go over everything I did since it was my first time working on an IFS truck.


Unrelated but possibly good info -- I did a lot of reading regarding bleeding the prop valve as part of my full system bleed etc. I chose not too, mainly because my rears never had air in them, the master keeps them separate from the fronts so when I pulled the front calipers it just drained the front portion of the master and I made sure to not touch the rears. So I filled it up with fluid and just hit each bleed screw starting farthest away from the master and it bled just fine with my dad pumping the brake pedal. I need more fluid to get more of the old out but now that I know how to do this that will be pretty straightforward. Brakes are 100 times better than they were with the old black fluid in there (I guess new rotors and ceramic pads help too)

Sorry I ramble.....

Happy Friday everyone!
 
Last edited:
Good thing I read [MENTION=166993]COMTB[/MENTION]'s post. Happened to be looking over my bushing install from over 10 years ago...

Passenger side rear bushing nut has worked itself back all the way to the torsion bar!

Passenger side
e04454f7935ac762bb34b9117c37ef99.jpg


It should look like this without the gaps, driver side
833a49ee2feb32d8b0d202c5a75a07d1.jpg


Means I'm dropping the torsion bar tonight and hopefully just tightening up the nut to re-seat the bushing. I have no idea how long it's been like this... Maybe I didn't stake the lock but good enough. Still held up for a decade
 
My new to me 88' had a roached W56. While tearing into it, everything was roached, so I've been replacing and cleaning everything. While I was under it I figured might as well throw in a double and triple shifters lol.

I feel like an old man. In the past I would of had this $hit done in two days. Now I'm replacing every seal, boot, clip and scrubbing every bolt till its clean. :ybrick:

Maybe I should start a build thread...

Vufxyt7h.jpg


ULnkqLXh.jpg


x4HEYIIh.jpg


Only the best :ybrick:
h0xuOi4h.jpg


Makeshift parts washer.
bJZRmVih.jpg
 
That's what makes it fun haha. When I was a kid I wanted it back together and working correctly. Now I want it back together, as good as OEM or better, so I don't have to do it again for awhile.

I need to post up my before/after alignment pictures. It was rough but dude got it done which I was very happy for. No more crazy bump steer etc. Drove it 250ish miles to and from the mountains (in some snow over passes) and it drove great. Brand new truck, minus the coolant leak that MAY be coming from the WP i replaced (with a new OEM unit)....
 

Members online

No members online now.

Forum statistics

Threads
278,316
Messages
3,554,121
Members
248,016
Latest member
Advally Service

Trending content

Back
Top