Willbgood Build Thread

Good for you giving that 4Runner a second chance. I cannot believe people who let their vehicle be that filthy, it's pretty scary.

Willbfollowing this build.:thumb:

Not to mention that they drove there yearling child around in that filth...
 
Day 11

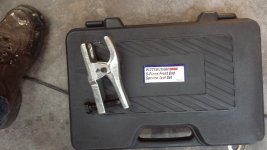
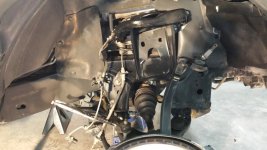
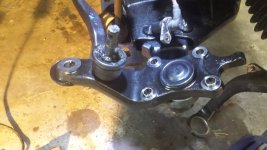
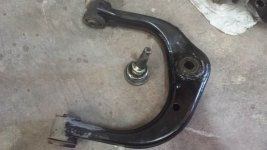
Frustrating day. I had an upper ball joint that simply did not want to come out. Heated it beat it, bought a Pittsburgh puller set form Harbor freight, heated and beat it some more and finally after hours of using every trick I know, it came free.


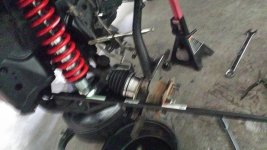
I was using a the ball joint puller in the photos and it lets loose with explosive force and puller hit my hand. I had safety gloves on, but it still hurt, and it left a mark.

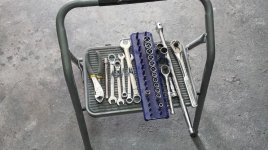
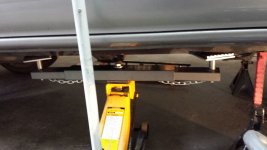
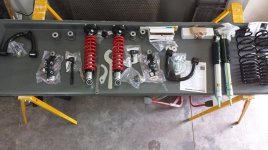
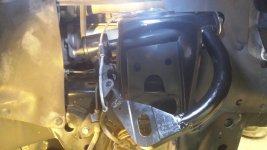
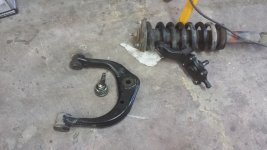
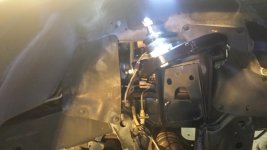
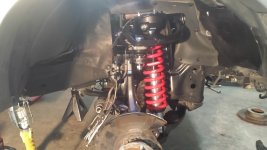
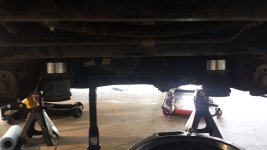
Tomorrow is another day. Here are some phots of my set up and the guilty puller.

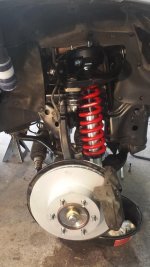
All the parts are laid out left and right side. (Who can catch the mistake?) One of these days I am going to get the 30 feet or so of salvage countertop mounted on the walls with supporting legs for my vise and anvil.

The truck is supported both on my beam jack and multiple stands. Safety is paramount, if you expect to go wheeling when the job is done.

Safety glasses, safety gloves, are part of the necessary tools.
 

Attachments

  • 20150926_105738.jpg
    20150926_105738.jpg
    66.9 KB · Views: 549
  • 20150926_140042.jpg
    20150926_140042.jpg
    97.2 KB · Views: 535
  • 20150926_105015.jpg
    20150926_105015.jpg
    57.1 KB · Views: 546
  • 20150926_162335.jpg
    20150926_162335.jpg
    83.6 KB · Views: 549
Last edited:
Fight the rust

I have very littles runt on the under carriage. Mostly light surface rust. I will rust mort and then paint those spots. I searched for various DYI methods of protecting it all afterwards, and this is what I think will most meet my south western winter needs for running up to Brianhead to ski.

<a href="http://kellsportproducts.com/fluidfilmkits.html"/a>Fluid Film Undercoating Kit 1 Gallon with Spray Gun, bottles, and everything you need
</a> They also have bigger kits.

Here is the Amazon description:

"Fluid Film® Product Information When the U.S. Navy needed to conquer the costs and delays of battling rust and corrosion inthe ballast tanks of its thousands of combat and support vessels in World War II, an innovative chemist formulated a powerful weapon based on an unlikely ingredient: lanolin (wool wax). The savings were immediate. The costs of chipping, sealing and painting were greatly reduced. The new film penetrated corrosion and rust quickly. Application was simple. Protective action was long lasting and economical. The weapon was Fluid Film®, produced in a variety of easy use forms by Eureka Chemical Company. Operating since 1943 and incorporated in 1953, the company continues as a family-owned business managed by descendants of the founding chemist. From its first seagoing use in the 1940's, Fluid Film® has been proved in some of the most severe conditions: industrial, agricultural, raw-terrain construction - even on the space shuttle. Modified over time to adapt to environmental and application considerations, it's non-toxic, non-hazardous, contains no solvents and is environmentally friendlier. Fluid Film® continues to serve as the most effective corrosion control for industry, agriculture, manufacturing and transportation. Fluid Film - A Rust and Corrosion Preventive for quick and effective corrosion control. For use on marine hardware, battery terminals, electrical connections, tools, brass clips, all metal parts or surfaces exposed to atmosphere or salty spray. No solvents - environmentally friendly. Made in the USA. It takes 1/2 to 3/4 gallon to undercoat a mid size suv. Eureka Fluid Film® is non-hazardous. Fresh inventory shipped direct from Kellsport Products."

Many years ago I met the original development of WD 40, his was a similar story. I have believed if the government would get out of the way, we would see products like this developed everyday, without nearly destroying the world, by war in the process.

Even if I have to do it several times a year, due to washing the undercarriage after salt exposure I think this will be a good investment.

<iframe width="420" height="315" src="https://www.youtube.com/embed/N7EyapjraEg" frameborder="0" allowfullscreen></iframe>
 
Last edited:
Day 12, very early

I am so excited about this project that I just up at 1:30 in the morning and made coffee and started my morning routine.

I have a spinal cord injury, from the service. It makes me get up several times a night for the latrine and to stretch my legs and rub out the cramps in my lower legs and feet. Last night I was hurting so bad I took pain meds and a muscle relaxer and went to bed early.

I get up early on most mornings, and when I did 15 minutes ago, I looked at the clock without turning on the light, so I would not wake my wife. I thought it said 6 O'clock, so I made coffee and went and sat on the porch to drink it.

When I went in to refill my cup I spilt some and turned on the light. When I saw the clock I realized it was 1:40 am and in the dark had I seen 6 am.

Now am coffe'd up, with no place to go...
 
Last edited:
More info on Fluid Film

<iframe width="560" height="315" src="https://www.youtube.com/embed/OQZRmZMhM10" frameborder="0" allowfullscreen></iframe>

<iframe width="560" height="315" src="https://www.youtube.com/embed/ICPiDOyA4T4" frameborder="0" allowfullscreen></iframe>

Its none conductive...HMMM, thinking about for other applications.

I am using this for the winter ski trips. I will post an update in the spring.
 
Last edited:
Day 12, very long, and frustrating

Spent most of the day trying to get the upper passenger side ball joint out. I have never had this much trouble with a ball joint before. It looks Like I am going to have to remove the knuckle and press it out with a standing press.

Hind sight is 20/20. I should have done that yesterday afternoon. I didn't because I did not want to mess with the shaft and bearing,(lazy man move).

Tomorrow is another day...
 
Gota love the toyota FSM

The directions for reinstalling a cv shaft...and a really important hint...

INSTALLATION
Installation is in the reverse order of removal (See page SA-17 ).
HINT:
After installation, fill the differential with differential oil (See page SA-24 ).
 
Last edited:
Day 13

Today I finally got the upper ball joint to let loose, I used a portable ball joint and an impact hammer. Not the way to do it, but my only choice at the moment. I made my wife take shelter in case it exploded and threw pieces everywhere. Sometimes I do things that I would beat my sons for doing...After I got it out, I made up my mind that I will find floor press as soon as I can.

The press is going back to harbor freight. To date it is the first harbor freight tool I have bought that I was completely unhappy with. The tolerances were so far out that nothing fit, increasing the chances of failure under load.

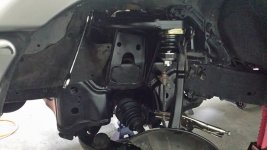
The pictures below show several things. One, I made headway in spite of my clear mistake. Can you see it?

Another mistake I made was not dropping the differential first, it my the job more difficult, as I had to use a pry bar and major force to get the shock attached to the lower. When I got it in and looked, I could see my mistake.

The set is in, but I have to do my propeller shafts before I button up that side. I picked up a set of NAPA new for 76 bucks and set up an account...they deliver daily to my neighbor and now to me.

As well, my land lord is moving me in to a new shop with an expoxy floor and fresh paint, it is slightly larger. She is keeping my rent the same, which is $275, plus 120 for my yard storage with is about the space of three buses. Getting this place during the recession and being faithful and on time has paid off!

When I do the other side, I am thinking of doing a video, (since I have made all my major mistakes, and I post it if I do.
 

Attachments

  • 20150927_101855.jpg
    20150927_101855.jpg
    107.4 KB · Views: 472
  • 20150928_142813.jpg
    20150928_142813.jpg
    104 KB · Views: 471
  • 20150928_142803.jpg
    20150928_142803.jpg
    87.8 KB · Views: 475
  • 20150928_142843.jpg
    20150928_142843.jpg
    123.3 KB · Views: 479
  • 20150928_142850.jpg
    20150928_142850.jpg
    103.7 KB · Views: 479
  • 20150928_145213.jpg
    20150928_145213.jpg
    72.6 KB · Views: 479
  • 20150928_165201.jpg
    20150928_165201.jpg
    91.5 KB · Views: 478
Well deliver my bumpers and we can...

Do the lift and Moab, the Arizona strip,( secret grand canyon route I have) some Colorado, and 5 nationals park in a few weeks... :)

I have great discounts here locally, and all the tools necessary, and a beer fridge...
 
Day 13

I dropped the diff, and installed new shafts today. Then I did a brake job, sans vacuum bleed. I will do a vacuum bleed flush when I get all the brakes done. One side, up front, complete. All bushings, and tie rods replaced and lift installed, roughly aligned. I am waiting for the links to be made and mailed I will do bushing for stabilizer then.

I love the Boss lift so far. There is a bit of a learning curve for my on this third gen, but I am confident I have learned a few tricks and the other side will go faster.

I was pleased to see a very little metal shavings on the diff drain plug, and the oil was fair.

I cleaned the shop and started getting ready for the shop move Thursday. Its going to be nice to have an epoxy floors, a sealed garage door, and new countertops. Not to mention getting everyone else's shit out of my shop. My new rule is you can leave your stuff for a day, but then it gets stored on my storage yard in the weather, that's heat for you easterners...
 

Attachments

  • 20150929_155939.jpg
    20150929_155939.jpg
    69.8 KB · Views: 544
  • 20150929_155953.jpg
    20150929_155953.jpg
    80.1 KB · Views: 562
Last edited:
First off thank you for your service as you mentioned earlier.

Great stuff going on here man!

I don't know if you've just done all the researched you can possibly do or you just know what's good when you see it but you have made a quality lift of modifications and maintenance and are steadily checking them off. Your methodology killer

I appreciate the time your taking in documenting the history your adding to the vehicle, this will be a great selling point for it if you ever decide to. As well as the fact that your helping restore a less-loved 4Runner to its proper state of glory.

Best of luck with your future endeavors wheeling and wrenching, I'll be watching for your updates.
 
SEE MY INSERTS

<P><b>My service was to God, family, country, and Corps. It was, and is my honor. It was my calling and vocation, and I am grateful for it, even though I feel it everyday. Semper Fi </b></P>
First off thank you for your service as you mentioned earlier.

Great stuff going on here man!
<P><b>Thank you very much, encouraging words are always, well encouraging.
</b></P>
I don't know if you've just done all the researched you can possibly do or you just know what's good when you see it but you have made a quality lift of modifications and maintenance and are steadily checking them off. Your methodology killer
<P><b>Part research, part mechanics experience to know what is good quality and what is not. I read here and chased down many vehicles to look at them as well. The final sell was seeing this set up at our local toy dealer when chasing parts for another toy. My parts guy let me go through a set and inspect and that was really my final decision point.

My mechanical background started years ago at home, then in the OR, (yep the OR working on an early stainless steel hip replacement team, orthopedics is about mechanics) as a industrial electrician/mechanic. You kind of get a feel for what is real, and what is quality. I think I have chosen well and time will tell.

Funny what you say about my methodology, I kind of of feel like I have not been as good as I used to be, and of course I would never do body or interior work first, but for the fact that this stunk so bad I did not want it in my shop.</b></P>
I appreciate the time your taking in documenting the history your adding to the vehicle, this will be a great selling point for it if you ever decide to. As well as the fact that your helping restore a less-loved 4Runner to its proper state of glory.
<P><b>I will never sell it, it will be given to one of my children when I find another project I am interested in. the history part is partly so I can remember, and partly help anyone else who is thinking about taking the plunge. When your 58, you get in the mode of wanting to help the next generation. In this case, some of youngster's here, have really encouraged me and also shared from their love of the life, its encouraging.</b></P>
Best of luck with your future endeavors wheeling and wrenching, I'll be watching for your updates.

Thanks again for the encouragement. I will try to live up to it.
 
Last edited:
Day 14

Today went very well, the gains based upon the learning curve on the right side, help me immensely on the left.

Some of the learning curve you simply cannot document as it is happening, you take things off, only to discover it might be better to remove them in a different order, or you bust a knuckle, and like a hot stove you say "shit that hurts, I ain't doing it that way again". Mostly though its order of operations and on the first side I experimented to figure out quicker methods based on the order of operations.

Of course on the first side I had a ball joint from hell. I am sure the sst would have made the process a little easier, but as well I know it still would have fought my like a 500 pound Tuna.

I did come up with a way to remove the upper ball joint today that went relatively quick. First off while dissembling, I took the knuckle completely off, I did this last after everything else was disconnected and removed. I then replaced the propeller shaft. and took the knuckle to my bench.

I then used a standard ball joint puller to remove the upper, but I did it with a twist. Instead of sleeving the bolt end, I removed the driver from the clamp screw mechanism, which leaves a hollow void, placed a round flat base,(the one that has the lagest hole,) over the bolt, and inserted the end of bolt in the hollow end of the driver. The base plate fits over the sleeve of the joint and is very stable, no trying to hold all parts while you begin to tighten the clamp. I then sleeved the other side of the joint and used an impact hammer, set on a low setting, to drive out the joint.

It all took about 20 minutes.

Everything is basically back together, minus the front strut. I will have to install it in the morning and go back over and check all my torque settings ensuring I have it right. I found and printed a copy the torque settings sheet in the third gen information and it is in my ring binder along with the sections of the FSM I need. I have decided that I am going to buy a paper copy of the FSM to carry in one of my seat pocket. For a 132 busk, you can't go wrong...its a steal.

I did make one major mistake yesterday, which I discovered today. The left tie rod is on the right side. Five minute swap, but a possible disaster if I did not catch it.

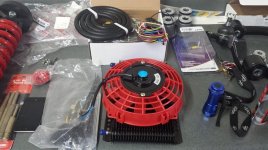
Finally, end of the day, I laid out my transmission cooler fan, and thermostat set up and spent a few moments cogitating how I will install it.

Photos follow.
 

Attachments

  • 20150930_154629.jpg
    20150930_154629.jpg
    99.8 KB · Views: 497
  • 20150930_104128.jpg
    20150930_104128.jpg
    58.7 KB · Views: 526
Last edited:
To do list

  1. Finish the front end lift and rear end lift
  2. Refill the front differential with royal purple.
  3. Vacuum flush, "bleed" the brakes lines
  4. Finish the throttle bottle cleaning, and change filter(I got the necessary parts in today).
  5. Alignment and tires,(the moment of truth, tires, bigfoot from big' O, again a warranty and experience choice).
  6. Inspect the rear differential and change fluid, royal purple again
  7. Change the engine oil, Mobile 1 and Mobile 1 filter.
  8. Grease everything, including doors and electric door gear.
  9. Replace the spark plugs wires
  10. Flush the transmission using a low flow diesel fuel evacuation pump and install Magnafine filter, replace Fluid with Mobil 1 transmission fluid
  11. Mount transmission cooler, thermostat and fan. Figure out a way to mount the sending unit. Remember to mount thermos control on some sort of shock absorption.
  12. Flush the power steering pump, replace fluid with Mobile 2 transmission fluid.
  13. Do an OBD check
  14. Re-upholster front seats.
  15. reinstall interior, (can't decide whether to use old carpet or replace, thinking use the old and mats and then later replace the with new as necessary).
  16. Hmmm, what am I missing...oh year this glass of wine and relaxation time...which be affecting my order of operations.
 
Last edited:
Keep looking around for that FSM. I got mine for $75. I'm pretty sure all of the paper copies are actually counterfeit. I've heard the Toyota version is electronic only. Either way the information is there but on mine at least the binding isn't that great, the pages are crooked and the cover faded very badly. I find I use my haynes manual more often. There's nothing particularly complicated about these trucks, the service manuals are helpful for specs though.
 
Day 15

So, today was a slow day. I started with a doctors appointment, and they always take everything out me. The good news is that the VA has agreed to provide my private doctor with my monthly lab work since my condition is related to my service connected disability. I see a private doctor on my own nickel, because the 600 mile round trip to the VA was out of the question, and the treatment I am getting is one that the VA rarely approves without a fight and a lot of BS...I have no time for BS.

Handling my labs cuts my monthly costs to a third, and that is substantial...sometimes the stars seem to align. Thirty years of fighting the VA system, and finally I am seeing some improvement.

Anyway...

I did install the strut on the drivers side. I was not happy with the appearance and called ToyTec for advice. They are very proactive about giving assistance and advice, I think they are a good company. In fact the tech invited me for a visit, and I will visit next time through there.

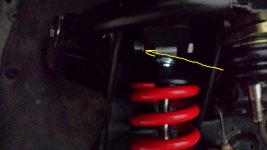
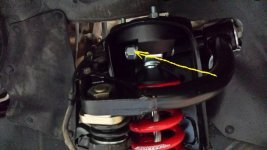
My problem was that the bolt on one side faces forward, and on the other back. I attached photos. I was not sure if I was doing something wrong or not. Apparently it does not matter, but can be either direction. I will swap it so bolt heads face forward.

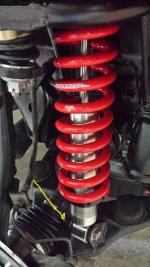
As well I was told the lower bold head should be on the shaft side so that the there is not chance of the bolt contacting the shaft boot. I will change mine tomorrow. I have a pic of that as well.

I also included my method of forcing the lower down to install the strut without help. I think a bolt fid, would come in handy as well and I will have one the next time.
 

Attachments

  • 20151001_131019.jpg
    20151001_131019.jpg
    57.4 KB · Views: 472
  • 20151001_131123.jpg
    20151001_131123.jpg
    96.5 KB · Views: 453
  • 20151001_131104.jpg
    20151001_131104.jpg
    119.4 KB · Views: 451
  • 20151001_131051.jpg
    20151001_131051.jpg
    57.5 KB · Views: 459
Last edited:

Members online

No members online now.

Forum statistics

Threads
278,306
Messages
3,554,045
Members
248,016
Latest member
Advally Service

Trending content

Back
Top