Xtremluck's 2012 SR5 Build Thread

After adding 200+ lbs of equipment to the front end it was time to switch to heavier springs. I was maxed out on preload on the driver side Icon coilover and was still 3/4” under my original lift height (23” hub to fender). So out with the old 13” 650lb springs and in with the 14” 700lb springs. A couple of pro tips from the install:
1. You need a wall mounted spring compressor for this
2. Make sure you disconnect your wheel speed sensor wire before trying to extract the coilovers. I toasted the passenger side cable when I stretched it out

Preload Before:
4f5f5fcc1b632cba7d592e1fc18d2282.jpg


Preload After:
2ae692f4dcf74f5e0cf692ff34e37991.jpg


Restored Ride Height:
4ece06747934391703dc1de7c2d1619f.jpg


Sent from my iPhone using Tapatalk

Any particular reason why you went up an inch for spring?
 
Did a bunch of “upgrades over the last month. First up was new Icon 3” rear springs to support my new rear bumper (Along with 285 Ridge Grapplers)

a1958adef1785ddb931a571e76c680fe.jpg


Stripped the 3rd row and rear bumper waiting to install my CBI dual swing outs

b2cb2c01913b3bbc83cd14dcfa6c7bcc.jpg


The little rear cubby for the 3rd row equipped 4runners make a perfect place to mount my rear fuse block.

72095c5677ea7972115cb5303161534b.jpg


Need to finish my rear bumper install and rear electrical work before Moab in a couple of weeks. Going to be tough!


Sent from my iPhone using Tapatalk
 
Rotopax mounting on roof rack

I am about to order two 3 gallons fuel packs like yours. I just can't find if any of the mounting hardware parts are required, apart from anchors.

Could you tell me how you mounted them on your rack?
What is the use of the universal mounting plate?

Thanks!
 
I am about to order two 3 gallons fuel packs like yours. I just can't find if any of the mounting hardware parts are required, apart from anchors.

Could you tell me how you mounted them on your rack?
What is the use of the universal mounting plate?

Thanks!

Hi Jean,

So the (2) 3.5 Gal Fuelpax are mounted using these: https://rotopax.com/fuelpax-dlx-pack-mounts-clone-.html

and the one 3 Gallon Rotopax is mounted using this: https://rotopax.com/dlx-pack-mount.html?category_id=7

All are bolted through the mesh flooring on the Gobi Rack. Hope that helps!
 
Slowly making progress on the rear setup. Have two more working nights to finish before a week long trip to Moab!

CBI Rear Bumper Installed:
8587345c351d50a748c7f04dd32586fa.jpg

[MENTION=107460]Magnetic4R[/MENTION] made a fantastic plate for me after I did my 3rd row delete:
515199c677fca0f07bb0140ccdefa6c2.jpg


Installed L-track with cargo tie downs and 65L Dometic fridge:
b9f6792541c8441475481c579cdc75e1.jpg


Rear fuse block hidden under the 2nd row seat + constant on rear power to my house battery:
c460dde84b68f0307aeb41928836462e.jpg


3dbe10d5add48bf612bad792b92f6a93.jpg


Sent from my iPhone using Tapatalk
 
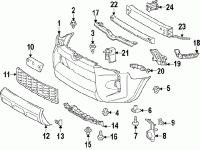
Thanks for posting the information regarding the facelift headlights and 14+ bumper! We have a 2011 Limited and I don't really like the bumper options for it. Other than the headlights and center upper grill, was there anything else you needed to modify or buy to make the newer aftermarket bumper work?

Thanks again
 
Thanks for posting the information regarding the facelift headlights and 14+ bumper! We have a 2011 Limited and I don't really like the bumper options for it. Other than the headlights and center upper grill, was there anything else you needed to modify or buy to make the newer aftermarket bumper work?

Thanks again

That is it! There is a upper support piece that I didn't buy that would be a good idea to get. It's #17 in the attached diagram. It will help solidify the mounting points for the headlights and upper grill. Im not running it right now and my headlights vibrate pretty badly on really rough roads/trails. Will eventually get it.

A couple of additional things:
•As mentioned somewhere else you will need to add some slack to the passenger side headlight wiring harness. I did this by cutting away some of the loom/electrical tape. It will be a tight fit but it will work!
•The side marker bulb holder in the headlights will need to be trimmed down a bit to fit the newer style headlight. Not a big deal (I used a dremel).
•There is a center sheetmetal piece that the pre-`13 bumper used to hang off of. You can safely remove it.

Let us know how it goes!
 
Thanks for posting the information regarding the facelift headlights and 14+ bumper! We have a 2011 Limited and I don't really like the bumper options for it. Other than the headlights and center upper grill, was there anything else you needed to modify or buy to make the newer aftermarket bumper work?

Thanks again

I just read your other thread. One thing to warn you about, the 14+ projectors retrofitted with HID bulbs have worse output than the `10-13` halogen headlights w/upgraded halogen bulbs. The projectors are absolute garbage when it comes to light output even when you upgrade the light source. You will need to retrofit a better performing projector even on the newer style headlights for any meaningful output upgrade.

I have diagnosed night vision blindness so im pretty sensitive to light levels. Sometimes I wish I could have my old headlights back :P
 
So after several trips with the new rear bumper, fridge and equipment setup. It became clear to me that for times when I have 3+ days worth of food, water and fuel my weight really started to make the rear end sit a little low with my Icon 3” Overland springs. Decided to step up to Old Man Emu’s extra heavy 2899 3” springs.

Swapping them out was a breeze since they are much shorter than the Icon dual rate springs. Now sitting at what I feel is a perfect rake. Sorry I’m not one of those “level bros”.

Ride height measurements hub to fender:
Driver front 23.7”
Driver rear 25.25”
Pass front 23.6”
Pass rear 25.25”

(Gained an inch of ride height over the icons)

Going to be interesting to see how it does this upcoming weekend. Taking 4 humans on an off grid trip for three days. So will be considerably weighed down.

Current stance:
69ecaba9ef921290b0d1e7082be9ec78.jpg


Sent from my iPhone using Tapatalk
 
Awesome

Great Build Thread. I just picked up a 2018 SR5 Premium and the modding has just begun. I am a fellow MTB in South OC and would like to build a truck similar to yours.

Keep the mods and updates coming.
 
In addition to adding heavier rear springs I also replaced my front lower control arms and tie rod ends in an effort to address an off road knocking I’ve been getting. Relatively straight forward but getting the LCAs separated from the steering knuckle attachment was a PITA

aafa7bdba88b11b187e26db2a1329567.png


Sent from my iPhone using Tapatalk
 
Adding a shot from a recent trip to the Eastern Sierras here in CA. Amazing what camp spots you can find when scrambling up 4wd roads in the middle of the night.

bf92882f7506f19bd17ed9120a2d016a.jpg


Sent from my iPhone using Tapatalk
 
A couple of shots from my recent trip into Death Valley:

6eb691af032f99d3413ddb7debacf58d.jpg


f29fd48a70f6678a362b0366db4611f5.jpg


Also decided to replace my front swaybar bushings and endlinks in my tiny garage space:

05c8c41c8d00ef44dcbe16c3e4f822aa.jpg


49f89b4b7a854a83daf9a6ff85def88c.jpg


Sent from my iPhone using Tapatalk
 

Members online

Forum statistics

Threads
278,310
Messages
3,554,079
Members
248,016
Latest member
Advally Service

Trending content

Back
Top